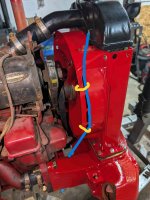
Farmall Cub Radiator Replacement

I'm not sure if anyone said, when painting the castings of the Cub, don't paint where they bolt onto each other. The electrical system of the Cub has to ground through the castings touching each other.
The head lights ground through the front end bolted to the engine.
If you painted where the front end fits against the engine, you could remove it, and remove the paint, or it might be good enough to remove the top 5/8" bolts that hold it to the engine, and remove the paint there, around the bolt hole, at both ends of the bolts, so the bolt heads at 1 end, and the lock washer at the other end are on bare metal.
I did get some paint on it when I painted but I went around the machined areas with a small phnuematic die grinder and a very light abrasive scotch brite pad and cleaned everything up to bright metal before bolting everything together.
 
Typically, yes you reduce torque on a fastener if lubrication is applied to the threads.

I was thinking there was a plate that covered the 4 bolt holes between the vertical (red) radiator supports but I may be wrong. Having a bolt plate over those 4 bolt holes (both front and back) would be the best way to tighten the bolts without deforming the radiator base. That's what base of the vertical radiator supports is doing, acting as a bolt plate to evenly distribute the bolts tightening force across the radiator base.
 
Last edited:
Well I got the lower bolster and axle mounted back up on tractor. I test fit the hood to see if the radiator filler neck would clear the hole in the hood and it went right up through with no interference.
 
The one issue I ran into and it has me worried is when I put the gasket on the lower bolster I put aviation gasket sealer on both sides and I put a little antiseize on the 5 bolts that go up into the steering gear housing. When I got it mounted back up and torqued down, I seen a little antiseize squeeze out along with the aviation gasket sealer. It wasn't a lot just a little around where all the bolts were. Now I am wondering if it will leak?
 
You could also clean the vent holes in the steering gear oil filler plug. They can get plugged with dirt.
Sometimes there could be paint over the hole on the outside of the plug.
1 hole is vertical on the bottom of the plug, and goes part way through it.
1 hole is horizontal on 1 flat for the wrench, and meets the vertical hole part way through the plug.
You can use drill bits, with no power drill, just use pliers to turn the drill bits.
If the holes are plugged, the steering gear can build pressure in it, and make oil come out.
Below are pictures. :)
 

Attachments

  • Cub steering gear plug.jpg
    Cub steering gear plug.jpg
    38.7 KB · Views: 6
You could also clean the vent holes in the steering gear oil filler plug. They can get plugged with dirt.
Sometimes there could be paint over the hole on the outside of the plug.
1 hole is vertical on the bottom of the plug, and goes part way through it.
1 hole is horizontal on 1 flat for the wrench, and meets the vertical hole part way through the plug.
You can use drill bits, with no power drill, just use pliers to turn the drill bits.
If the holes are plugged, the steering gear can build pressure in it, and make oil come out.
Below are pictures. :)
Yep already did that! Thanks though.
 
1000002329.jpgI ran into another problem when I was finishing up getting the tractor together. I forgot about the overflow tube. It's so close to the fan I don't think there is clearance to even put a tube over it. Even a small piece of tubing I think will hit the fan blades, I'd hate to put something on there and it and the fan grab it and tear up the radiator. I checked and there isn't much clearance between the fan blade and overflow tube and the overflow tube come out over the fan blade some. What should I do here?
 
Last edited:
I used 1/4" ID - 1/2" OD rubber tubing, and that has about 5/8" clearance to the fan blade. What is the OD of your overflow tube?
 
Your lack of room may be due to the radiator tilting towards the back. I have several Cubs w/o overflow tubes and unless you over fill the radiator, it doesn't seem to matter. It might have been more important when straight water was used as the coolant and it was drained and refilled often.
 
For comparison, this is the 1/2" OD rubber overflow tube on my Cub. It has about 5/8" clearance to the fan blade and is resting against the radiator fins. There is a slotted opening in the fan shroud at the bottom (similar to the top) for the tube to go through, and this holds it in place. The distance from the fins to the fan blade is approximately 1 1/4".
 

Attachments

  • Rubber Tubing.jpeg
    Rubber Tubing.jpeg
    52.9 KB · Views: 8
Going along with what Bob said, I personally don't think its necessary. The worst thing is that you overfilled the radiator and it spurts out coolant and is blown all over by the fan, which is obnoxious but its nothing a quick rinse with a garden hose couldn't take care of. Ultimately its your prerogative, but don't rack your brain too much about it.
 
For comparison, this is the 1/2" OD rubber overflow tube on my Cub. It has about 5/8" clearance to the fan blade and is resting against the radiator fins. There is a slotted opening in the fan shroud at the bottom (similar to the top) for the tube to go through, and this holds it in place. The distance from the fins to the fan blade is approximately 1 1/4".
I have 1" on the bottom but only 1/4" from the face of the fan to the overflow tube and the same to the top of the fan blade to the bottom of the overflow tube. So I guess at this point there is not much I can do. I didn't want to have antifreeze blowing all over my tractor and new radiator. I only put enough antifreeze in to go about 1/2" over the tubes inside the radiator.
 
Going along with what Bob said, I personally don't think its necessary. The worst thing is that you overfilled the radiator and it spurts out coolant and is blown all over by the fan, which is obnoxious but its nothing a quick rinse with a garden hose couldn't take care of. Ultimately its your prerogative, but don't rack your brain too much about it.
Yea I don't really think I can do much about it. I will just be careful how much I put in. I hate the smell of cooking antifreeze though lol.
 
If you come up with nothing else, you MIGHT consider carefully cutting off the metal overflow tube BEFORE it goes through the hole in front of the fan shroud. Then attach the flexible "rubber" tubing and route it around the shroud on the outside, securing it to the slots along the side of the shroud with cable ties.
My replacement radiator (Clancey) only came with a "nub" sticking out of the neck, so that is how mine is done.
radiator overflow tube small.jpg
 
Last edited:
If you come up with nothing else, you MIGHT consider carefully cutting off the metal overflow tube BEFORE it goes through the hole in front of the fan shroud. Then attach the flexible "rubber" tubing and route it around the shroud on the outside, securing it to the slots along the side of the shroud with cable ties.
My replacement radiator (Clancey) only came with a "nub" sticking out of the neck, so that is how mine is done.
View attachment 75948
That's an idea. Hmmm, I'll have to think more about that. I'd hate to do that with a brand new radiator though. I thought about something kind of like that but I checked the overflow tube and they have it soldered to the cap and it's about 2" long so I would have to cut it up pretty far. I wish they would just do like your Clancy was to begin with, it would make things a little easier. Ofcourse those looking to restore them to factory appearance would probably complain about it then too. I like the graphics, helps show exactly what I'd need to do so thanks.
 
That's an idea. Hmmm, I'll have to think more about that. I'd hate to do that with a brand new radiator though. I thought about something kind of like that but I checked the overflow tube and they have it soldered to the cap and it's about 2" long so I would have to cut it up pretty far. I wish they would just do like your Clancy was to begin with, it would make things a little easier. Ofcourse those looking to restore them to factory appearance would probably complain about it then too.
The problem with mine is that the clearance between the hood and the "nub"/tubing is very small and the hood is resting against the tubing, and the cable tie holding the tubing on sometimes interferes with removing the radiator cap!

There's always SOMETHING!!! 😉
 
The problem with mine is that the clearance between the hood and the "nub"/tubing is very small and the hood is resting against the tubing, and the cable tie holding the tubing on sometimes interferes with removing the radiator cap!

There's always SOMETHING!!! 😉
Yea I know, ehhh it gives me something to wrench on. I'm seriously considering doing what you showed. Lol I just hate taking the hood on and off.
 
Back
Top