Farmall Cub Radiator Replacement

Good that the radiator measurements are close to the same.
I thought I would mention this while you have the hood off.
The hood originally has 2 brackets under the front corners, to bolt the front of the hood to the radiator side supports. The brackets are welded to the hood, sometimes the welds come off the hood, and then the front of the hood is not bolted on.
Below is a listing at TM Tractor Parts showing the brackets. There are pictures of them on the hood, the last picture shows them with the hood right side up.
http://www.tmtractor.com/new/fl/827fp.htm

The brackets use 5/16" x 1/2" long, coarse thread bolts, with lock washers to hold them onto the side supports, the Cub and LoBoy parts manual says. Maybe the brackets on your hood are ok.
 
Last edited:
Good that the radiator measurements are close to the same.
I thought I would mention this while you have the hood off.
The hood originally has 2 brackets under the front corners, to bolt the front of the hood to the radiator side supports. The brackets are welded to the hood, sometimes the welds come off the hood, and then the front of the hood is not bolted on.
Below is a listing at TM Tractor Parts showing the brackets. There are pictures of them on the hood, the last picture shows them with the hood right side up.
http://www.tmtractor.com/new/fl/827fp.htm

The brackets use 5/16" x 1/2" long, coarse thread bolts, with lock washers to hold them onto the side supports, the Cub and LoBoy parts manual says. Maybe the brackets on your hood are ok.
I'll check them, thanks for letting me know.
 
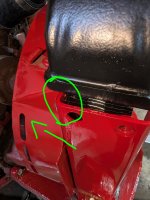
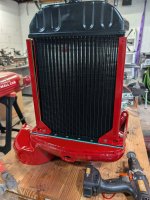
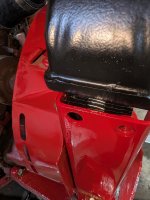
Got the radiator on and the housing on. Stiner sure don't like to give you any extra water hose. In the first picture the radiator is pushing back against one of the side supports. Is this going to be a problem? It's only this one side the rest have clearance.
 
I would opt for a longer upper hose to give some clearance between the radiator and the metal, being that vibration over time might wear a hole in that thin copper of the new high dollar radiator. A replacement hose should be readily available and not too costly. JMHO Stan
 
I would opt for a longer upper hose to give some clearance between the radiator and the metal, being that vibration over time might wear a hole in that thin copper of the new high dollar radiator. A replacement hose should be readily available and not too costly. JMHO Stan
I second this. I used the wrong size hose once for my Super A and the hose clamp didn't sit fully over the iron pipe under the rubber. It eventually vibrated off and made a big mess. Ended up finding some flexible pipe couplers with pre fitted hose clamps that were perfectly sized.

1790028964881.jpeg

Regardless, you got a lotta pipe to work with, a little extra hose isn't gonna hurt anything and will allow you to adjust and wiggle the radiator where you need it.
 
What about the radiator rubbing against the upright support? It was like that before I even put the top water hose on.
 
What about the radiator rubbing against the upright support? It was like that before I even put the top water hose on.
The threaded hole on the upright support should line up with the bracket, which Glen referenced that is on the underside of the hood. The radiator fins that are in contact with the side support in that area will interfere with the end of the connecting bolt when it is fully threaded into the hole. Maybe use a shorter bolt or add another washer under the bolt head. There are a lot of Cubs that are missing those brackets anyway.
 
I would toss those old hose clamps, see how rusty the screws are? the screw threads rot as they are not stainless as the clamp is, seen many fail from the threads rotten
 
The threaded hole on the upright support should line up with the bracket, which Glen referenced that is on the underside of the hood. The radiator fins that are in contact with the side support in that area will interfere with the end of the connecting bolt when it is fully threaded into the hole. Maybe use a shorter bolt or add another washer under the bolt head. There are a lot of Cubs that are missing those brackets anyway.
I should have made it more clear in my post. Sometimes I work on stuff and have so much going through my brain that forget people aren't going to know what I am talking about. I circled the area where the fins are pushing up tight against the upright support and direction it's pushing towards.
 

Attachments

  • PXL_20260921_214137102~3.jpg
    PXL_20260921_214137102~3.jpg
    1.3 MB · Views: 13
I would toss those old hose clamps, see how rusty the screws are? the screw threads rot as they are not stainless as the clamp is, seen many fail from the threads rotten
I reused those ones cause I went and bought new ones and the stripped out like butter. Even the USA made ones aren't that great anymore. At least not the ones I've been trying. I threw them away but the next time I go to the hardware store I'll find the brand name.
 
I should have made it more clear in my post. Sometimes I work on stuff and have so much going through my brain that forget people aren't going to know what I am talking about. I circled the area where the fins are pushing up tight against the upright support and direction it's pushing towards.
It looks like the fins are the only things touching the side support. If so, I don't think I would worry about it. Of more concern is whether the filler neck will go through the hole in the hood. If the side of the radiator is too far back, maybe the filler neck is also. If you haven't yet, do a test fit of the hood to check for interference at the filler.
 
I should have made it more clear in my post. Sometimes I work on stuff and have so much going through my brain that forget people aren't going to know what I am talking about. I circled the area where the fins are pushing up tight against the upright support and direction it's pushing towards.
I'm assuming the other side is not hitting? Is the radiator just flexed in that direction? Or is there something going on where its attached to the bolster causing it to lean? Is the bracket not sitting perfectly upright and is canted forward slightly? You posted this picture earlier, and it could simply be camera angle (or the fact you haven't actually put all the radiator bolts in yet), but I couldn't help but notice that this bracket doesn't looks straight.

canted.jpg
 
It looks like the fins are the only things touching the side support. If so, I don't think I would worry about it. Of more concern is whether the filler neck will go through the hole in the hood. If the side of the radiator is too far back, maybe the filler neck is also. If you haven't yet, do a test fit of the hood to check for interference at the filler.
I didn't even think of that, I hope it goes through cause if it doesn't I don't know what to do. I only measured the dimensions of the new filler neck to the old one. Soon as I get the front axle back on and the tractor down under its own weight I'll be able to drop my crane so I can get the hood test fit.
 
I'm assuming the other side is not hitting? Is the radiator just flexed in that direction? Or is there something going on where its attached to the bolster causing it to lean? Is the bracket not sitting perfectly upright and is canted forward slightly? You posted this picture earlier, and it could simply be camera angle (or the fact you haven't actually put all the radiator bolts in yet), but I couldn't help but notice that this bracket doesn't looks straight.

View attachment 75935
Yea that's when I was dry fitting everything together. That is just the angle the picture was taken. I checked the bolster before and everything checkout as ok. The uprights appear to be straight and not leaning. I just think that the radiator itself is leaning that way possibly? I won't know for sure until I can get the hood on.
 
I should have made it more clear in my post. Sometimes I work on stuff and have so much going through my brain that forget people aren't going to know what I am talking about. I circled the area where the fins are pushing up tight against the upright support and direction it's pushing towards.
No problem, I saw that. The only issue that I thought could potentially be a problem is potential interference with the bolt for the support bracket.
 
I just think that the radiator itself is leaning that way possibly? I won't know for sure until I can get the hood on.
Could be that the radiator is just flexed/twisted a little. Does everything line up in relation to the black upper tank cast and the bracket? Definitely do as Jim suggested and see if the filler neck lines up with the hood hole. If it is flexed, it's possible you could give it some gentle nudging back. I had to do that with my Super A radiator after it came back from the shop and that has the benefit of fixed side supports. With the Cubs basically being just a core with an upper tank, I can imagine the thing could more easily tweak itself in shipping or whatever.
 
Could be that the radiator is just flexed/twisted a little. Does everything line up in relation to the black upper tank cast and the bracket? Definitely do as Jim suggested and see if the filler neck lines up with the hood hole. If it is flexed, it's possible you could give it some gentle nudging back. I had to do that with my Super A radiator after it came back from the shop and that has the benefit of fixed side supports. With the Cubs basically being just a core with an upper tank, I can imagine the thing could more easily tweak itself in shipping or whatever.
Just looking at it everything looks ok, I'm going to try putting the tank on tomorrow. I'd be real nervous to try and pull the tank back some.
 
Just looking at it everything looks ok, I'm going to try putting the tank on tomorrow. I'd be real nervous to try and pull the tank back some.
You probably can move the tank back a bit, maybe not enough. Consider stretching the holes at the bottom of the dash/rear support to let it move back a little. I've never tried that but can't think of a reason it can't be done. You have the range of movement of the slots in the front hood supports that Glen mentioned in post #61.
 
I'm not sure if anyone said, when painting the castings of the Cub, don't paint where they bolt onto each other. The electrical system of the Cub has to ground through the castings touching each other.
The head lights ground through the front end bolted to the engine.
If you painted where the front end fits against the engine, you could remove it, and remove the paint, or it might be good enough to remove the top 5/8" bolts that hold it to the engine, and remove the paint there, around the bolt hole, at both ends of the bolts, so the bolt heads at 1 end, and the lock washer at the other end are on bare metal.
 
Back
Top