Picked up a John Deere BO at auction

On my Cub, I Heli-Coiled every head bolt hole. I was amazed at the small amount of thread engagement each bolt hole actually had. With the seemingly small amount of thread engagement and the fact that the threads were in cast iron, I was worried (knowing my luck) I'd strip the threads in the block. I figured the Heli-Coils would be less prone to stripping out than the cast iron block. I never had one leak and never stripped any holes out. 🤞
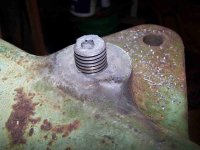
My concern was the sealing. The head was pretty thick at this point so I used a 7/16 x .870 insert that made it just shy of the bottom. Used loctite on it as insurance.
 
On my Cub, I Heli-Coiled every head bolt hole. I was amazed at the small amount of thread engagement each bolt hole actually had. With the seemingly small amount of thread engagement and the fact that the threads were in cast iron, I was worried (knowing my luck) I'd strip the threads in the block. I figured the Heli-Coils would be less prone to stripping out than the cast iron block. I never had one leak and never stripped any holes
Heli-Coils have always worked really well for me. Even in softer materials, cast and aluminum.
 
Cleaned off the front of the crankcase and sprayed it with some quick drying oil resistant paint. Cleaned up the block, head, pistons, rods, and rocker assy. I'll look things over to see what I missed and then start assembly.
 

Attachments

  • 100_8538-m.JPG
    100_8538-m.JPG
    174.4 KB · Views: 6
  • 100_8540-m.JPG
    100_8540-m.JPG
    172.3 KB · Views: 5
  • 100_8541-m.JPG
    100_8541-m.JPG
    152.6 KB · Views: 5
  • 100_8542-m.JPG
    100_8542-m.JPG
    152.4 KB · Views: 5
  • 100_8547-m.JPG
    100_8547-m.JPG
    181.7 KB · Views: 5
  • 100_8545-m.JPG
    100_8545-m.JPG
    165.7 KB · Views: 4
  • 100_8543-m.JPG
    100_8543-m.JPG
    196.3 KB · Views: 5
  • 100_8548-m.JPG
    100_8548-m.JPG
    308.9 KB · Views: 6
  • 100_8549-m.JPG
    100_8549-m.JPG
    354.7 KB · Views: 6
Managed to do a little more clean up on the pistons before I shut the shop down. Did a light wire brushing and followed that by putting them in the lathe and hitting them with a scotch-brite pad. Took care of the rest of the carbon and light rust.
 

Attachments

  • 100_8550-m.JPG
    100_8550-m.JPG
    223.6 KB · Views: 7
  • 100_8551-m.JPG
    100_8551-m.JPG
    258 KB · Views: 7
Only got the breather and oiler tubes cleaned and primed. Had lawn and weed spraying duty today.
 

Attachments

  • 100_8556-m.JPG
    100_8556-m.JPG
    295.6 KB · Views: 3
Resurfaced the rockers.
 

Attachments

  • 100_8548-m.JPG
    100_8548-m.JPG
    308.9 KB · Views: 7
  • 100_8560-m.JPG
    100_8560-m.JPG
    231.5 KB · Views: 6
  • 100_8561-m.JPG
    100_8561-m.JPG
    281.1 KB · Views: 7
  • 100_8562-m.JPG
    100_8562-m.JPG
    295 KB · Views: 7
  • 100_8563-m.JPG
    100_8563-m.JPG
    233.5 KB · Views: 7
Did a little cleanup picking up tools and sweeping the floor. That made it so I could get the front axle and casting under the bridge crane. Pulled the pivot pin in the axle and removed the casting. The front eye bolt that these tractors have was broken off so I drilled a 3/8 hole, heated it a couple of times, and drove a allen socket into it to act as an easy out. That was enough to get the broken stub backed out. The plan is to sand blast the casting and paint so I won't need to pull this apart again. The pivot pin is worn badly so I will repair or make a new one. The axle pivot hole has some wear but not to bad so I may just run that as it is.
 

Attachments

  • 100_8564-m.JPG
    100_8564-m.JPG
    164.9 KB · Views: 10
  • 100_8565-m.JPG
    100_8565-m.JPG
    189 KB · Views: 9
  • 100_8568-m.JPG
    100_8568-m.JPG
    198.2 KB · Views: 9
  • 100_8567-m.JPG
    100_8567-m.JPG
    168.8 KB · Views: 10
  • 100_8570-m.JPG
    100_8570-m.JPG
    203.5 KB · Views: 10
  • 100_8571-m.JPG
    100_8571-m.JPG
    160.5 KB · Views: 10
  • 100_8573-m.JPG
    100_8573-m.JPG
    168 KB · Views: 10
  • 100_8578-m.JPG
    100_8578-m.JPG
    239.8 KB · Views: 10
  • 100_8577-m.JPG
    100_8577-m.JPG
    208.8 KB · Views: 10
  • 100_8576-m.JPG
    100_8576-m.JPG
    194.3 KB · Views: 10
Got set up and sandblasted the front casting. I'll move it to the paint booth, treat it with Ospho, and get some epoxy sprayed on it.
 

Attachments

  • 100_8579-m.JPG
    100_8579-m.JPG
    389.5 KB · Views: 8
  • 100_8582-m.JPG
    100_8582-m.JPG
    349.5 KB · Views: 8
  • 100_8583-m.JPG
    100_8583-m.JPG
    417.1 KB · Views: 8
  • 100_8585-m.JPG
    100_8585-m.JPG
    406.4 KB · Views: 8
  • 100_8584-m.JPG
    100_8584-m.JPG
    428.9 KB · Views: 8
Sprayed some green on the front casting and hit the block where the nut bolt it down. Sprayed a little on the front of the crankcase and painted my nuts, but I won't show pics of that.
 

Attachments

  • 100_8605-m.JPG
    100_8605-m.JPG
    196.7 KB · Views: 6
  • 100_8607-m.JPG
    100_8607-m.JPG
    196 KB · Views: 6
  • 100_8606-m.JPG
    100_8606-m.JPG
    150 KB · Views: 6
  • 100_8608-m.JPG
    100_8608-m.JPG
    152.9 KB · Views: 6
  • 100_8609-m.JPG
    100_8609-m.JPG
    155.4 KB · Views: 6
Used some Plastigage and checked the rod bearing clearance. Looks like it should work at .002/.003. These have .003 shims so if I add one it will be on the loose side.
 

Attachments

  • 100_8610-m.JPG
    100_8610-m.JPG
    157.3 KB · Views: 4
  • 100_8611-m.JPG
    100_8611-m.JPG
    117.5 KB · Views: 4
Back
Top