Picked up a John Deere BO at auction

That tractor is going to have some real Purdy insides!
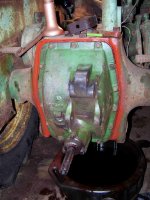
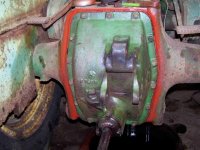
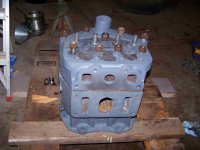
My plan is to get it running and drive it around to see what else it needs before tearing down to paint. I will be doing some paint on the engine block and the inside of the front casting. That way I won't have to tear it down so far when I do paint.
 
Bolted the rear cover back on. Hope I don't need to go back in for bad bearings but I won't know until I run it.
 

Attachments

  • 100_8469-m.JPG
    100_8469-m.JPG
    207 KB · Views: 5
  • 100_8470-m.JPG
    100_8470-m.JPG
    693 KB · Views: 5
Cleaned and primed the cast iron rocker cover. I was trying to figure out how the rocker arms were oiled and found these older B's have a tube from the governor that feeds oil to a metal trough riveted into the top of the rocker cover and that drips oil on the rockers through small holes. The newer B's have a oil tube and line bolted onto the rocker assy.
 

Attachments

  • 100_8471-m.JPG
    100_8471-m.JPG
    208.5 KB · Views: 2
  • 100_8472-m.JPG
    100_8472-m.JPG
    242.8 KB · Views: 2
  • 100_8473-m.JPG
    100_8473-m.JPG
    290 KB · Views: 3
  • 100_8474-m.JPG
    100_8474-m.JPG
    263.5 KB · Views: 3
  • 100_8475-m.JPG
    100_8475-m.JPG
    251.7 KB · Views: 3
  • 100_8477-m.JPG
    100_8477-m.JPG
    231.9 KB · Views: 2
  • 100_8476-m.JPG
    100_8476-m.JPG
    230.2 KB · Views: 2
  • 100_8478-m.JPG
    100_8478-m.JPG
    266 KB · Views: 2
  • 100_8479-m.JPG
    100_8479-m.JPG
    111 KB · Views: 2
  • 100_8480-m.JPG
    100_8480-m.JPG
    146.5 KB · Views: 2
Got more info on the oil tube for the rocker shaft. The governor housing has a cast in oil trough that catches oil slinging around in the governor. That gravity feeds to the rocker cover where it feeds another trough that drips oil onto the rocker shaft. It has a separate breather tube that goes to the air intake.
 

Attachments

  • 100_8481-m.JPG
    100_8481-m.JPG
    339 KB · Views: 7
  • 100_8482-m.JPG
    100_8482-m.JPG
    165.5 KB · Views: 7
  • 100_8483-m.JPG
    100_8483-m.JPG
    147.5 KB · Views: 7
  • 100_8484-m.JPG
    100_8484-m.JPG
    162.8 KB · Views: 7
  • PHO00001-1.JPG
    PHO00001-1.JPG
    97 KB · Views: 7
  • PHO00004-1.JPG
    PHO00004-1.JPG
    249.8 KB · Views: 7
  • PHO00007-1.JPG
    PHO00007-1.JPG
    87 KB · Views: 7
  • PHO00008-1.JPG
    PHO00008-1.JPG
    82 KB · Views: 7
Pulled some push rods out of a parts tractor and got them wire brushed. Ran the flex-hone thru the bores. I can still see some pitting in the worst cylinder. It will have to do for now. And took one pic of the head with the valves sitting in place.
 

Attachments

  • 100_8485-m.JPG
    100_8485-m.JPG
    386 KB · Views: 8
  • 100_8486-m.JPG
    100_8486-m.JPG
    320.6 KB · Views: 8
  • 100_8488-m.JPG
    100_8488-m.JPG
    212.1 KB · Views: 9
  • 100_8487-m.JPG
    100_8487-m.JPG
    228.7 KB · Views: 9
  • 100_8489-m.JPG
    100_8489-m.JPG
    208.9 KB · Views: 8
  • 100_8490-m.JPG
    100_8490-m.JPG
    191 KB · Views: 7
Yesterdays project. I didn't have any nuts for bolting down the head on the BO so I went out to the parts B to see what I could find. Decided while I was at it to pull the head and block out. Head came off with no problem but the block is putting up a fight. One piston is stuck pretty good and the crank won't turn. I pulled the rod cap off of the stuck side figuring I could pull the block out with piston and rod still in it. Well that side the crank is sitting up so that the rod hits the cam before the rod bolt clears the crank so it won't come out. I tried knocking the rod bolt out but it also hits the cam before it comes out of the rod. I think this is going to be a complete tear down in order to get it aparts so it will have to wait. I did get the nuts that I am looking for. The head surprised me as all of the valves are free. I think it will get a good cleaning and maybe touch up the valves and put it on the shelf.
 

Attachments

  • 100_8501-m.JPG
    100_8501-m.JPG
    270.5 KB · Views: 5
  • 100_8500-m.JPG
    100_8500-m.JPG
    205.3 KB · Views: 5
  • 100_8499-m.JPG
    100_8499-m.JPG
    238.2 KB · Views: 6
  • 100_8498-m.JPG
    100_8498-m.JPG
    325.5 KB · Views: 6
  • 100_8497-m.JPG
    100_8497-m.JPG
    175.8 KB · Views: 6
  • 100_8496-m.JPG
    100_8496-m.JPG
    289.4 KB · Views: 6
  • 100_8495-m.JPG
    100_8495-m.JPG
    315.6 KB · Views: 6
  • 100_8494-m.JPG
    100_8494-m.JPG
    289.9 KB · Views: 6
  • 100_8493-m.JPG
    100_8493-m.JPG
    281.8 KB · Views: 6
Today I pulled the valves out of the parts B head and they look to be in great shape. One seat has a little rust spot but won't know if it can be saved until we do a valve grind. Weather is supposed to get better so I can get outside and wash up the head and block for the BO to get ready for assembly.
 

Attachments

  • 100_8502-m.JPG
    100_8502-m.JPG
    288.9 KB · Views: 4
  • 100_8503-m.JPG
    100_8503-m.JPG
    402 KB · Views: 4
  • 100_8506-m.JPG
    100_8506-m.JPG
    244.5 KB · Views: 4
  • 100_8505-m.JPG
    100_8505-m.JPG
    148.9 KB · Views: 4
  • 100_8504-m.JPG
    100_8504-m.JPG
    305.9 KB · Views: 4
  • 100_8507-m.JPG
    100_8507-m.JPG
    213.9 KB · Views: 4
  • 100_8508-m.JPG
    100_8508-m.JPG
    252.3 KB · Views: 4
  • 100_8509-m.JPG
    100_8509-m.JPG
    275 KB · Views: 4
  • 100_8510-m.JPG
    100_8510-m.JPG
    220.2 KB · Views: 4
Managed to get the crank turned enough to get the block out of the parts B tractor with the stuck piston. Stuck the block in the press and the piston came out with little effort. I think a lot of the problem was the starter was engaged in the flywheel and it was froze up pretty bad. I cleaned the top of the rusty bore with a 3-stone spring hone and then ran the flex hone thru both bores. I think it could be run the way it is now. I planning on pulling the crank out so it doesn't sit and rust. Should have all of the parts for a running engine for a late styled B.
 

Attachments

  • 100_8530-m.JPG
    100_8530-m.JPG
    290.2 KB · Views: 8
  • 100_8529-m.JPG
    100_8529-m.JPG
    386.1 KB · Views: 8
  • 100_8527-m.JPG
    100_8527-m.JPG
    396.5 KB · Views: 8
  • 100_8525-m.JPG
    100_8525-m.JPG
    371.2 KB · Views: 8
  • 100_8524-m.JPG
    100_8524-m.JPG
    378.6 KB · Views: 8
  • 100_8521-m.JPG
    100_8521-m.JPG
    195.5 KB · Views: 8
  • 100_8520-m.JPG
    100_8520-m.JPG
    174.7 KB · Views: 8
  • 100_8519-m.JPG
    100_8519-m.JPG
    182.1 KB · Views: 8
  • 100_8518-m.JPG
    100_8518-m.JPG
    191.8 KB · Views: 8
The nuts for the head are going to work for the BO.
 

Attachments

  • 100_8517-m.JPG
    100_8517-m.JPG
    172 KB · Views: 6
  • 100_8516-m.JPG
    100_8516-m.JPG
    156.4 KB · Views: 7
  • 100_8515-m.JPG
    100_8515-m.JPG
    151.3 KB · Views: 6
  • 100_8514-m.JPG
    100_8514-m.JPG
    158.7 KB · Views: 6
  • 100_8513-m.JPG
    100_8513-m.JPG
    164.3 KB · Views: 6
The oil pump screen looks scary!:eek: 
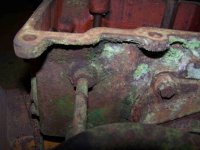
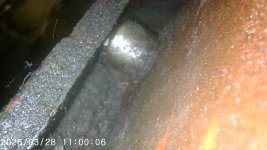
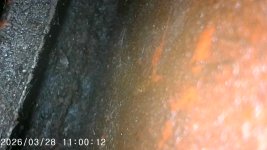
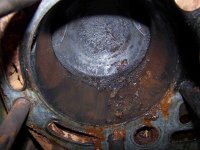
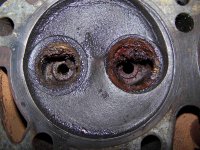
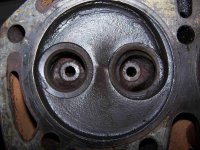
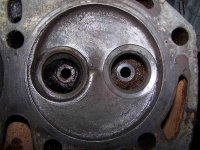
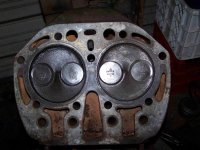
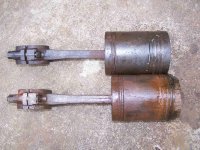
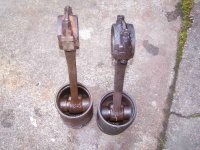
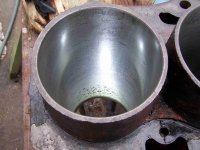
Was there much of a ridge at the top of the cylinders?
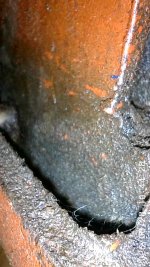
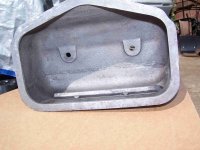
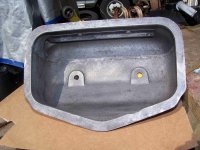
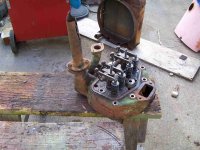
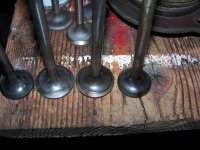
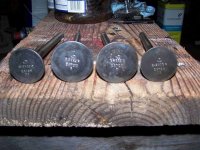
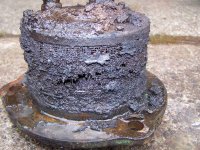
I agree, that screen is about as plugged as I have seen. Not much wear but I haven't measured. This has .045 over pistons and the valves look new with no wear. Might have been gone thru not long before it got water in it.My cousin bought it and let it sit for 5 years and sold it to my dad where its been sitting another 13 years. Might have been an easy fix when my cousin first got it.
 
My brother came over and made some adjustments to the rotary broach and wanted to try it on something. Used the parts B head to test as it had some dings in the gasket surface that needed to be taken care of. It worked great. I had a couple broken manifold bolts in the BO head. One I drilled out perfectly the other not so much. Got a Time-Sert kit for it and installed it today. Worked out good. This is open to the water jacket so it needs to be sealed good.Now all of the machining and repairs are done on the BO block and head so now I can get them washed up good.
 

Attachments

  • 100_8531-m.JPG
    100_8531-m.JPG
    175.6 KB · Views: 8
  • 100_8532-m.JPG
    100_8532-m.JPG
    272.1 KB · Views: 8
  • 100_8533-m.JPG
    100_8533-m.JPG
    155.8 KB · Views: 8
  • 100_8535-m.JPG
    100_8535-m.JPG
    208.2 KB · Views: 7
  • 100_8536-m.JPG
    100_8536-m.JPG
    200.5 KB · Views: 7
On my Cub, I Heli-Coiled every head bolt hole. I was amazed at the small amount of thread engagement each bolt hole actually had. With the seemingly small amount of thread engagement and the fact that the threads were in cast iron, I was worried (knowing my luck) I'd strip the threads in the block. I figured the Heli-Coils would be less prone to stripping out than the cast iron block. I never had one leak and never stripped any holes out. 🤞
 
Back
Top