dont think your gonna do 42" rows!!! as plants grow they expand! I use 72" rows here and still cant get a cub in there after the first time so I stick with the TB HORSE and hiller blade in the tatoes. Mine are set as close as possible,--- tire on one side rubs fender and its still too wide!
You are using an out of date browser. It may not display this or other websites correctly.
You should upgrade or use an alternative browser.
You should upgrade or use an alternative browser.
Cub hood mount question
- Thread starter kopeck
- Start date
dont think your gonna do 42" rows!!! as plants grow they expand! I use 72" rows here and still cant get a cub in there after the first time so I stick with the TB HORSE and hiller blade in the tatoes. Mine are set as close as possible,--- tire on one side rubs fender and its still too wide!
It's mostly just the corn that I'm worried about. I've done some measuring, and it should work out. You are right though, beans and potatoes would be a challenge on 42".
K
If you have small enough rear tires and really squeeze them in to max , --- you might get by a few times in corn but still gonna run the corn down when the plants try to fill in the rows! --- I dont use mine for that reason. too much crop damage with them. Old HORSE slides right down the middles no matter how tall corn is! lol!
If you have rear weights, dropping them off helps some.If you have small enough rear tires and really squeeze them in to max , --- you might get by a few times in corn but still gonna run the corn down when the plants try to fill in the rows! --- I dont use mine for that reason. too much crop damage with them. Old HORSE slides right down the middles no matter how tall corn is! lol!
Now I'm speaking from inexperience here, but the variety of corn we plant doesn't fill out until after it would be too tall to cultivate. Like you, I've used a TB Horse, and it works well, but I'm hoping to save a little time with the Cub. Once it gets tall enough, I hope to use some half sweeps to hill up the corn to keep the close weeds in check. We fence our corn after it starts forming ears, so any sort of mechanical weed control stops then. Usually, the corn has made a pretty decent canopy by that point, which slows the weeds.
I have the complete set of shovels on C tines that came with the Cub, but I also have a lot of tools from my A & BN. Sweeps, more C-Tines, and shovels etc.
The thing I'm dreading is trying to narrow up the front end. Pulling the front axle apart on my A was an absolute bear of a job, so I've been there and done that. If it's really bad, I might just swap the fronts on the two cubs for the time being (the '50 has a fixed axle). The tie rod links are in pretty awful shape but I can probably come up with a fix for those.
K
had to use the BIG torch on 2 of my cubs and 2 days later ,--- WE DONE!!!! lol! best thing I ever did was to narrow them up as far as they would go. --- even narrower would have been better but I can live with it for now. ---- on flat land they are fine, just dont go gittin stupid and think they are a billy goat and try going on hilly ground with them!
had to use the BIG torch on 2 of my cubs and 2 days later ,--- WE DONE!!!! lol! best thing I ever did was to narrow them up as far as they would go. --- even narrower would have been better but I can live with it for now. ---- on flat land they are fine, just dont go gittin stupid and think they are a billy goat and try going on hilly ground with them!
My A I used a rosebud on, it took a ton of heat, but it did come apart. I had a buddy helping me and he got a little crazy with the hammer an screwed up one of the drop legs. I know better now. At least on the A, when I want to replace the leg, I know it will come apart...
I've wondered what would happen if you sealed up the holes on the axle tube and filled it with Evapo-rust...
EDIT: Or...since the axle tube is so small, just build a tray to soak it in. I might try this if the axle gives me issues (which I fully expect it to).
K
Last edited:
Board shortener Tom
Well-known member
I took the front axle off the tractor and put it in a vice. I used a rosebud to put heat to it while I had a 10 ton porta power between the drop leg and vice. I then used a piece of oak against the top side of the drop leg and a 3# hammer to "love" it apart. I cleaned up the outer half of the axle with a wire wheel and greased it really well before putting it back together. I also painted the axle up before installing it. I hope to never have to do this again.My A I used a rosebud on, it took a ton of heat, but it did come apart. I had a buddy helping me and he got a little crazy with the hammer an screwed up one of the drop legs. I know better now. At least on the A, when I want to replace the leg, I know it will come apart...
I've wondered what would happen if you sealed up the holes on the axle tube and filled it with Evapo-rust...
EDIT: Or...since the axle tube is so small, just build a tray to soak it in. I might try this if the axle gives me issues (which I fully expect it to).
K

Evening,
I've been slowly getting the cub back into shape. I replaced the touch control O-Ring, and that fixed the leak, and the hydraulics seem to work well. Changed the oil, found ATF in the oil cleaner; that was interesting.
The sheet metal is more or less in place now. It had zero fasteners holding anything together. The biggest issue I'm facing now is that the new grill I got from TM Tractors needs some adjustments to fit properly. I guess that's how it goes with reproduction parts. I'll get it.
The issue I've encountered now is that there's something wrong with the clutch. I noticed when I got it that there was a lot of free play, like 1 1/2"+. So I adjusted the pedal to 3/4" per the manual. Doing so made the clutch make some terrible noises when fully depressed. It's like the fingers were being depressed too much, and things were making contact that shouldn't be. I was by myself, so I couldn't work the pedal and observe. I just set it back to where it was, and it seems happy. I've read about folks needing to adjust clutch fingers. Could that be my issue?
The core tractor is good. I think it's had a somewhat recent engine rebuild. I see all sorts of signs that the engine has been opened up. It runs really well, and the transmission is really quiet. It's almost like someone was getting ready to restore it and then never did. So many loose or missing bolts. Like the belt pulley bolts were only threaded in a few turns. I pulled them to ensure they were the correct lengths, and they were; it's just unusual. The wiring is a bit of a mess. Why do people hack up old tractors so badly?
K
The biggest issue I'm facing now is that the new grill I got from TM Tractors needs some adjustments to fit properly
Look at this thread. https://farmallcub.com/community/threads/mesh-grille-fit-by-mike-tiemann-arizona-mike.66578/
Just a small update. I finally got the front axle apart. I had to get a rosebud tip, I just could not get enough heat into the tube. I used pipe wrenches to twist, which left a little scarring, but I just didn't know how to hold things and not burn myself at the same time. 95% will be hidden anyway. One side came apart really easy with heat, the other I had to heat up quite a few times to get it fully out. What a pain...
Do you folks paint everything apart and then grease it up upon reassembly, or leave the "knees" bare, grease them, and just paint the exposed part? I don't plan on moving the axle often, I do want to make sure the next time I don't need to use the fire to make it happen.
One step closer.
K
Do you folks paint everything apart and then grease it up upon reassembly, or leave the "knees" bare, grease them, and just paint the exposed part? I don't plan on moving the axle often, I do want to make sure the next time I don't need to use the fire to make it happen.
One step closer.
K
MM-TX
Active member
Just a small update. I finally got the front axle apart. I had to get a rosebud tip, I just could not get enough heat into the tube. I used pipe wrenches to twist, which left a little scarring, but I just didn't know how to hold things and not burn myself at the same time. 95% will be hidden anyway. One side came apart really easy with heat, the other I had to heat up quite a few times to get it fully out. What a pain...
Do you folks paint everything apart and then grease it up upon reassembly, or leave the "knees" bare, grease them, and just paint the exposed part? I don't plan on moving the axle often, I do want to make sure the next time I don't need to use the fire to make it happen.
One step closer.
K
No room for paint. I would definitely polish the inside of the tube with a course wire brush on a shaft with something with enough grunt to get it de-burred. The knees also but also go over them with a flat file. Then grease. They need pulling apart and grease every few years or they will rust stuck again if in the weather.
No room for paint. I would definitely polish the inside of the tube with a course wire brush on a shaft with something with enough grunt to get it de-burred. The knees also but also go over them with a flat file. Then grease. They need pulling apart and grease every few years or they will rust stuck again if in the weather.
That's what I was figuring. I've already wire-wheeled the outsides; I'm going to take a crack at the insides tonight. I've hit the marks I left with the pipe wrench with a flap disk and other things that look proud. I'll touch it all up with a flat file like you suggested.
I don't plan to leave it out in the weather. This is Maine, however, so an unheated building still can cause some corrosion.
K
staninlowerAL
501 Club
If you can find or build a flapper wheel large enough to clean the inside of the tube will help. As you reassemble be generous with the neverseize and you won't regret it. My personal preference is C5A, by Loctite, available at auto parts and mill supplies outlets like Motion Industries and McMaster Carr. JMHO StanThat's what I was figuring. I've already wire-wheeled the outsides; I'm going to take a crack at the insides tonight. I've hit the marks I left with the pipe wrench with a flap disk and other things that look proud. I'll touch it all up with a flat file like you suggested.
I don't plan to leave it out in the weather. This is Maine, however, so an unheated building still can cause some corrosion.
K
MM-TX
Active member
That's what I was figuring. I've already wire-wheeled the outsides; I'm going to take a crack at the insides tonight. I've hit the marks I left with the pipe wrench with a flap disk and other things that look proud. I'll touch it all up with a flat file like you suggested.
I don't plan to leave it out in the weather. This is Maine, however, so an unheated building still can cause some corrosion.
K
Half round file on the inside might help. The whole idea is find the burrs and knock them down. Corse paper backed with a large dowel. Get it where it will slide in easy.
So I am not REALLY late to cultivate corn this season, I'm REALLY early for next season!


The freeing up of the front end derailed me quite a lot. Just finding the time to work on it, the process of freeing things up, and then painting and reassembling everything.
I'm pretty happy with the tractor. The engine seems to be really strong. Great oil pressure, runs smoothly, no smoke, and starts really well. The drive train is also quiet and seems tight. The only major issue is that there's something up with the throw-out bearing. It works, but it chatters a bit when you put the clutch in. I figure I'll run it this way for a while, shake everything else down before I split the tractor.
Shortly after I took these pictures, I pulled the rear cultivators off and the front "arms" and installed the drawbar. At least it can get some work pulling stuff this fall.
K
Hi,
Here is info to go with the message I sent to you.
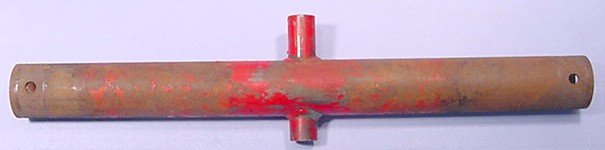
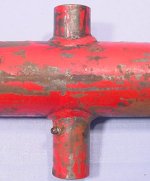
Below are pictures from TM Tractor Parts of the center part of the front axle, the long side of the welded in tube for the pivot shaft goes to the rear, and the grease fitting on the right side, facing down. They are facing opposite ways in pictures 1 and 2.
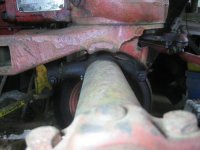
Picture 3 shows the axle is centered under the curved stop.
Here is info to go with the message I sent to you.
Below are pictures from TM Tractor Parts of the center part of the front axle, the long side of the welded in tube for the pivot shaft goes to the rear, and the grease fitting on the right side, facing down. They are facing opposite ways in pictures 1 and 2.
Picture 3 shows the axle is centered under the curved stop.
Attachments
Last edited:
Hi,
Here is info to go with the message I sent to you.
Below are pictures from TM Tractor Parts of the center part of the front axle, the long side of the welded in tube for the pivot shaft goes to the rear, and the grease fitting on the right side, facing down. They are facing opposite ways in pictures 1 and 2.
Picture 3 shows the axle is centered under the curved stop.
So, Glen noticed that the axle was installed upside down (it was oriented correctly). I did see this when I went to grease the pivot, but didn't think much of it. I figured I would fix the issue when I replaced he upper bolster/tank. What I didn't see is that the legs are raked, they are supposed to be raked slightly forward, mine were raked backwards.
Glen has a good eye! Hopefully, he can sleep at night now!
")


K