

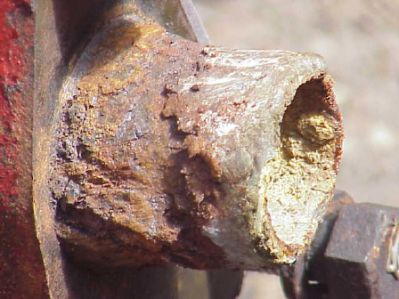
I had to remove the corroded pipe from the radiator casting and replace it. As you can see it was ugly... But using this technique, I was able to remove the bad pipe in 20 minutes. This included the time spent making a custom cold chisel.
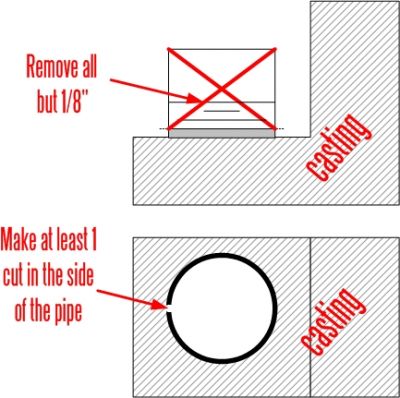
The method I used is a modification of the exhaust pipe pipe removal technique and worked quite well in my situation. Since the standard method requires cutting the bad pipe flush and making several cuts into the bad pipe, I suggets using my method first. If it does not work, you can still use the standard method. This modified technique has three significant differences compared to the standard approach.
First, only one cut is made into the bad pipe rather than several. This reduces the probability that you will bugger up the threads in the piece you want to save.
Second, the force is directed at the bad piece of pipe and not into both the good and bad pieces. Yes, you want to break something, but only the bad piece.
Third, instead of trying to drive a cold chisel between the bad pipe and the good piece, you are striking the exposed piece of bad pipe. This reduces the amount of control required and allows you to increase the amount of force applied to the bad pipe.
- Site Preparation
The lower radiator casting is heavy enough that you don't need to bolt or clamp it down. And if you leave it on the Cub, you have a 1500# weight attached to it. An exhaust manifold is not heavy enough and will require it to be secured somehow. A possibility is to:- Drill some holes in a piece of plywood
- bolt the manifold to the ply
- clamp the ply to the bench
- Flailing Away On The Bad Pipe
The actual removal is pretty simple. The objective is to bend the bad pipe inward on both sides of the cut you made in the pipe wall. To do this, you put the chisel on the bad pipe and "git after it". The drawing below shows both top and side views of the process.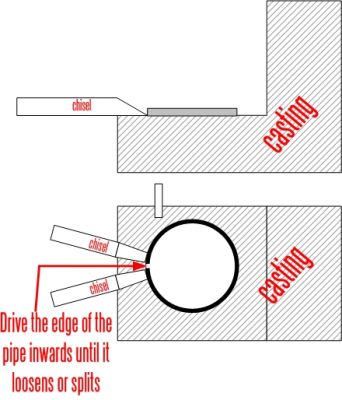
Notice that the force behind the chisel is directed at the bad piece of pipe. You are trying to break the bad pipe loose, not completely destroy it. The real problem with corroded pipes is a bond develops between the threads in casting and the pipe. The bond is pretty weak, but there is a lot of it. By bending the bad pipe inward, you have broken the bond between pipe and casting at that point and made the entire piece of bad pipe just a little bit smaller. Use a little PB Blaster and a pair of vise-Grips on the bad pipe and it will come right out. - Making the Chisel
You don't have to make a custom chisel, if you leave enough bad pipe showing and a conventional cold chisel can down and make good contact with the bad pipe. I made a custom chisel to use in this modified pipe removal method. A conventional cold chisel has a centered edge. From the side a cold chisel has two or four tapers with the cutting edge centered on the tool shaft (Detail A). A wood chisel has the cutting edge on one of the edges of the steel and forms the cutting edge with a simple bevel (Detail B).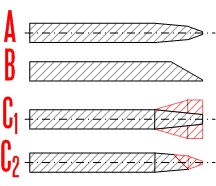
You can either make your own "custom" cold chisel or you can make a suitable chisel by grinding an existing cold chisel. To use an existing cold chisel, remove the red areas as shown in Detail C and you will have a good approximation of a wood chisel shape. To make your own, take a piece of square or rectangular bar stock and cut or grind one end to a chisel point. Once the point and been shaped to your satisfaction, heat the point area up past cherry red and quench. Polish the hardened edge and there you go.
Why all the fuss and bother about the shape of the chisel? A situation where there is not much bad pipe left, might require a very sharp edge on the chisel. If that is the case, either grind an existing chisel or make a new one. - What If The Modified Technique Does Not Work?
You are still ok, if the modifed technique does not work. As mentioned earlier, the standard technique requires more sidewall cuts on the bad pipe and a different force angle for the chisel. See the Wiki article for removing the exhaust pipe from the exhaust manifold
I would appreciate any feedback you have. This link will take you to the Feedback thread: Shade Tree Feedback


