Picked up a John Deere BO at auction

.003" looks good to me! If you pick up on the flywheel/clutch, do you notice any play in the mains? You can put an indicator on each to measure that play.
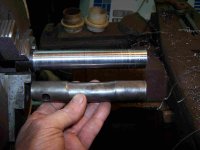
They call for .003 minimum so if anything it might be slightly on the tight side. This is where it was when we got it and rolling it over after I had it unstuck it seemed good. I'm going to call it good.
 
Found a piece of round stock to make a new front axle pivot pin. Turned it down to size and gave it a test fit. Need to cut the length and drill the hole for the retaining pin.
 

Attachments

  • 100_8620-m.JPG
    100_8620-m.JPG
    202 KB · Views: 4
  • 100_8621-m.JPG
    100_8621-m.JPG
    134.2 KB · Views: 4
  • 100_8622-m.JPG
    100_8622-m.JPG
    142.5 KB · Views: 4
  • 100_8623-m.JPG
    100_8623-m.JPG
    147.4 KB · Views: 3
  • 100_8624-m.JPG
    100_8624-m.JPG
    108.8 KB · Views: 3
  • 100_8625-m.JPG
    100_8625-m.JPG
    112.1 KB · Views: 3
  • 100_8627-m.JPG
    100_8627-m.JPG
    304.2 KB · Views: 3
  • 100_8626-m.JPG
    100_8626-m.JPG
    110.8 KB · Views: 3
Today was mostly cleaning up nuts and bolts, chasing threads, cleaning the oil filter bottom retainer, and blasting the crankcase and Transmission shift cover. That will all need paint shot on it tomorrow. Trying to get everything I need prepped so when I start assembly I can get it buttoned up ASAP.
 
Shot some primer and I will see if I can spray the green later today or wait until tomorrow.
 

Attachments

  • 100_8631-m.JPG
    100_8631-m.JPG
    160 KB · Views: 8
  • 100_8633-m.JPG
    100_8633-m.JPG
    113.2 KB · Views: 8
  • 100_8635-m.JPG
    100_8635-m.JPG
    110.7 KB · Views: 8
Got most of the BO front axle pulled apart yesterday and just remove the spindles from the wheels this morning. Figured while I am putting the repaired original wheel back on that I should check all of the bearings and king pin bushings. Then while its all apart I might as well clean it up and paint it. Just another piece that won't need to come back off.
 

Attachments

  • 100_8641-m.JPG
    100_8641-m.JPG
    148.2 KB · Views: 9
  • 100_8642-m.JPG
    100_8642-m.JPG
    170.5 KB · Views: 9
  • 100_8643-m.JPG
    100_8643-m.JPG
    177 KB · Views: 9
  • 100_8647-m.JPG
    100_8647-m.JPG
    155.9 KB · Views: 10
  • 100_8649-m.JPG
    100_8649-m.JPG
    160.3 KB · Views: 9
  • 100_8648-m.JPG
    100_8648-m.JPG
    119.2 KB · Views: 10
Used the blast cabinet to clean up the axle and spindles. Still need to clean up the steering arms, drag link, and tie rod. Probably just wire brush those parts.
 

Attachments

  • 100_8656-m.JPG
    100_8656-m.JPG
    152.9 KB · Views: 5
Cleaned up the steering arms, drag link, radius rods, and tie rod. Treated everything with Ospho and should be ready for primer tomorrow. Gotta get started on the front wheels next.
 

Attachments

  • 100_8657-m.JPG
    100_8657-m.JPG
    192.3 KB · Views: 5
  • 100_8658-m.JPG
    100_8658-m.JPG
    141 KB · Views: 5
37°F overnight so the shop was in the mid 40's this morning. Loaded up the wood stove and with temps climbing outside and the fire I got it up to 70°F in the paint booth. That sure helps the paint to tack off nicely. Sprayed the green on the front end parts and am now in the process of cleaning up the front wheels. I had repaired the rusted out rim a while back and now I have removed the bearings, races, and seals. I plan on pressure washing them and running them through the electrolysis tank. Then follow it up with some sand blasting.
 

Attachments

  • 100_8663-m.JPG
    100_8663-m.JPG
    137.7 KB · Views: 4
  • 100_8664-m.JPG
    100_8664-m.JPG
    170.1 KB · Views: 4
  • 100_8665-m.JPG
    100_8665-m.JPG
    188.8 KB · Views: 4
  • 100_8667-m.JPG
    100_8667-m.JPG
    125.8 KB · Views: 4
  • 100_8666-m.JPG
    100_8666-m.JPG
    135.5 KB · Views: 4
  • 100_8668-m.JPG
    100_8668-m.JPG
    126.6 KB · Views: 4
  • 100_8669-m.JPG
    100_8669-m.JPG
    186.4 KB · Views: 4
Cleaned all of the grease out of the center hubs in the front wheels and got them pressure washed.
 

Attachments

  • 100_8673-m.JPG
    100_8673-m.JPG
    226 KB · Views: 5
  • 100_8674-m.JPG
    100_8674-m.JPG
    199.2 KB · Views: 5
  • 100_8675-m.JPG
    100_8675-m.JPG
    197.6 KB · Views: 5
  • 100_8676-m.JPG
    100_8676-m.JPG
    178.9 KB · Views: 5
  • 100_8677-m.JPG
    100_8677-m.JPG
    289.2 KB · Views: 5
Yesterday I got the anode plates cleaned and put the first front wheel in the electrolysis tank. By evening it was cooking nicely. Pulled the wheel out this morning and hit it with a hose, no pressure wash. Cleaned the anode plates and put the second wheel in the E-Tank.
 

Attachments

  • 100_8678-m.JPG
    100_8678-m.JPG
    171.9 KB · Views: 10
  • 100_8682-m.JPG
    100_8682-m.JPG
    382.9 KB · Views: 10
  • 100_8683-m.JPG
    100_8683-m.JPG
    230.1 KB · Views: 7
  • 100_8684-m.JPG
    100_8684-m.JPG
    317.1 KB · Views: 7
  • 100_8685-m.JPG
    100_8685-m.JPG
    300 KB · Views: 8
  • 100_8686-m.JPG
    100_8686-m.JPG
    392.5 KB · Views: 8
  • 100_8687-m.JPG
    100_8687-m.JPG
    279.3 KB · Views: 10
Pulled the second wheel out of the E-Tank, hosed it off, and hit it with a quick wire wheel with the Dewalt cordless drill to get the loose paint off. Yesterday I did a little blasting in the blast cabinet to see how the first wheel would clean up. The rust and paint just fly off with ease. Using the cabinet for the center casting and spokes keeps the sand usage down and then I will use the pressure pot on the rim after I fill some rust holes and thin spots. I need to find my new glass protectors for the cabinet and get it changed so I can see what I am doing.
 

Attachments

  • 100_8689-m.JPG
    100_8689-m.JPG
    354.4 KB · Views: 5
  • 100_8690-m.JPG
    100_8690-m.JPG
    346.3 KB · Views: 5
  • 100_8691-m.JPG
    100_8691-m.JPG
    323.1 KB · Views: 5
  • 100_8692-m.JPG
    100_8692-m.JPG
    190.9 KB · Views: 5
  • 100_8693-m.JPG
    100_8693-m.JPG
    174.8 KB · Views: 5
  • 100_8694-m.JPG
    100_8694-m.JPG
    131.8 KB · Views: 5
Back
Top