Below is a listing at TM Tractor Parts for the breaker cover, you can look at the pictures.
https://www.tmtractor.com/new/el/322fp.htm
Below are other parts that I don't see in your pictures, maybe you have them.
There is a spark plug wire holder that bolts onto the 3rd head bolt from the front on the right side of the engine.
https://www.tmtractor.com/new/gr/359fp.htm
There is a small screen in the inlet of the IH carburetor.
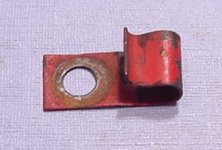
There is a clip that holds the long throttle rod, it bolts onto the head, towards the rear, with a 5/16" bolt. The clip keeps the rod from flexing. Below is a picture from TM Tractor Parts.")
https://www.tmtractor.com/new/el/322fp.htm
Below are other parts that I don't see in your pictures, maybe you have them.
There is a spark plug wire holder that bolts onto the 3rd head bolt from the front on the right side of the engine.
https://www.tmtractor.com/new/gr/359fp.htm
There is a small screen in the inlet of the IH carburetor.
There is a clip that holds the long throttle rod, it bolts onto the head, towards the rear, with a 5/16" bolt. The clip keeps the rod from flexing. Below is a picture from TM Tractor Parts.