This site uses cookies to maintain login information on FarmallCub.Com. Click the X in the banner upper right corner to close this notice. For more information on our privacy policy, visit this link:
Privacy Policy

NEW REGISTERED MEMBERS: Be sure to check your SPAM/JUNK folders for the activation email.

Clutch adjustment

The Cub Club -- Questions and answers to all of your Cub related issues.
Forum rules
Notice: For sale and wanted posts are not allowed in this forum. Please use our free classifieds or one of our site sponsors for your tractor and parts needs.
marshall
10+ Years
10+ Years
Posts: 150
Joined: Mon Sep 23, 2013 7:36 am
Zip Code: 01012
Tractors Owned: 1950 Farmall Cub

Clutch adjustment

Postby marshall » Sat Aug 27, 2022 6:29 pm

I've started a new thread because I've finally rebuilt my PTO and got it all back together but I can't test it since the clutch is so out of adjustment.

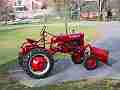
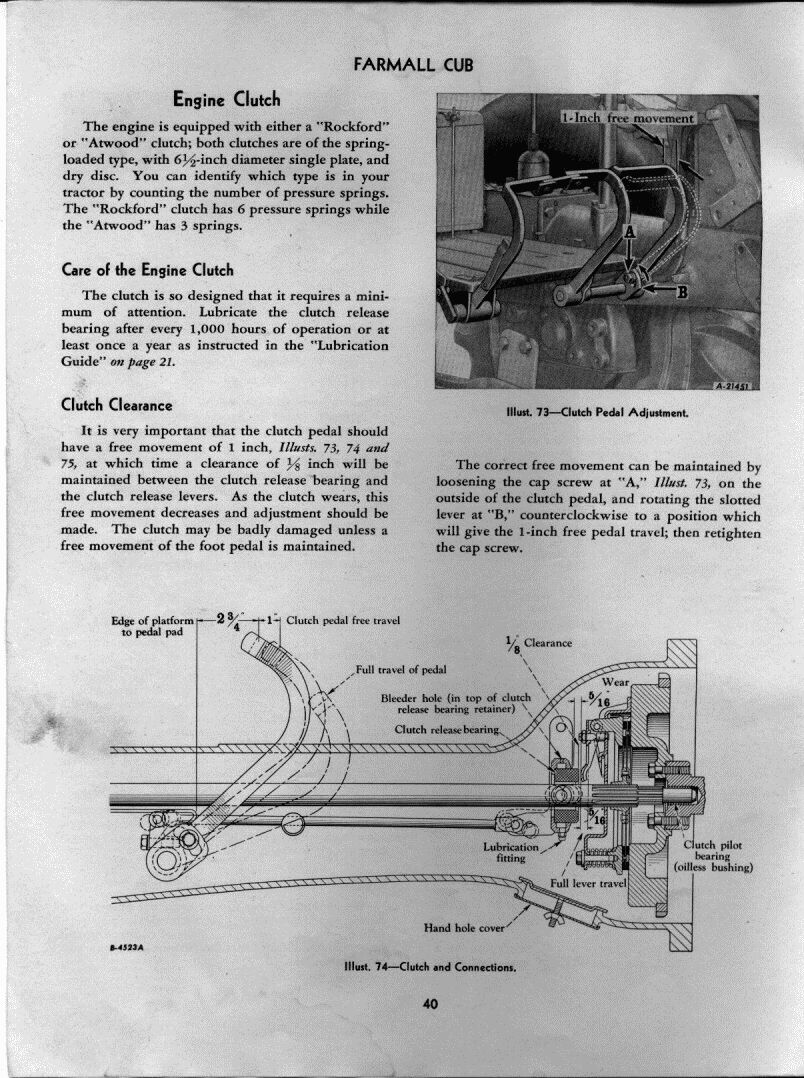
I've tried setting the free-play in the pedal but there's really no setting that will allow the clutch to correctly engage. I either have so much free play that depressing the pedal doesn't do anything or else I get metal-to-metal contact as the TO bearing contacts the fingers. I've looked at the instructions in http://farmallcub.com/phpBB2/viewtopic.php?f=141&t=66543 and the manual diagram at http://farmallcub.com/phpBB2/download/file.php?id=34642&mode=view so I have some idea of what I'm up to. I stuck the camera up into my hand-hole and got some decent shots. I think the TO looks OK. I think I can get those nuts loosened and maybe a small screwdriver into the adjustment screw. I'll have to see how loose the adjustment screw is to know if such a method will work or if the ratchet screwdriver like in the instructions will be necessary.

What I'm trying to figure out is how these fingers are raised and how much I need to raise them. I understand that they all need to be to the same height so that the TO contacts them evenly. From the pictures I've included can someone give me some guidance on how much these look off and how far I might need to bring them up? In the third picture I put in a yellow arrow. I just want to make sure that what it is pointing at is the part of the finger which I need to attend to when gapping it from TO bearing. Is this gap supposed to be 5/16" as I think I see in the manual at http://farmallcub.com/rudi_cub/www.cleancomputes.com/Cub/Cub%20Owner's%20Manuals/McCormick%20Farmall%20Cub%20Owner's%20Manual%201950/Page%2040.jpg
IMG_0876-b.jpg

IMG_0874_a.jpg
Attachments
IMG_0876-a.jpg

User avatar
tmays
10+ Years
10+ Years
Posts: 3424
Joined: Wed May 11, 2011 8:59 pm
Zip Code: 39154
Tractors Owned: 1969 Farmall Cub
1952 Cub
1942 Farmall H
Location: Raymond, MS

Re: Clutch adjustment

Postby tmays » Sat Aug 27, 2022 7:10 pm

Some excellent how to’s in the how to section on this topic. Yours look way out of adjustment or the camera angle makes it look that way. The nut in your pics gets loosened and you turn the bolt inside that nut. Check out the how to’s. No need to reiterate what’s already here
Thomas

User avatar
Bill Hudson
Team Cub
Team Cub
Posts: 9533
Joined: Wed Jul 26, 2006 10:50 am
Zip Code: 44057
Tractors Owned: 57 F-Cub - Dad & Mom's Cub
77 F-Cub - Red Long Stripe
Circle of Safety: Y
Location: OH, Madison

Re: Clutch adjustment

Postby Bill Hudson » Sat Aug 27, 2022 7:11 pm

From your pics, the hanger yoke is seriously bent, the angle of the bends on both halves needs to be 90 degrees, yours are less. To the point that the TOB appears to be held in place by the two pieces of the yoke. The TOB needs to be in the hanger so that it can rotate. Fix that and then adjust the pressure plate fingers to 1.25", some people use 1.125".

The bad news is a split is in your immediate future for the TOB fix. The good news is that adgusting the fingers while the Cub is split is a piece of cake.

Bill
Bill

"The probability of life originating from accident is comparable to the probability of the unabridged dictionary resulting from an explosion in a printing shop." Edwin Conklin, biologist

Image
Member of Ohio Chapter #6

User avatar
Glen
10+ Years
10+ Years
Posts: 6168
Joined: Mon Mar 19, 2012 7:33 pm
Zip Code: 00000
Tractors Owned: 1956 Farmall Cub with Fast Hitch, F-11 plow, Disc, Cultivator, Cub-22 mower
Circle of Safety: Y
Location: Wa.

Re: Clutch adjustment

Postby Glen » Sat Aug 27, 2022 8:00 pm

Hi,
Thanks for the pictures, they are clear.
I guess you got the PTO put together, shift it in and out of engaged with the lever, and try turning the PTO shaft in both positions, with the engine Off, and see if it works right.
The shaft should turn easily when the lever is at disengaged and not turn when the lever is at engaged.
The PTO clutch splines only match with the clutch shaft splines in a few positions, so you may need to turn the PTO shaft to make it shift into engaged.

Yes the holder looks bent, that would make the throwout bearing too far to the rear.

Below is a listing from TM Tractor for a new holder, you can look at the pics.

http://www.tmtractor.com/new/cl/112fp.htm

Below is one of their pics of a new holder, with the bearing in it, you can look at the shape of it.

marshall wrote:What I'm trying to figure out is how these fingers are raised and how much I need to raise them.

After loosening the lock nut at each finger's base, turn the screw in the center of the nut in, and it raises the finger height.

Use the post by Jeff Spivey about adjusting the finger height, that you posted above, and make the tool it shows, so the fingers are set to an accurate height.
Tighten the lock nuts tight after adjusting the finger height, hold the screw while tightening the locknut, so the screw doesn't turn and change the finger height.

marshall wrote: Is this gap supposed to be 5/16" as I think I see in the manual

No, the gap between the throwout bearing and the fingers is about 1/8" like it shows in the manual page you posted above, the 1/8" is above the shaft, and has an arrow down to the gap.
That gap is set automatically when you set the pedal free play to 1", when everything is working right, and the holder is not bent.
Attachments
Cub clutch throwout bearing and holder.jpg

marshall
10+ Years
10+ Years
Posts: 150
Joined: Mon Sep 23, 2013 7:36 am
Zip Code: 01012
Tractors Owned: 1950 Farmall Cub

Re: Clutch adjustment

Postby marshall » Mon Aug 29, 2022 1:49 pm

It was mentioned above that the hanger yoke is bent and that I've now got to split the tractor and replace the yoke and make adjustments. Would there be any harm in setting the finger height using a wire hanger as a feeler gauge in the gap between the finger and the extended portion of the TO bearing and trying things out before going into the splitting project? Is it possible that it might work OK but not perfectly? If things sound roughly like they did before I got into the PTO project maybe I can postpone splitting the tractor?

I also want to make sure I understand this gapping question. The diagram (and Glen) said the gap between the finger and TO is 1/8". The other instructions say to set this gap to 1.25" (or 1.125). My pictures show something much greater than 1/8" but not certain how much greater than 1.25".
Are these numbers we're talking about the same gap? Given the feeler gauge design it seems like we're adjusting it to be 1.25, so when does the 1/8 come into play?

This splitting operation is a huge deal. I'm not certain how to support all the weight of the two pieces or separating them enough for the repair and then bringing them back together lined up perfectly for bolting. Is this something people do alone out on the lawn? How do you support and move the tractor once it's split?

User avatar
Don McCombs
Team Cub Mentor
Team Cub Mentor
Posts: 17510
Joined: Mon Feb 03, 2003 6:45 am
Zip Code: 21550
Tractors Owned: "1950 Something" Farmall Cub
1957 Farmall Cub w/FH
1977 International Cub w/FH
1978 International Cub
1948 Farmall Super A
Circle of Safety: Y
Location: MD, Deep Creek Lake

Re: Clutch adjustment

Postby Don McCombs » Mon Aug 29, 2022 2:53 pm

If you’re up for it and have a way to transport your tractor, there is a Cubfest 3.5 hours West of you in Oxford, NY in late September/early October. There will be plenty of expertise, help, tools and equipment to get the job done right the first time. All you need to bring are the tractor, the parts and a willingness to participate.

viewtopic.php?t=112461
Last edited by Don McCombs on Mon Aug 29, 2022 3:59 pm, edited 1 time in total.
Don McCombs
MD, Deep Creek Lake

Image
Proud Member of Maryland Chapter 39

The best teachers are those who show you where to look, but don't tell you what to see.
A. K. Trenfor

User avatar
Bill V in Md
10+ Years
10+ Years
Posts: 1126
Joined: Sun Feb 02, 2003 6:51 pm
Zip Code: 21228
Tractors Owned: 1948 Farmall Cub
LT1045 Cub Cadet
Circle of Safety: Y
Location: MD, Catonsville

Re: Clutch adjustment

Postby Bill V in Md » Mon Aug 29, 2022 3:53 pm

marshall wrote:I also want to make sure I understand this gapping question. The diagram (and Glen) said the gap between the finger and TO is 1/8". The other instructions say to set this gap to 1.25" (or 1.125). My pictures show something much greater than 1/8" but not certain how much greater than 1.25".
Are these numbers we're talking about the same gap? Given the feeler gauge design it seems like we're adjusting it to be 1.25, so when does the 1/8 come into play??

The 1 1/4" gap IS NOT measured from the clutch fingers to the throwout bearing. It is measured from the clutch fingers down to the clutch plate. As Thomas mentioned in his post above there are good "How To" instructions on adjusting the clutch fingers. The below link is one example and it includes diagrams on exactly where the 1 1/4" gap is measured.
http://farmallcub.com/phpBB2/viewtopic.php?f=141&t=6994
Bill VanHooser
Cub 54 Blade, Cub 193 Moldboard Plow, Cub 28A Disc Harrow
Circle of Safety

User avatar
Glen
10+ Years
10+ Years
Posts: 6168
Joined: Mon Mar 19, 2012 7:33 pm
Zip Code: 00000
Tractors Owned: 1956 Farmall Cub with Fast Hitch, F-11 plow, Disc, Cultivator, Cub-22 mower
Circle of Safety: Y
Location: Wa.

Re: Clutch adjustment

Postby Glen » Mon Aug 29, 2022 3:57 pm

marshall wrote:Would there be any harm in setting the finger height using a wire hanger as a feeler gauge in the gap between the finger and the extended portion of the TO bearing and trying things out before going into the splitting project?

Hi,
You can set the finger height and try running the Cub and see how the clutch works.

You are confusing the finger height, and the gap between the fingers and throwout bearing.
They are 2 completely different things.

The finger height is 1 1/4", measured to the surface below the fingers, in the pressure plate.
That is what Jeff's post is showing.

The gap between the throwout bearing and the fingers is 1/8".

Set the finger height first.
The 1/8' gap between the bearing and fingers will automatically be set when you adjust the pedal free play to 1", after adjusting the finger height.
Forget the 1/8" gap for now, and adjust the finger height.
You don't have to measure or set the 1/8" gap.

You have to make the tool in Jeff's post, from some thin metal, or a heavy wire might work.
It has a part that sticks out 1 1/4".
Below is a pic of where to measure to adjust the finger height. That is the 1 1/4" measurement.
It has nothing to do with the 1/8" gap measurement.

If you have never split a Cub before, and have no equipment to do it, or don't want to do it, it would be better to take it where Don said above, or if you can't go there, find a shop that repairs Cubs.

The service manual I posted for you has a section about splitting the Cub behind the engine.
It works better in a shop with a cement floor.
The people on here make splitting stands, they bolt on the sides of the clutch housing on the pads for the implements, they have a small wheel at the bottom, then when the Cub is split you can wheel the rear section away from the engine.

But adjust the finger height first, then set the pedal free play adjustment, and try it, it might work good enough.
The pic is a pressure plate off the flywheel, the plate has to be on the flywheel to set the finger height to the 1 1/4".
Attachments
Cub clutch 3.jpg

marshall
10+ Years
10+ Years
Posts: 150
Joined: Mon Sep 23, 2013 7:36 am
Zip Code: 01012
Tractors Owned: 1950 Farmall Cub

Re: Clutch adjustment

Postby marshall » Tue Aug 30, 2022 7:40 am

Ok. Thanks. I get it now. I'll avoid the split until the Cubfest which I've never been to. No Cub repair places out here in Mass that I know of but lots of shiny fresh red-painted Farmalls around at country fairs and in parades. Glen - thanks for your patience. That PTO is really shifting smoothly and it turns when I rotate the engine so I'm optimistic about that. Now I just hope I can fit a short screwdriver up into that clutch area so I can turn those adjustment screws on the fingers.

Gary Dotson
Team Cub Mentor
Team Cub Mentor
Posts: 5650
Joined: Thu Aug 03, 2006 6:20 am
Zip Code: 43358
Tractors Owned: 48 Cub Diesel (Cubota)
53 Cockshutt 20 restored (Shooter)
52 Cockshutt 20 unrestored
47 Leader "B" (Herckie)
49 Leader "D" (Princess)
49 Leader "D" very rough
48 Leader "D" unrestored
Kubota B6200E
Kubota B6200HST
Kubota B8200HST-D
Circle of Safety: Y
Location: OH West Mansfield

Re: Clutch adjustment

Postby Gary Dotson » Tue Aug 30, 2022 8:23 am

I doubt that you’ll de able to adjust with the short screwdriver, that’s why we all use offset or ratcheting screwdrivers.

User avatar
Dale Finch
10+ Years
10+ Years
Posts: 6693
Joined: Tue Apr 27, 2010 11:34 am
Zip Code: 27517
Tractors Owned: '51 Cub #140966 "Bruno" with Woods 59 mower
'55 Cub #187541 "Betty" with Fast Hitch
'55 Cub #190482 "Ben" with Woods 42 mower
'55 Cub #191739 "Bertha" with Woods 42 mower
'56 Cub #194370 "Boris" with Mott Flail mower
Circle of Safety: Y
Location: NC, Chapel Hill

Re: Clutch adjustment

Postby Dale Finch » Tue Aug 30, 2022 10:48 pm

This is similar to the screwdriver I use on the adjusting locknuts:
https://www.harborfreight.com/8-piece-right-angle-screwdriver-92630.html?utm_source=google&utm_medium=cpc&utm_campaign=12169518939&campaignid=12169518939&utm_content=114845782057&adsetid=114845782057&product=92630&store=&gclid=CjwKCAjw6raYBhB7EiwABge5Klbx-YB0Q2WWEGDGNhcIMvdhq7jwOaRJ5Zb6YtYFe92Mb3dq9IZEzxoCvJgQAvD_BwE
I suggest you mark each of the fingers with a marker, so you know for sure which ones you have done. When you get the height of each adjusted (~1 1/4"), make sure you have retightened each nut securely. Then I suggest you check each one one last time!
Dale Finch
Image
Circle of Safety


  • Similar Topics
    Replies
    Views
    Last post

Return to “Farmall Cub”

Who is online

Users browsing this forum: Cub49 and 2 guests