Clutch and throw-out bearing adjustment.
Morning all!
Split the tractor this weekend in hopes of getting the clutch properly adjusted.
1. Now that I have the tractor apart I cannot find any posts on directions for adjusting the pressure plate. Can someone point me in the correct direction?
2. Also, the throw-out bearing is looking like it is very offset. Any suggestions there?
3. Anyone know where I put my clutch alignment tool? I am sure it was somewhere safe.
Thanks!!
Andrew
This site uses cookies to maintain login information on FarmallCub.Com. Click the X in the banner upper right corner to close this notice. For more information on our privacy policy, visit this link: Privacy Policy
NEW REGISTERED MEMBERS: Be sure to check your SPAM/JUNK folders for the activation email.
Offset throw-out bearing
Forum rules
Notice: For sale and wanted posts are not allowed in this forum. Please use our free classifieds or one of our site sponsors for your tractor and parts needs.
Notice: For sale and wanted posts are not allowed in this forum. Please use our free classifieds or one of our site sponsors for your tractor and parts needs.
-
AndrewSpencer
- Cub Star

- Posts: 72
- Joined: Tue Mar 15, 2022 7:19 pm
- Zip Code: 20855
Offset throw-out bearing
- Attachments
-
-
Glen

- 10+ Years

- Posts: 6184
- Joined: Mon Mar 19, 2012 7:33 pm
- Zip Code: 00000
- Tractors Owned: 1956 Farmall Cub with Fast Hitch, F-11 plow, Disc, Cultivator, Cub-22 mower
- Circle of Safety: Y
- Location: Wa.
Re: Offset throw-out bearing
Hi,
The top of the throwout bearing holder is not spread out enough, so there is too much sideways movement of the holder.
The throwout bearing should be centered on the 3 pressure plate fingers.
If the holder is good, with no worn holes, and you are going to use it again, the upper area of it needs bending out, so both sides are almost against the clutch housing, and the bearing is centered on the 3 fingers.
If you bend it, don't bend it too low, the throwout bearing has to be held firmly so it stays vertical.
The throwout bearing looks worn in the wrong places from being used offside, if the wear pattern is worn into the face of the bearing, it will need to be replaced with a new one, when using the holder aligned properly.
Below is the Cub and LoBoy service manual, it has lots of info.
I would read the section you need before, or when working on a Cub.
There is a contents beginning on page 1 of most sections, that makes it easier to use online.
http://farmallcub.com/rudi_cub/www.clea ... index.html
Below is info about the clutch, if you need it.
Some of the people on here like the original IH clutches better than the new imported clutches, they say the quality is better for the old clutches.
The old one can be used more if it isn't worn much, and still looks good.
I remember someone on here said that he put in a new pressure plate, and used the Cub a short time, and the clutch didn't work right. He looked in the hand hole under the clutch, and 1 of the fingers had bent down.
He thought the metal in the finger wasn't hard enough.
One of the experts on here has said that if the clutch pilot bushing it has measures ok, and it looks in good condition, it doesn't need replacing.
If you replace the pilot bushing, after putting it in the crankshaft hole, be sure to measure it's ID with a dial caliper before putting the pressure plate on the flywheel.
If the clearance is too small, the bushing needs reaming to make it bigger.
The pilot bushing ID can shrink after driving it in the hole. Then if the bushing ID is too small, and you put the Cub together, the clutch shaft won't stop turning when you push the clutch pedal down.
Then the gears grind when trying to shift them.
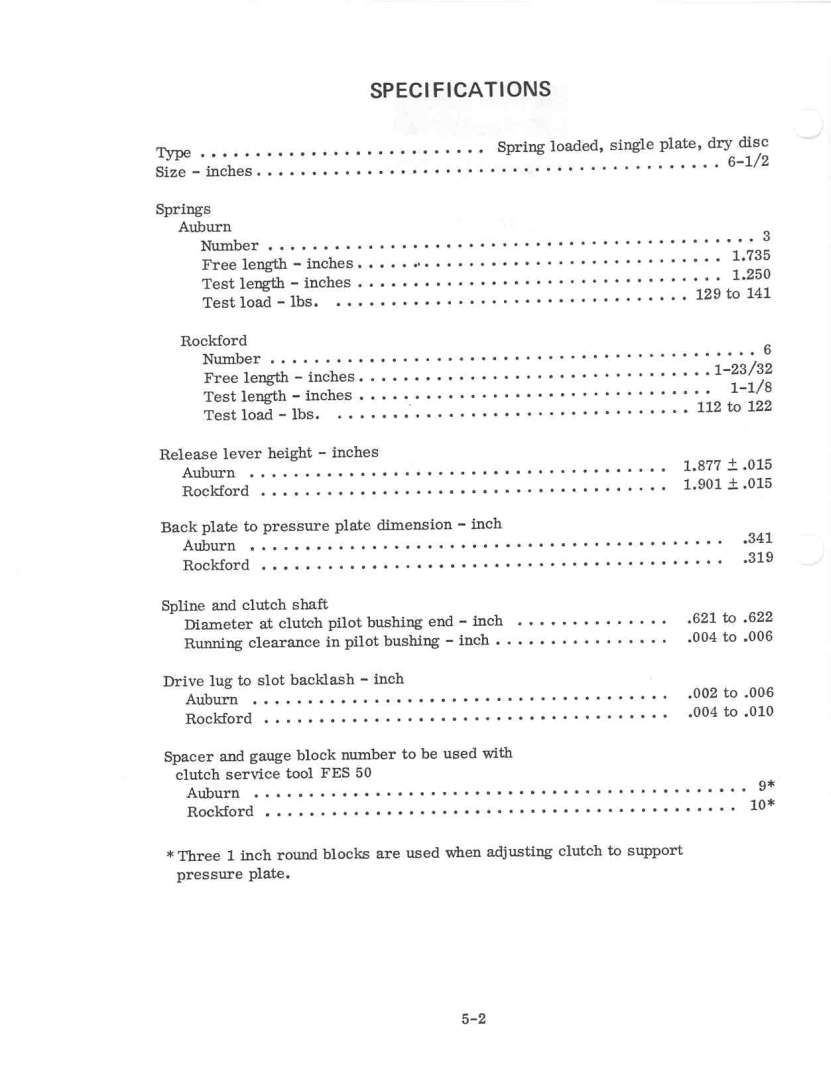
Below is a page from the Cub service manual, showing the running clearance for the pilot bushing, at Spline and clutch shaft.
http://farmallcub.com/rudi_cub/www.clea ... -05-02.jpg
If the bushing is too small, it needs reaming.
The graphite material sticks out of a new throwout bearing 5/16", they can wear down with use, and need replacing.
They have said on here to soak a new throwout bearing in light motor oil for a day or more before putting it in.
Also they have said on here, grease the throwout bearing grease fitting with cheap grease, so the oil in the grease absorbs into the graphite material.
The original bearings had a small hole at the top of them for excess grease to come out.
Grease it until grease comes out the hole, if the new bearing has the hole.
Be sure the throwout bearing holder is straight, and check it's holes, and the pin at the top of the holder for wear.
The holder should not move up and down, or side to side, so the throwout bearing is centered on the 3 pressure plate fingers.
Bend the upper part of the holder if needed, so it is out almost against the casting, and has very little side to side movement. The bearing has to be centered side to side with the 3 fingers.
TM Tractor, at the bottom of the page, has a new holder and pin, if you need them.
Their holder is for Cubs serial number 32229 and above.
The holder has to hold the throwout bearing snugly, so the top of the bearing doesn't flop down and rub on the fingers.
Turn the clutch shaft when the Cub is split and be sure it turns straight, and it's not bent.
The hub on the clutch disc sticks out farther on one side than the other. The side that sticks out farther goes to the rear.
You can sand the flywheel, and the pressure plate surface, if you are using the same pressure plate again, with fine sandpaper. Wipe off all sanding with a clean rag.
Tighten the 6 pressure plate bolts that hold it on the flywheel evenly, it is loading the springs as you tighten the bolts.
The pressure plate fingers height should be 1 3/16" - 1 1/4", they recommend on here.
The fingers need to be the same height to form a flat surface for the throwout bearing to push on.
The finger height is set when the clutch is fully assembled on the flywheel.
Tighten the nuts on the finger height adjustments tight when done adjusting them, so they don't come loose.
I would put a light layer of grease in the pilot bushing, and on the end of the clutch shaft that goes in the bushing, when you put the Cub together.
If the rear crankshaft seal leaks any, when the Cub is split is a good time to replace it.
You have to remove the flywheel to replace it.
They have said on here that the oil seal sold nowadays doesn't fit well in the original seal holders, on older Cubs.
The seal is too loose in the holder.
Member tst machines used holders and puts in a slightly bigger OD oil seal in them, so the seal fits tight in the holder.
You can write him a PM, if you want info about it.
He may have an ad for them in The Vine section on here.
TM Tractor at the bottom of the page has new parts for Cubs.
You didn't say the year of the Cub.
When you have it together again, Cubs serial number 32228 and below should have 1 3/16" of clutch pedal free play, at the top of it's travel, measured at the surface where you put your foot.
The free play on the 1st style of adjustment is internal, you turn the yoke on the rod inside the housing.
Cubs serial number 32229 and above should have 1" of clutch pedal free play.
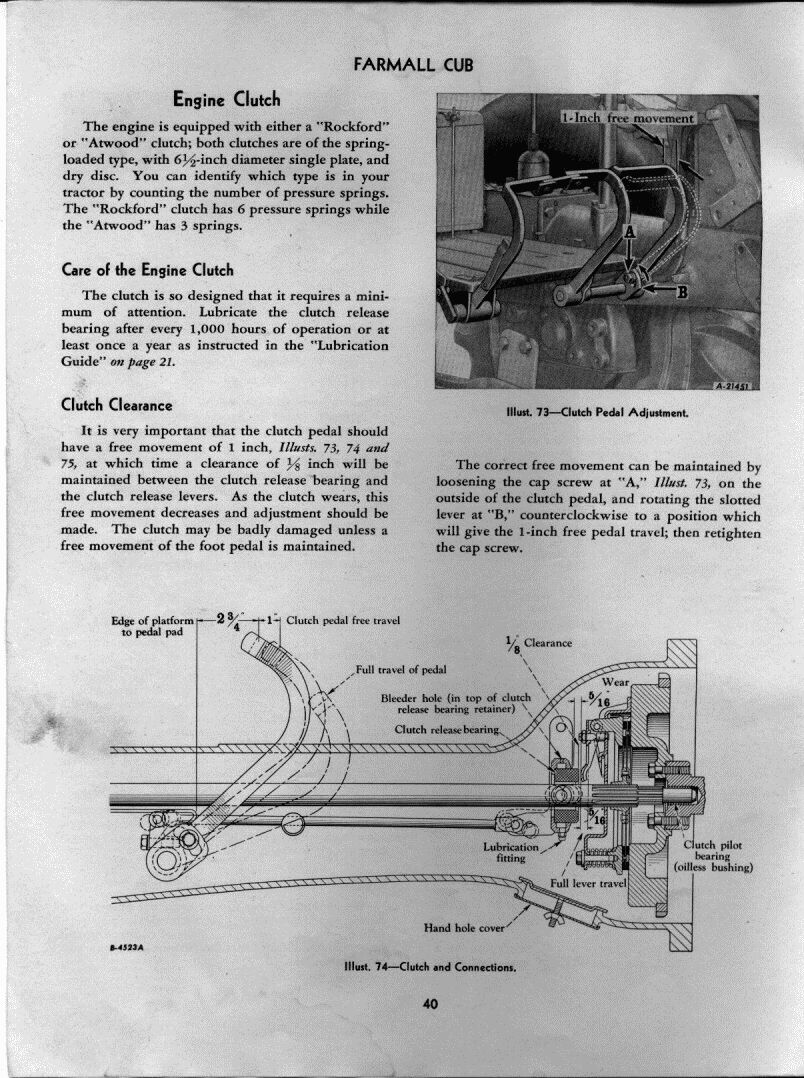
Below is a page from the 1950 Cub owner's manual, showing adjusting the clutch pedal free play.
That is the newer style of free play adjustment. It is external, at the clutch pedal base.
There is a pic of the clutch in the lower part of the page.
http://farmallcub.com/rudi_cub/www.clea ... e%2040.jpg
All 3 pedals should have return springs under the platform, to hold the pedals up against the platform.
If the clutch pedal had no return spring, it would always go ahead, and the throwout bearing would touch on the pressure plate fingers.
The clutch pedal should move freely at it's base, sometimes the clutch pedal base gets tight from no lube. Work penetrating oil, or oil into the base if it hasn't been oiled lately.
If the pedal is free at the base, it usually pulls out of the clutch housing about 1/4", that helps to get oil into the base. There is a length the base goes into the housing to work oil into.
Below is a pic of a pressure plate, showing where to measure to, the pressure plate has to be assembled on the flywheel, not off, like the pic is.
The 2nd pic from TM Tractor shows the clutch pedal base. 2/3 of the shiny area at the right makes contact in the hole made in the clutch housing.
The 1/3 on the left of the pic sticks through the hole.
Push the pedal base back into the housing when done oiling it.
Good luck.
The top of the throwout bearing holder is not spread out enough, so there is too much sideways movement of the holder.
The throwout bearing should be centered on the 3 pressure plate fingers.
If the holder is good, with no worn holes, and you are going to use it again, the upper area of it needs bending out, so both sides are almost against the clutch housing, and the bearing is centered on the 3 fingers.
If you bend it, don't bend it too low, the throwout bearing has to be held firmly so it stays vertical.
The throwout bearing looks worn in the wrong places from being used offside, if the wear pattern is worn into the face of the bearing, it will need to be replaced with a new one, when using the holder aligned properly.
Below is the Cub and LoBoy service manual, it has lots of info.
I would read the section you need before, or when working on a Cub.
There is a contents beginning on page 1 of most sections, that makes it easier to use online.
http://farmallcub.com/rudi_cub/www.clea ... index.html
Below is info about the clutch, if you need it.
Some of the people on here like the original IH clutches better than the new imported clutches, they say the quality is better for the old clutches.
The old one can be used more if it isn't worn much, and still looks good.
I remember someone on here said that he put in a new pressure plate, and used the Cub a short time, and the clutch didn't work right. He looked in the hand hole under the clutch, and 1 of the fingers had bent down.
He thought the metal in the finger wasn't hard enough.
One of the experts on here has said that if the clutch pilot bushing it has measures ok, and it looks in good condition, it doesn't need replacing.
If you replace the pilot bushing, after putting it in the crankshaft hole, be sure to measure it's ID with a dial caliper before putting the pressure plate on the flywheel.
If the clearance is too small, the bushing needs reaming to make it bigger.
The pilot bushing ID can shrink after driving it in the hole. Then if the bushing ID is too small, and you put the Cub together, the clutch shaft won't stop turning when you push the clutch pedal down.
Then the gears grind when trying to shift them.
Below is a page from the Cub service manual, showing the running clearance for the pilot bushing, at Spline and clutch shaft.
http://farmallcub.com/rudi_cub/www.clea ... -05-02.jpg
If the bushing is too small, it needs reaming.
The graphite material sticks out of a new throwout bearing 5/16", they can wear down with use, and need replacing.
They have said on here to soak a new throwout bearing in light motor oil for a day or more before putting it in.
Also they have said on here, grease the throwout bearing grease fitting with cheap grease, so the oil in the grease absorbs into the graphite material.
The original bearings had a small hole at the top of them for excess grease to come out.
Grease it until grease comes out the hole, if the new bearing has the hole.
Be sure the throwout bearing holder is straight, and check it's holes, and the pin at the top of the holder for wear.
The holder should not move up and down, or side to side, so the throwout bearing is centered on the 3 pressure plate fingers.
Bend the upper part of the holder if needed, so it is out almost against the casting, and has very little side to side movement. The bearing has to be centered side to side with the 3 fingers.
TM Tractor, at the bottom of the page, has a new holder and pin, if you need them.
Their holder is for Cubs serial number 32229 and above.
The holder has to hold the throwout bearing snugly, so the top of the bearing doesn't flop down and rub on the fingers.
Turn the clutch shaft when the Cub is split and be sure it turns straight, and it's not bent.
The hub on the clutch disc sticks out farther on one side than the other. The side that sticks out farther goes to the rear.
You can sand the flywheel, and the pressure plate surface, if you are using the same pressure plate again, with fine sandpaper. Wipe off all sanding with a clean rag.
Tighten the 6 pressure plate bolts that hold it on the flywheel evenly, it is loading the springs as you tighten the bolts.
The pressure plate fingers height should be 1 3/16" - 1 1/4", they recommend on here.
The fingers need to be the same height to form a flat surface for the throwout bearing to push on.
The finger height is set when the clutch is fully assembled on the flywheel.
Tighten the nuts on the finger height adjustments tight when done adjusting them, so they don't come loose.
I would put a light layer of grease in the pilot bushing, and on the end of the clutch shaft that goes in the bushing, when you put the Cub together.
If the rear crankshaft seal leaks any, when the Cub is split is a good time to replace it.
You have to remove the flywheel to replace it.
They have said on here that the oil seal sold nowadays doesn't fit well in the original seal holders, on older Cubs.
The seal is too loose in the holder.
Member tst machines used holders and puts in a slightly bigger OD oil seal in them, so the seal fits tight in the holder.
You can write him a PM, if you want info about it.
He may have an ad for them in The Vine section on here.
TM Tractor at the bottom of the page has new parts for Cubs.
You didn't say the year of the Cub.
When you have it together again, Cubs serial number 32228 and below should have 1 3/16" of clutch pedal free play, at the top of it's travel, measured at the surface where you put your foot.
The free play on the 1st style of adjustment is internal, you turn the yoke on the rod inside the housing.
Cubs serial number 32229 and above should have 1" of clutch pedal free play.
Below is a page from the 1950 Cub owner's manual, showing adjusting the clutch pedal free play.
That is the newer style of free play adjustment. It is external, at the clutch pedal base.
There is a pic of the clutch in the lower part of the page.
http://farmallcub.com/rudi_cub/www.clea ... e%2040.jpg
All 3 pedals should have return springs under the platform, to hold the pedals up against the platform.
If the clutch pedal had no return spring, it would always go ahead, and the throwout bearing would touch on the pressure plate fingers.
The clutch pedal should move freely at it's base, sometimes the clutch pedal base gets tight from no lube. Work penetrating oil, or oil into the base if it hasn't been oiled lately.
If the pedal is free at the base, it usually pulls out of the clutch housing about 1/4", that helps to get oil into the base. There is a length the base goes into the housing to work oil into.
Below is a pic of a pressure plate, showing where to measure to, the pressure plate has to be assembled on the flywheel, not off, like the pic is.
The 2nd pic from TM Tractor shows the clutch pedal base. 2/3 of the shiny area at the right makes contact in the hole made in the clutch housing.
The 1/3 on the left of the pic sticks through the hole.
Push the pedal base back into the housing when done oiling it.
Good luck.
- Attachments
-
-
Last edited by Glen on Tue Aug 02, 2022 8:30 pm, edited 1 time in total.
-
Dale Finch

- 10+ Years
- Posts: 6712
- Joined: Tue Apr 27, 2010 11:34 am
- Zip Code: 27517
- Tractors Owned: '51 Cub #140966 "Bruno" with Woods 59 mower
'55 Cub #187541 "Betty" with Fast Hitch
'55 Cub #190482 "Ben" with Woods 42 mower
'55 Cub #191739 "Bertha" with Woods 42 mower
'56 Cub #194370 "Boris" with Mott Flail mower - Circle of Safety: Y
- Location: NC, Chapel Hill
Re: Offset throw-out bearing
Check the bolt at the bottom of the TOB Carrier to make sure it is tight, while you're there. If it is loose, it could allow the carrier/TOB to ride cockeyed.
Dale Finch


-
AndrewSpencer
- Cub Star
- Posts: 72
- Joined: Tue Mar 15, 2022 7:19 pm
- Zip Code: 20855
Re: Offset throw-out bearing
Thank you all for the wisdom. I gave the bearing carrier a push apart and it just about sprung, but was still a bit loose, so I used a washer on each side to tighten up the clearance. Also, checked the bolts on the back, thank you!
Thank you for the sheet on clearances. I honed the pilot bushing to be .0055" over using a wooden down with a 1" slit and some 80 grit sand paper wrapped around loosely. FYI, If you are checking that dimension using a spring loaded bore gauge, make sure you do not go too deeply as the gauge will pop, then you get to remove the flywheel, too.
Also adjusted the clutch fingers to be 1.220" (don't ask what they were!)
Got it re-mated this afternoon, test it out after I drink a gallon of water.
Thank you all again.
-
SamsFarm
- 501 Club

- Posts: 1853
- Joined: Wed Jan 20, 2021 8:21 pm
- Zip Code: 44410
- Tractors Owned: 1968 Cub Fast Hitch
LF-1 Platform Carrier
144 Cultivators
L-F194 Plow(s)
F38 Disk
L-F3 Spring Tooth Harrow
CS Bell No. 60 Grain Mill on a unmodified Fast Hitch Disk hitch prong
Home Made Fast Hitch Potato Plow
54A Blade
Couple 1948 Cubs
172 Runner Planter
53 Fertilizer
Cub-3 Field Cultivator
Cub-189 Two Way Plow
Cub-22 Sickle Bar Mower
Mechanical Transplanter with side mount barrel (needs a fast hitch adapter) :)
Misc Belly Mowers
Wish List
International 100 Fast Hitch Blade
Mott Fast Hitch Flail Mower
Wish Wish Wish List
Fast Hitch Rotary Hoe
4E hammer mill - Location: Ne Ohio
Re: Offset throw-out bearing
AndrewSpencer wrote:Also adjusted the clutch fingers to be 1.220" (don't ask what they were!)
What were they at?
AndrewSpencer wrote:Got it re-mated this afternoon, test it out after I drink a gallon of water.
Work good now?
1968 Cub Fast-Hitch
-
Clemsonfor
- 501 Club
- Posts: 1120
- Joined: Sun Nov 10, 2019 5:14 pm
- Zip Code: 29848
- Tractors Owned: Yanmar YM2000
Yanmar YM186 (non running)
1952 Farmall Cub - Circle of Safety: Y
- Location: Greenwood County SC
Re: Offset throw-out bearing
SamsFarm wrote:AndrewSpencer wrote:Also adjusted the clutch fingers to be 1.220" (don't ask what they were!)
What were they at?AndrewSpencer wrote:Got it re-mated this afternoon, test it out after I drink a gallon of water.
Work good now?
He is either still drinking that water or hopefully he didn't stroke out from heat exhaustion!! Sounds like it was hot!!
-
AndrewSpencer
- Cub Star
- Posts: 72
- Joined: Tue Mar 15, 2022 7:19 pm
- Zip Code: 20855
Re: Offset throw-out bearing
How far up? They were all the way. As the adjustment bolts were hitting the throw out. Now they are again. Suggestions there?
-
AndrewSpencer
- Cub Star
- Posts: 72
- Joined: Tue Mar 15, 2022 7:19 pm
- Zip Code: 20855
Re: Offset throw-out bearing
Just kidding, I checked again and it is in good shape.
-
- Similar Topics
- Replies
- Views
- Last post
-
- 14
- 374
-
by Glen
Tue May 03, 2022 8:25 pm
-
- 4
- 216
-
by tst
Tue Oct 04, 2022 5:46 pm
-
- 1
- 179
-
by Dale Finch
Wed Jun 02, 2021 8:27 pm
-
- 1
- 61
-
by Bill Hudson
Thu May 16, 2024 2:50 pm
-
- 5
- 230
-
by crankstart
Wed Sep 21, 2022 2:08 pm
Who is online
Users browsing this forum: No registered users and 2 guests


