This site uses cookies to maintain login information on FarmallCub.Com. Click the X in the banner upper right corner to close this notice. For more information on our privacy policy, visit this link: Privacy Policy
NEW REGISTERED MEMBERS: Be sure to check your SPAM/JUNK folders for the activation email.
clutch and throwout bearing wear?
Forum rules
Notice: For sale and wanted posts are not allowed in this forum. Please use our free classifieds or one of our site sponsors for your tractor and parts needs.
Notice: For sale and wanted posts are not allowed in this forum. Please use our free classifieds or one of our site sponsors for your tractor and parts needs.
-
pett3227b
- 5+ Years

- Posts: 116
- Joined: Tue Nov 27, 2018 7:28 am
- Zip Code: 28327
clutch and throwout bearing wear?
I am wondering how to determine if my throwout bearing has enough wear to need replacing. Is there a measurement to go by? All the wear seems to be fairly uniform. Also am wondering the same thing with the clutch metal surface and the flywheel metal surface that the clutch plate wears on. I have purchased a new clutch plate. I don't have any heavy grooves except there is a groove on the flywheel. This is where the outside edge of the clutch plate rides and the groove is a step down in space.
-
Glen

- 10+ Years

- Posts: 6152
- Joined: Mon Mar 19, 2012 7:33 pm
- Zip Code: 00000
- Tractors Owned: 1956 Farmall Cub with Fast Hitch, F-11 plow, Disc, Cultivator, Cub-22 mower
- Circle of Safety: Y
- Location: Wa.
Re: clutch and throwout bearing wear?
Hi,
I guess you have the Cub apart, from what you are asking.
Below is info about the Cub clutch, if you need it. There is info about the throwout bearing.
I would use fine sandpaper and smooth the surface of the flywheel.
Below is the Cub and LoBoy service manual, it has lots of info.
I would read it before, or when working on a Cub.
There is a contents on page 1 of most sections, that makes it easier to use online.
http://farmallcub.com/rudi_cub/www.clea ... index.html
Some of the people on here like the original IH clutches better than the new imported clutches, they say the quality is better for the old clutches.
The old one can be used more if it isn't worn much, and still looks good.
I remember someone on here said that he put in a new pressure plate, and used the Cub a short time, and the clutch didn't work right. He looked in the hand hole under the clutch, and 1 of the fingers had bent down.
He thought the metal in the finger wasn't hard enough.
One of the experts on here has said that not all Cub clutch pilot bushings need replacing.
If the ID measures ok, and it looks in good condition, it can be used more.
If you replace the pilot bushing, after putting it in the crankshaft hole, be sure to measure it's ID with a dial caliper before putting the pressure plate on the flywheel.
If the clearance is too small, the bushing needs reaming to make it bigger.
The pilot bushing ID can shrink after driving it in the hole. Then if the bushing ID is too small, and you put the Cub together, the clutch shaft won't stop turning when you push the clutch pedal down.
Then the gears grind when trying to shift them.
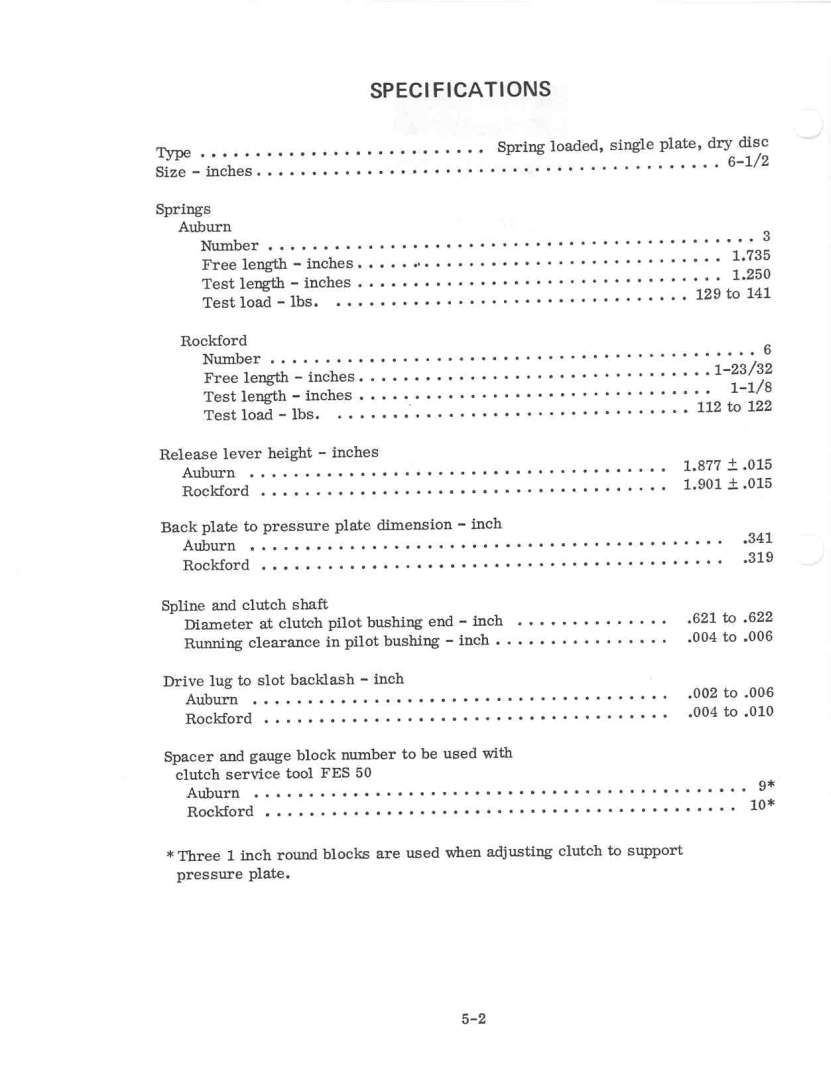
Below is a page from the Cub service manual, showing the running clearance for the pilot bushing, at Spline and clutch shaft.
http://farmallcub.com/rudi_cub/www.clea ... -05-02.jpg
If the bushing is too small, it needs reaming.
The graphite material sticks out of a new throwout bearing 5/16", they can wear down with use, and need replacing.
They have said on here to soak a new throwout bearing in light motor oil for a day or more before putting it in.
Also they have said on here, grease the throwout bearing grease fitting with cheap grease, so the oil in the grease absorbs into the graphite material.
The original bearings had a small hole at the top of them for excess grease to come out.
Grease it until grease comes out the hole, if the new bearing has the hole.
Be sure the throwout bearing holder is straight, and check it's holes, and the pin at the top of the holder for wear.
The holder should not move up and down, or side to side, so the throwout bearing is centered on the 3 pressure plate fingers.
Bend the upper part of the holder if needed, so it is out almost against the casting, and has very little side to side movement. The bearing has to be centered side to side with the 3 fingers.
TM Tractor, at the bottom of the page, has a new holder and pin, if you need them.
Their holder is for Cubs serial number 32229 and above.
The holder has to hold the throwout bearing snugly, so the top of the bearing doesn't flop down and rub on the fingers.
Turn the clutch shaft when the Cub is split and be sure it turns straight, and it's not bent.
The hub on the clutch disc sticks out farther on one side than the other. The side that sticks out farther goes to the rear.
Tighten the 6 pressure plate bolts that hold it on the flywheel evenly, it is loading the springs as you tighten the bolts.
The pressure plate fingers height should be about 1 3/16", or slightly less than 1 1/4", they recommend on here.
The fingers need to be the same height to form a flat surface for the throwout bearing to push on.
The finger height is set when the clutch is fully assembled on the flywheel.
Tighten the nuts on the finger height adjustments tight when done adjusting them, so they don't come loose.
I would put a light layer of grease in the pilot bushing, and on the end of the clutch shaft that goes in the bushing, when you put the Cub together.
If the rear crankshaft seal leaks any, when the Cub is split is a good time to replace it.
You have to remove the flywheel to replace it.
They have said on here that the oil seal sold nowadays doesn't fit well in the original seal holders, on older Cubs.
The seal is too loose in the holder.
Member tst machines used holders and puts in a slightly bigger OD oil seal in them, so the seal fits tight in the holder.
You can write him a PM, if you want info about it.
He may have an ad for them in The Vine section on here.
TM Tractor at the bottom of the page has new parts for Cubs.
You didn't say the year of the Cub.
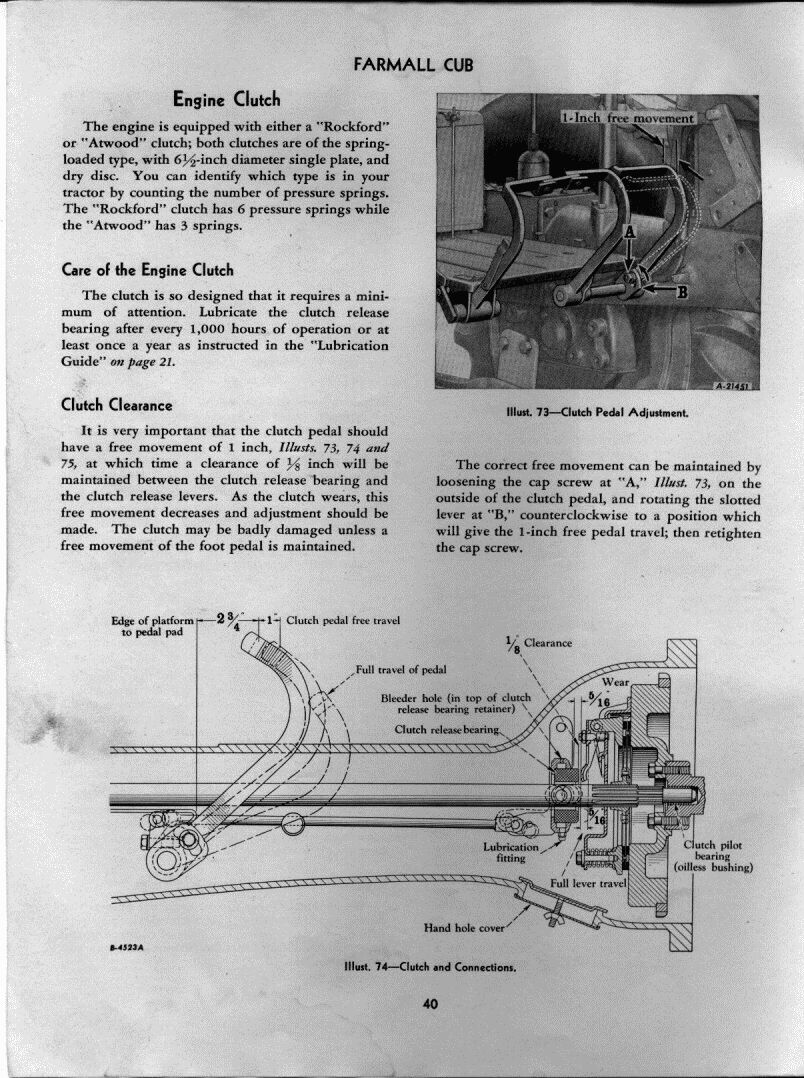
When you have it together again, Cubs with the external free play adjustment at the clutch pedal base should have 1" of clutch pedal free play, at the top of it's travel, measured at the surface where you put your foot.
Below is a page from the 1950 Cub owner's manual, showing adjusting the clutch pedal free play.
There is also a pic of the clutch on the page.
http://farmallcub.com/rudi_cub/www.clea ... e%2040.jpg
All 3 pedals should have return springs under the platform, to hold the pedals up against the platform.
If the clutch pedal had no return spring, it would always go ahead, and the throwout bearing would touch on the pressure plate fingers.
The clutch pedal should move freely at it's base, sometimes the clutch pedal base gets tight from no lube. Work penetrating oil, or oil into the base if it hasn't been oiled lately.
If the pedal is free at the base, it usually pulls out of the clutch housing about 1/4", that helps to get oil into the base. There is a length the base goes into the housing to work oil into.
Below are pictures.
The 1st pic is a new throwout bearing.
The 2nd pic is a pressure plate, showing where to measure to, the pressure plate has to be assembled on the flywheel, not off, like the pic is.
The 3rd pic, from TM Tractor, shows the clutch pedal base. 2/3 of the shiny area at the right makes contact in the hole made in the clutch housing.
The 1/3 on the left of the pic sticks through the hole.
Push the pedal base back into the housing when done oiling it.
Good luck.
I guess you have the Cub apart, from what you are asking.
Below is info about the Cub clutch, if you need it. There is info about the throwout bearing.
I would use fine sandpaper and smooth the surface of the flywheel.
Below is the Cub and LoBoy service manual, it has lots of info.
I would read it before, or when working on a Cub.
There is a contents on page 1 of most sections, that makes it easier to use online.
http://farmallcub.com/rudi_cub/www.clea ... index.html
Some of the people on here like the original IH clutches better than the new imported clutches, they say the quality is better for the old clutches.
The old one can be used more if it isn't worn much, and still looks good.
I remember someone on here said that he put in a new pressure plate, and used the Cub a short time, and the clutch didn't work right. He looked in the hand hole under the clutch, and 1 of the fingers had bent down.
He thought the metal in the finger wasn't hard enough.
One of the experts on here has said that not all Cub clutch pilot bushings need replacing.
If the ID measures ok, and it looks in good condition, it can be used more.
If you replace the pilot bushing, after putting it in the crankshaft hole, be sure to measure it's ID with a dial caliper before putting the pressure plate on the flywheel.
If the clearance is too small, the bushing needs reaming to make it bigger.
The pilot bushing ID can shrink after driving it in the hole. Then if the bushing ID is too small, and you put the Cub together, the clutch shaft won't stop turning when you push the clutch pedal down.
Then the gears grind when trying to shift them.
Below is a page from the Cub service manual, showing the running clearance for the pilot bushing, at Spline and clutch shaft.
http://farmallcub.com/rudi_cub/www.clea ... -05-02.jpg
If the bushing is too small, it needs reaming.
The graphite material sticks out of a new throwout bearing 5/16", they can wear down with use, and need replacing.
They have said on here to soak a new throwout bearing in light motor oil for a day or more before putting it in.
Also they have said on here, grease the throwout bearing grease fitting with cheap grease, so the oil in the grease absorbs into the graphite material.
The original bearings had a small hole at the top of them for excess grease to come out.
Grease it until grease comes out the hole, if the new bearing has the hole.
Be sure the throwout bearing holder is straight, and check it's holes, and the pin at the top of the holder for wear.
The holder should not move up and down, or side to side, so the throwout bearing is centered on the 3 pressure plate fingers.
Bend the upper part of the holder if needed, so it is out almost against the casting, and has very little side to side movement. The bearing has to be centered side to side with the 3 fingers.
TM Tractor, at the bottom of the page, has a new holder and pin, if you need them.
Their holder is for Cubs serial number 32229 and above.
The holder has to hold the throwout bearing snugly, so the top of the bearing doesn't flop down and rub on the fingers.
Turn the clutch shaft when the Cub is split and be sure it turns straight, and it's not bent.
The hub on the clutch disc sticks out farther on one side than the other. The side that sticks out farther goes to the rear.
Tighten the 6 pressure plate bolts that hold it on the flywheel evenly, it is loading the springs as you tighten the bolts.
The pressure plate fingers height should be about 1 3/16", or slightly less than 1 1/4", they recommend on here.
The fingers need to be the same height to form a flat surface for the throwout bearing to push on.
The finger height is set when the clutch is fully assembled on the flywheel.
Tighten the nuts on the finger height adjustments tight when done adjusting them, so they don't come loose.
I would put a light layer of grease in the pilot bushing, and on the end of the clutch shaft that goes in the bushing, when you put the Cub together.
If the rear crankshaft seal leaks any, when the Cub is split is a good time to replace it.
You have to remove the flywheel to replace it.
They have said on here that the oil seal sold nowadays doesn't fit well in the original seal holders, on older Cubs.
The seal is too loose in the holder.
Member tst machines used holders and puts in a slightly bigger OD oil seal in them, so the seal fits tight in the holder.
You can write him a PM, if you want info about it.
He may have an ad for them in The Vine section on here.
TM Tractor at the bottom of the page has new parts for Cubs.
You didn't say the year of the Cub.
When you have it together again, Cubs with the external free play adjustment at the clutch pedal base should have 1" of clutch pedal free play, at the top of it's travel, measured at the surface where you put your foot.
Below is a page from the 1950 Cub owner's manual, showing adjusting the clutch pedal free play.
There is also a pic of the clutch on the page.
http://farmallcub.com/rudi_cub/www.clea ... e%2040.jpg
All 3 pedals should have return springs under the platform, to hold the pedals up against the platform.
If the clutch pedal had no return spring, it would always go ahead, and the throwout bearing would touch on the pressure plate fingers.
The clutch pedal should move freely at it's base, sometimes the clutch pedal base gets tight from no lube. Work penetrating oil, or oil into the base if it hasn't been oiled lately.
If the pedal is free at the base, it usually pulls out of the clutch housing about 1/4", that helps to get oil into the base. There is a length the base goes into the housing to work oil into.
Below are pictures.
The 1st pic is a new throwout bearing.
The 2nd pic is a pressure plate, showing where to measure to, the pressure plate has to be assembled on the flywheel, not off, like the pic is.
The 3rd pic, from TM Tractor, shows the clutch pedal base. 2/3 of the shiny area at the right makes contact in the hole made in the clutch housing.
The 1/3 on the left of the pic sticks through the hole.
Push the pedal base back into the housing when done oiling it.
Good luck.
- Attachments
-
-
-
-
- Similar Topics
- Replies
- Views
- Last post
-
- 19
- 1187
-
by indy61
Mon Oct 04, 2021 1:53 pm
-
-
throwout bearing should be soaked in oil? Attachment(s)
by pett3227b » Mon Jan 02, 2023 4:38 pm » in Farmall Cub - 13
- 730
-
by john2189
Wed Jan 04, 2023 7:55 am
-
-
-
My modified throwout bearing performance update
by sevy » Sat Jan 22, 2022 10:25 pm » in Farmall Cub - 14
- 623
-
by Jim Becker
Mon Jan 24, 2022 6:07 pm
-
-
-
throwout bearing yoke and drive shaft Attachment(s)
by pett3227b » Wed Apr 20, 2022 9:49 am » in Farmall Cub - 13
- 483
-
by Gary Dotson
Fri Apr 29, 2022 7:54 am
-
-
- 5
- 325
-
by Cubfriend
Wed Apr 06, 2022 9:43 am
Who is online
Users browsing this forum: Bill V in Md and 6 guests


