Servicing starter motor

marshall

Well-known member
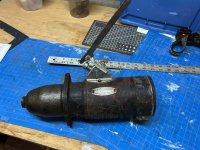
Hi folks. Last summer I replaced the switch on my starter which all of you helped me through on this thread (https://farmallcub.com/community/threads/servicing-starter-motor.118583/). Most of the problem was a bad cable connection from my battery to chassis but I got a new starter switch out of the project. This spring the tractor didn't turn over at all after putting the battery on a charger and I again went through the process of using jumper cables to check if my connection to the starter. I put it on the bench and connected from the battery directly to the starter body and nub and got no response. After rereading the my original post I decided to try rotating the starter a bit and then it immediately responded and smoothly rotated. So what does this mean? I don't have a trustworthy mechanic near me that can rebuild this 6volt delco starter (for my 1950 12 volt cub), so can I get some advice on:

If I'm just going to clean it, am I trying to get out the grime and polish surfaces with steel wool or some light abrasive? Follow up with any kind of lube?
Brush replacement. I'm not even sure what the brushes are. THe shot of the inside shows me those 4 arm-like things. Are they brushes? The openings in the sides of the starter allow me to view them (also in an image in that original thread) but I don't really see how I'd get them off for replacement. This end only moves out a little bit but feels connected (via wires?) to something and so I'm not sure how I can really get into that area to replace parts. The side-screws on the starter body will not turn so if they have anything to do with releasing the end, I don't think I can get them free.

Assuming, you can tell me how and what needs to be replaced here, can anyone refer to the kit of brushes I'd need for this starter?
 

Attachments

  • IMG_5190.jpg
    IMG_5190.jpg
    1.8 MB · Views: 28
  • IMG_5191.jpg
    IMG_5191.jpg
    1 MB · Views: 30
  • IMG_5193.jpg
    IMG_5193.jpg
    801.2 KB · Views: 29
  • IMG_5197.jpg
    IMG_5197.jpg
    959.6 KB · Views: 29
From what I've learned about your symptoms you probably have a bad armature. You'll have to find a starter rebuild service to get it fixed. They're available, Maybe someone will post a source. JMHO Stan
 
You may have a bad armature. But maybe it just needs to be cleaned up. A generator shop would test it and if OK otherwise use a lathe to clean up the commutator. A do-it-yourself option would be to clean the commutator and see if it works. Clean it with sandpaper until it is shiny. Then use a hacksaw blade to get any junk out of the spaces between the segments. These spaces need to be "undercut" so they are recessed between the segments.

Your brushes (shown in your third picture) are very worn out. New brushes are pictures in the old thread you pointed to and are inexpensive. They are each held with a single screw. You will end up fighting with the wires that connect to them. The big screws that go in from the outside hold the pole shoes and thus the field coils in place. Don't bother trying to remove them. The only other wear parts are the bushings in each end. They are cheap and fairly easy to change. New brushes and bushings are probably all it needs. They are so inexpensive relative to the cost of a rebuilt unit, it is worth a try to simply replace them.

You want to clean the whole thing up the best you can. Keep things dry, at most use a damp rag to clean it. Don't spray it down with solvents or water.
 
Hi,
In your pictures, I see the brushes are worn down lots. When the brushes wear down to a certain length, the starter won't work anymore. They need replacing.
I see the large part of the armature has been rubbing lots inside the starter. This means the bushing at each end of the starter is worn. The armature should not rub any inside the starter. Rubbing makes the starter run slow, and wears the armature. The bushings need replacing.
Don't use the starter any more with the worn bushings, it will keep wearing the armature on the metal parts in the case. The bushings are pressed into the holes in the housings.
If you don't want to repair it yourself, I would take it to a starter repair shop for repair.
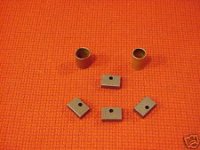
Below is a picture of new brushes and bushings.
I sent you a message. You get to it at the upper right of the page.
 

Attachments

  • Cub starter brushes.jpg
    Cub starter brushes.jpg
    9.5 KB · Views: 5
Last edited:
I had brushes wear almost halfway through the holders. They even did some damage to the armature itself.
Knowing i should have touched up the armature on a lathe and replace the holders, I slapped new brushes in the worn out holders and hit the armature lightly with sandpaper. Still working today after more than a few years.
The 6 volt starters running on 12V are. TOUGH. My 63 starts faster than you can get off the pull rod.
Pretty sure the worn brushes were primarily from the 6V days from way back.
Total cost to repair, under $20.
Contrast that with my 12V starter repair at a starter shop…$150.
 
I'm finding it hard to read the serial number on my starter but people on here identified it as a Delco 6 volt. I found this kit for replacing brushes and bushings on ebay. It looks similar to the image Glen posted. Can someone tell me if this is the right one or post me a link to a kit on Steiner or TMTractor where I get the right ones. Thanks. Hoping some new brushes and a new set of points will get me back to operational before too long
 
Hoping some new brushes and a new set of points will get me back to operational before too long
The brushes and bushings you put the link to above are right for the Delco 6 volt starter on the Cub.
The starter needs new bushings too, they are worn out.
Use something round slightly smaller than the OD of the bushings to drive them out, so the driver isn't tight in the holes as it goes through the holes.
The model number of the starter is at the left side of the ID plate, it is used to identify the starter.
The serial number is at the right side of the plate, it isn't needed to identify the starter.
Be sure to clean the parts, and inside the case. Use rags and not solvent on the armature, or inside the case.
Sand the commutator, where the brushes run on, with fine sandpaper, 400 grit or finer, so it is shiny and clean. Wipe off all sanding with a clean rag.
Check the bolts holding the ends of the spring on the drive, be sure they are tight.
 
Last edited:
Back
Top