Interesting find

Sledstormed

New member
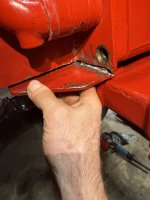
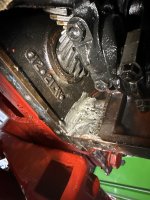
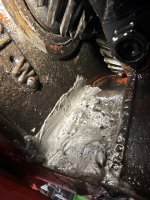
I’m starting to tear down my 51 Cub for rings/valves and noticed I couldn’t remove the oil pan due to a bracket that was bolted to it in the way. Could not find a threads with this bracket so I cut the weld and dropped the pan. Then I noticed this silver sealant plastered in the front right corner of the block. Looks like the front of the block comes off. Do I need to remove this to replace the front seal. It’s currently leaking oil. I can’t tell if the previous owners welded underneath the sealant to repair a crack or just to stop an oil leak. Has anyone seen this type of a repair job before? Thanks
 

Attachments

  • IMG_8982.jpeg
    IMG_8982.jpeg
    1.2 MB · Views: 59
  • image.jpg
    image.jpg
    1.3 MB · Views: 60
  • image.jpg
    image.jpg
    1.5 MB · Views: 59
If you are overhauling the engine, now would be a good time to replace the block. No point in putting money into a broken block. For what it’s worth, JPTractor Salvage (573)783-7055 has a good deal on blocks that have been hot tanked and checked for cracks, bored w/new pistons and rings. It might be an easy way to get to your final result. Good Luck with your project! P.S. I can’t remember but they may have a valve job too. Check with them. They are good people to deal with and they will ship it to you.
 
Last edited:
If you are overhauling the engine, now would be a good time to replace the block. No point in putting money into a broken block. For what it’s worth, JPTractor Salvage (573)783-7055 has a good deal on blocks that have been hot tanked and checked for cracks, bored w/new pistons and rings. It might be an easy way to get to your final result. Good Luck with your project! P.S. I can’t remember but they may have a valve job too. Check with them. They are good people to deal with and they will ship it to you.
I spoke to JP to day and they do have blocks ready to ship with new pistons valves and cam. They do have some cranks that are .20 to .30 over however they will not set them for customers due to issues in the past. Is there a trick to setting these cranks? They said they would provide the rod and crank bearings just not set it.
 
I spoke to JP to day.........Is there a trick to setting these cranks? They said they would provide the rod and crank bearings just not set it.
Your best bet is to get the engine rebuild service manual and follow the instructions in it. It's been a good source of information for about 70 years. JMHO Stan
 
I don’t believe there is any trick to it. The main thing is don’t turn your rod caps and main caps around backwards. There are machined for one assembled direction. If they are turned around the machined surfaces could be misaligned. If you have a service manual, follow it. When you take your block apart, number the caps and block and mark the direction they go together. Number the sides of the rods with matching numbers top and bottom. Normal engine rebuilding skills for most engines. Plastigage all of the bearing and use plenty of assembly lube. I like the red sticky stuff in a bottle.after checking each bearing, remove the plastigage from the bearning and crankshaft surface and rotate assembly to be sure there is no bind. Note: there will be some drag from the rings in the bore. Should not be too severe. One additional note. Use the factory torque specs for the main saddles, rod caps and head bolts. Use some kind of sealer on the end of the head bolts. They go into the water jacket. Also put sealer on the two bolts on the front of the head that mount the air cleaner. Make sure that all plugs in the oil galleys get put back in before assembly. I believe there is one behind the cam gear.
 
Last edited:
2 different Rods,bearings and crank used so be careful that you are using the correct ones together
 
When you take your block apart, number the caps and block and mark the direction they go together. Number the sides of the rods with matching numbers top and bottom.
They were originally marked with the position in the engine (1, 2, 3, or 4) on both the connecting rod and the cap, camshaft side. New replacements (obviously) would not be numbered. So, usually you just need to verify the markings are present. Mark any that you can't find an existing mark.
 
Hi,
Below is the Cub and LoBoy service manual, it has lots of info.
I would read the engine section, section 1, before working on the engine.
There is a contents beginning on page 1 of most sections, that makes it easier to use online.
The crankshaft info begins on page 1-47, and tells how to use plastigauge. They sell plastigauge at auto parts stores, NAPA has it in my area. Plastigauge is like a small string.
There are different colors of plastigauge for different thicknesses. You probably need the green plastigauge.
Info for using Plastigauge on the connecting rod bearings is on page 1-34.
The manual says all the crankshaft bearing clearances should be .002" - .003"
https://farmallcub.club/rudi/farmallcub.com/rudi_cub/www.cleancomputes.com/Cub/Blue Ribbon Service Manuals/GSS-1411 Service Manual for Cubs and Lo-boy Tractors/index.html

Wipe the front and back of the new bearings, and all surfaces where the bearings fit into, with a clean rag, before putting the bearings into the rods, or block, or caps, to be sure there is no oil or grit. Wipe all oil off where the caps fit against the rods or block, so the thickness of the oil doesn't interfere with the bearing clearance.
This manual was made in the 1970's so it has 6 volt, and newer 12 volt electrical system info. :)
 
Last edited:
They were originally marked with the position in the engine (1, 2, 3, or 4) on both the connecting rod and the cap, camshaft side. New replacements (obviously) would not be numbered. So, usually you just need to verify the markings are present. Mark any that you can't find an existing mark.
Thanks Jim, for the clarification!
 
Back
Top