
You are using an out of date browser. It may not display this or other websites correctly.
You should upgrade or use an alternative browser.
You should upgrade or use an alternative browser.
Had to get it running to see what all is wrong with it.
- Thread starter mrbushhog
- Start date


Dale Finch
501 Club
Take LOTS of photos as you go along! I then use those to complete the records in my log book, so I can keep track of what I've done.
Sunday I learned a lot about working on the cub. Doing things get easier and faster the more you do them for sure.
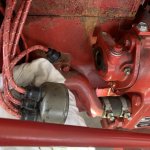
I put in new points and condenser and it really made a difference in how it runs. It runs for more than 5-8 while driving now. I tried to install the points and condenser with the distributor on the tractor. Easier for me to take the distributor off and put parts on it on a work bench. Did it a few times because I would forget something or did not know what I was doing. Tractor runs really quiet now , kinda neat.
I looked at the rad. cap and noticed it has a pressurized cap. Going to order the right one from a vender on here in a day or two.
Also getting tired of the fuel sediment bowl issues so I am going to start slowly piece a new valve setup to put on.
I put in new points and condenser and it really made a difference in how it runs. It runs for more than 5-8 while driving now. I tried to install the points and condenser with the distributor on the tractor. Easier for me to take the distributor off and put parts on it on a work bench. Did it a few times because I would forget something or did not know what I was doing. Tractor runs really quiet now , kinda neat.
I looked at the rad. cap and noticed it has a pressurized cap. Going to order the right one from a vender on here in a day or two.
Also getting tired of the fuel sediment bowl issues so I am going to start slowly piece a new valve setup to put on.


Below are pages from a manual on here showing the Battery Ignition unit, and the points and condenser, if you need them. It shows the style of coil IH used for years. Some of the coils have quit, and have been replaced with newer coils, with the posts all at the same end of the coil.
https://farmallcub.club/rudi/farmallcub.com/rudi_cub/www.cleancomputes.com/Cub/Cub Optional Equipment Manuals/Battery Ignition Packages for Tractors/Page-11.jpg
https://farmallcub.club/rudi/farmallcub.com/rudi_cub/www.cleancomputes.com/Cub/Cub Optional Equipment Manuals/Battery Ignition Packages for Tractors/Page-12.jpg
The post for the wire on the side of the distributor points straight to the right, when the engine is timed right. Then the cap is turned the right way, number one spark plug wire goes at the upper right post on the cap, looking forward from behind the cap. The cap only fits one way.
The distributor has to be put in the base with the gear turned to the right position.
It's easier to check it if you turn the engine to number 1 cylinder TDC before removing the distributor.
The 1949 Cub owner's manual on here doesn't have any info about a Battery Ignition unit.
I think the 1st operator's manual on here with that info is the 1952 operator's manual.
I think you said before that it drips. Tightening the nut at the handle should stop the dripping from the shaft there, if that is where it drips. Don't tighten it too tight, it makes the handle hard to turn.
I sent you a message, you get to it near the top right of the page.
https://farmallcub.club/rudi/farmallcub.com/rudi_cub/www.cleancomputes.com/Cub/Cub Optional Equipment Manuals/Battery Ignition Packages for Tractors/Page-11.jpg
https://farmallcub.club/rudi/farmallcub.com/rudi_cub/www.cleancomputes.com/Cub/Cub Optional Equipment Manuals/Battery Ignition Packages for Tractors/Page-12.jpg
The post for the wire on the side of the distributor points straight to the right, when the engine is timed right. Then the cap is turned the right way, number one spark plug wire goes at the upper right post on the cap, looking forward from behind the cap. The cap only fits one way.
The distributor has to be put in the base with the gear turned to the right position.
It's easier to check it if you turn the engine to number 1 cylinder TDC before removing the distributor.
The 1949 Cub owner's manual on here doesn't have any info about a Battery Ignition unit.
I think the 1st operator's manual on here with that info is the 1952 operator's manual.
There was a post on here recently about which new gas strainers were good. TM Tractor Parts on here has new ones.Also getting tired of the fuel sediment bowl issues so I am going to start slowly piece a new valve setup to put on.
I think you said before that it drips. Tightening the nut at the handle should stop the dripping from the shaft there, if that is where it drips. Don't tighten it too tight, it makes the handle hard to turn.
I sent you a message, you get to it near the top right of the page.
Last edited:
staninlowerAL
501 Club
Here's one fix.I did get the messages from you Glen, even printed them out.
The sediment bowl valve still lets gas through. My plan it to work on it and fix it, but...the next time it leaks have a new/different valve setup ready to go.
Attachments
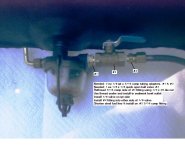
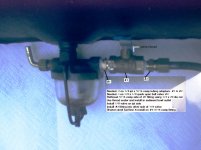
If your sediment bowl is leaking around the shut off valve, go to a hardware and get a roll of graphite packing: https://www.menards.com/main/plumbi...packing/9d00080793/p-1444428630387-c-8544.htm Back the valve out a way's and completely remove the nut and slide it back out of the way. Put at least 2 rounds of the graphite packing around the stem of the valve, packing it in with a very small screwdriver then run the valve stem nut back in, then snug the nut. I did the one on my one Super C 6-7 years ago, and another on my 140. Still seals it off with no leaks.
I do like that route with keeping the sediment bowl. Keeps looking nice and original looking.Here's one fix.
Hi,
In your video, where it shows the left side of the Cub, and showing the choke rod, it looks like the rod is down rubbing on the Touch Control tubes.
The rod is supposed to be up, just above the tubes.
The rod can wear into the tubes from engine vibration over time if it is rubbing on the tubes.
Below is a page from the 1955 Cub operator's manual showing the engine, and the choke rod is just above the tubes.
https://farmallcub.club/rudi/farmallcub.com/rudi_cub/www.cleancomputes.com/Cub/Cub Owner's Manuals/McCormick Farmall Cub Operator's Manual 12-20-55/Page 17.jpg
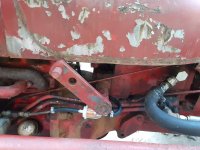
To fix it, you will need to disconnect the rod from the carburetor, and bend it at the bend shown in the pic. Increasing the bend should raise the rod up above the tubes.
The arm on the engine side of the carburetor that the choke rod connects to should be facing about straight down when the choke is fully open, and the rod is the original length. The arm can loosen on the shaft, be sure it is tight.
Below is a picture of the choke rod.
In your video, where it shows the left side of the Cub, and showing the choke rod, it looks like the rod is down rubbing on the Touch Control tubes.
The rod is supposed to be up, just above the tubes.
The rod can wear into the tubes from engine vibration over time if it is rubbing on the tubes.
Below is a page from the 1955 Cub operator's manual showing the engine, and the choke rod is just above the tubes.
https://farmallcub.club/rudi/farmallcub.com/rudi_cub/www.cleancomputes.com/Cub/Cub Owner's Manuals/McCormick Farmall Cub Operator's Manual 12-20-55/Page 17.jpg
To fix it, you will need to disconnect the rod from the carburetor, and bend it at the bend shown in the pic. Increasing the bend should raise the rod up above the tubes.
The arm on the engine side of the carburetor that the choke rod connects to should be facing about straight down when the choke is fully open, and the rod is the original length. The arm can loosen on the shaft, be sure it is tight.
Below is a picture of the choke rod.
Attachments

Last edited:
Below is a listing at TM Tractor Parts for a new gas line. The upper 4 pictures on the page would be like your Cub would have.
You have to have the original size and thread holes in the gas strainer and carburetor to use the fittings the line comes with.
You have to have the original size and thread holes in the gas strainer and carburetor to use the fittings the line comes with.
staninlowerAL
501 Club
Carb and sediment bowl are 1/2 x 20 straight (NF bolt) threads. Pipe thread fittings will mess things up and you'll be helicoiling the parts. JMHO Stan.....You have to have the original size and thread holes in the gas strainer and carburetor to use the fittings the line comes with.....
A clear reinforced hose section about an inch long was slit on the side to go over line where it touches tractor ahead of touch control. (Not visible in pictures.)
Insulation from friction and heat.
Fuel strainer unit removed had cork gasket petrified in the corners of it's groove. reaching in under the tank and scraping it out with fingernails didn't work.
I'd put a ball valve on the other Cub years ago.

Insulation from friction and heat.
Fuel strainer unit removed had cork gasket petrified in the corners of it's groove. reaching in under the tank and scraping it out with fingernails didn't work.
I'd put a ball valve on the other Cub years ago.
Last edited:
dang I wish I saw your setup sooner. I could have saved a few dollars on brass fittings. That looks nice.A clear reinforced hose section about an inch long was slit on the side to go over line where it touches tractor ahead of touch control. (Not visible in pictures.)
Insulation from friction and heat.
Fuel strainer unit removed had cork gasket petrified in the corners of it's groove. reaching in under the tank and scraping it out with fingernails didn't work.
I'd put a ball valve on the other Cub years ago.
View attachment 74242View attachment 74243