Gas leak at sediment bowl on 49 cub.

unkalunk

Active member
I'm working on magneto issues on my 49 cub but I also have a steady drip coming from the gasoline shut-off valve at the sediment bowl which I also have to take care of. I've read that some just convert to a flexible fuel line with an inline filter. I'm wondering what the pros and cons are to doing this and what parts I would need. I love how the sediment bowl looks but wonder how it compares to an inline filter. Are there alternative setups that people like more than others? Is it a matter of unscrewing the current apparatus and screwing in new parts from the hardware or auto parts store? Thank you

IMG_0492.JPG
 
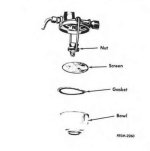
It appears that your leak is where it attaches to the tank. I can see that it's corroded and wet in the picture. I would keep it original if l could. Clean up the corrosion, drain the tank, remove the bowl assembly (carefully), clean it up thoroughly along with the female threads of the tank, then reinstall with fuel rated teflon tape or other sealant.
 
If you need to add some packing the the shut off handle, unscrew the brass nut and slide it back on the handle then wrap the stem with 3 or 4 wraps of dental floss for packing and replace the nut. Tighten just enough to stop any seepage. BTW, TSC has the cork gasket and brass screen if you need to replace them. The screen goes on top of the gasket. Take your old one in to be sure it fits, there's several different styles and sizes. JMHO Stan
EDIT: I looked at the picture and what you have is an aftermarket replacement valve that has a tee handle. The OEM valve had a brass ell shaped handle. The other info that I wrote still applies. I added a 1/4 turn quick open ball valve on the outlet side for convenience. If you want to see what it looks like I have some pictures. Stan
 

Attachments

  • Valve assy.JPG
    Valve assy.JPG
    17.4 KB · Views: 10
Last edited:
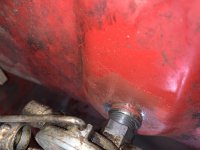
Looks to me like the leak is coming from pretty high up on the assembly. Does the leak stop or continue when the valve is shut? If it is leaking at the threads, it will continue while shut off. If leaking from the valve stem or bowl gasket, the leak will stop shortly after closing the valve.

There is one other as yet unmentioned possibility that the apparent location of the leak suggests. There could be a fatigue crack in the tank itself next to the threaded outlet of the tank. As with a leak at the threads, it will continue with the fuel turned off. I don't recall anyone reporting a crack in the tank of a Cub (although some have rusted through). But the location of the accumulated crud is suspicious. If the answer to my question points to a problem with the threads or tank, clean it up and dust it with talc or chalk to pinpoint the leak.
 
Looks to me like the leak is coming from pretty high up on the assembly. Does the leak stop or continue when the valve is shut? If it is leaking at the threads, it will continue while shut off. If leaking from the valve stem or bowl gasket, the leak will stop shortly after closing the valve.

There is one other as yet unmentioned possibility that the apparent location of the leak suggests. There could be a fatigue crack in the tank itself next to the threaded outlet of the tank. As with a leak at the threads, it will continue with the fuel turned off. I don't recall anyone reporting a crack in the tank of a Cub (although some have rusted through). But the location of the accumulated crud is suspicious. If the answer to my question points to a problem with the threads or tank, clean it up and dust it with talc or chalk to pinpoint the leak.
I chased a leak on one of my cubs and FINALLY found what I believe Jim Becker described. There was a crack in the spot welding that held the threaded piece in the tank.

I took it off the tractor, turned it upside down and cleaned it REALLY well. Then I made what looked like a weld bead of JB WELD all the way around the spot-welded area of the fitting. I let it dry for a couple days, installed the sediment bowl assembly, then added gas (after turning it right side up, of course!!).

No more leak! (At least so far! But it's been over a year)
 
I went through two sediment bowls on my 48, both leaked through the stem of the shutoff valve. Got fed up and swapped to a rubber line, plastic shutoff, and inline filter and never looked back. Runs great on this setup and I don’t have to hear the wife complain about the garage smelling like gas.
 
I went through two sediment bowls on my 48, both leaked through the stem of the shutoff valve.
Hi,
The nut at the gas shutoff handle of the original style gas strainer has a packing inside it. Tightening the nut slightly should make it stop leaking gas, if the gas was dripping out onto the Cub.
The nut has to be tightened the right amount, too loose and it can leak gas out, too tight and the handle could be hard to turn.
When working on the gas strainer, it is easier to get to it if you move the Touch Control arms to the rear or down position, before beginning the work.
 
Looks to me like the leak is coming from pretty high up on the assembly. Does the leak stop or continue when the valve is shut? If it is leaking at the threads, it will continue while shut off. If leaking from the valve stem or bowl gasket, the leak will stop shortly after closing the valve.

There is one other as yet unmentioned possibility that the apparent location of the leak suggests. There could be a fatigue crack in the tank itself next to the threaded outlet of the tank. As with a leak at the threads, it will continue with the fuel turned off. I don't recall anyone reporting a crack in the tank of a Cub (although some have rusted through). But the location of the accumulated crud is suspicious. If the answer to my question points to a problem with the threads or tank, clean it up and dust it with talc or chalk to pinpoint the leak.
Thank you for the talc idea. It leaks whether turned on or off unfortunately and now that others have mentioned it I see in my picture that it's leaking from high up near the tank.
 
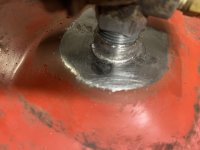
Hi- I removed the tank from the tractor, cleaned it up and took pictures. I tried carefully to unscrew the the valve assembly and it was pretty tight and I didn't want to force it. Should my next move be to set right side up and add gas to better identify where the gas is coming from?

You can see in the pictures it doesn't show much corrosion but there is a gap between the tank and the collar that has the female threads.
You can see the gap in the first and third photo.
 

Attachments

  • IMG_0620.JPG
    IMG_0620.JPG
    1.5 MB · Views: 29
  • IMG_0621.JPG
    IMG_0621.JPG
    1.5 MB · Views: 27
  • IMG_0622.JPG
    IMG_0622.JPG
    1.7 MB · Views: 27
Last edited:
Hi- I removed the tank from the tractor, cleaned it up and took pictures. I tried carefully to unscrew the the valve assembly and it was pretty tight and I didn't want to force it. Should my next move be to set right side up and add gas to better identify where the gas is coming from?

You can see in the pictures it doesn't show much corrosion but there is a gap between the tank and the collar that has the female threads.
You can see the gap in the first and third photo.
When your first picture is magnified, it shows the leaking spot (IMO) and is what Dale described in an earlier post (and what Jim described a metal fatigue). I would clean the area to bare metal, de-grease it with alcohol and try a JBWeld patch much like she described. Clean is the key to the epoxy sticking as any oil or residue will prevent a good adhesive bond. About the only other option is to remove the valve assembly completely, clean/inert the interior of the tank and weld or silver solder the break. If you can find a good "old time" radiator shop they could probably do the job for you. JMHO Stan
 
When your first picture is magnified, it shows the leaking spot (IMO) and is what Dale described in an earlier post (and what Jim described a metal fatigue). I would clean the area to bare metal, de-grease it with alcohol and try a JBWeld patch much like she described. Clean is the key to the epoxy sticking as any oil or residue will prevent a good adhesive bond. About the only other option is to remove the valve assembly completely, clean/inert the interior of the tank and weld or silver solder the break. If you can find a good "old time" radiator shop they could probably do the job for you. JMHO Stan
That is exactly what my issue was, and where the leak was. Fortunately, I was able to remove the sediment bowl, so that it could be cleaned now and in the future. You might consider, for that reason, trying again to remove the sediment bowl now, while it's accessible. Of course you take the chance of breaking that weld completely out. 🤔

As Stan said, clean it very thoroughly before your repair, and I think the JB weld worked fine.
 
That is exactly what my issue was, and where the leak was. Fortunately, I was able to remove the sediment bowl, so that it could be cleaned now and in the future. You might consider, for that reason, trying again to remove the sediment bowl now, while it's accessible. Of course you take the chance of breaking that weld completely out. 🤔

As Stan said, clean it very thoroughly before your repair, and I think the JB weld worked fine.
Just to clear up one bit of info, as I recall, Dale did not completely remove the entire valve, only the glass bowl and bail. This approach removes the possibility of more leaking at the threads (providing there's none now). Stan
 
I've cleaned it up a lot more as you can see. I used a dremel with a fine pointed metal tip to get into the tight spots and sandpaper and wire brush for the larger flat areas. It appears there is still rust in the crack. I'm wondering about using Klean Strip which I think is phosphoric acid. It should convert rust to an inert compound to at least slow if not stop the rusting progression.

I don't want to remove too much metal chasing after the small amount of rust in the crack with the dremel. Would the acid treatment help by reaching the inaccessible bit's of rust? Do others use that kind of acid inside the gas tank to just slow down the rusting?
 

Attachments

  • IMG_0652.JPG
    IMG_0652.JPG
    1.2 MB · Views: 14
  • IMG_0653.JPG
    IMG_0653.JPG
    1.9 MB · Views: 14
JMHO, the bit of rust in the crack will not cause any problem once it is isolated by the coating on the outside and the fuel on the inside. No more opportunity to have any contact with air/oxygen should stop the rusting process. Stan
 
JMHO, the bit of rust in the crack will not cause any problem once it is isolated by the coating on the outside and the fuel on the inside. No more opportunity to have any contact with air/oxygen should stop the rusting process. Stan
I think the JB Weld did the trick. But now it is leaking from the valve. I wish I had tested before putting the tank and hood back on😖 . I was able to turn the nut next to the T handle on the valve could not budge the main part of the valve that threads into the sediment bowl assembly. Rereading earlier posts it seems like I could repack that nut with dental floss. Didn't realize floss is basically teflon, made with nylon and ptfe which is teflon and both are resistant to gas. Also read that someone rolled teflon tape into a string and used that inside the nut.
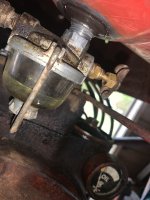
So is the idea to wind the packing loose enough that it can be pushed up inside the nut? I'm wondering how this is different than say wrapping teflon tape tightly on the threads to stop a leak?
 

Attachments

  • IMG_0686.JPG
    IMG_0686.JPG
    1.5 MB · Views: 6
Back
Top