Farmall Cub Fuel Line Question

RunningRed

Well-known member
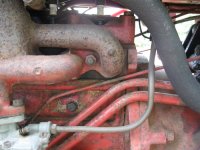
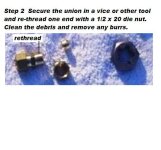
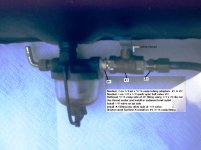
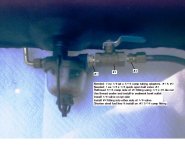
Hey guys, the time has come around to replace the metal fuel line on my Cub. I tried last year to replace it with a piece of brake line but failed to do so because my Cub has a filter after the sediment bowl. It looks just like the sediment bowl but is filled with a pumice like material. The problem is this sticks out far enough that I can't get a sharp enough bend to clear the rock shaft without collapsing the metal line. It's also put on with 90degree brass fittings that make it a job to change because I have to take the fuel tank off the Cub and remove the sediment bowl from the tank to remove the other filter because there isn't enough clearance there to spin it off without hitting the fuel tank. I also seen a few people mention that the threads are 1/2-20 but the ones on mine are NPT. Can someone help me with what I need to get this done?
 
Hi,
If the gas tank is clean inside, you could take off the 2nd filter, and use only the original one.
It is supposed to have a filter screen in it, above the bowl gasket. Sometimes the screen is gone.
Sometimes if the gasket is old, and you remove the bowl, the gasket doesn't seal if you try to reuse it.
TM Tractor Parts sells the screen and gasket.
To bend the tubing without it collapsing in one place, it is helpful to bend it around something rounded, and solid, that you can push on, about the size you want the bend to be. Bend the tubing slowly.
Below is a listing for a new fuel line at TM Tractor Parts, you can look at the pictures. It shows the shape they originally are. Yours would be like in the upper 2 pictures, of the pictures showing the tubes installed. :)
http://www.tmtractor.com/new/fl/864fp.htm
 
Last edited:
Hi,
It looks like the choke rod is down rubbing on the Touch Control tubes.
The rod is supposed to be up, just above the tubes.
The rod can wear into the tubes from engine vibration over time if it is rubbing on the tubes.
Below is a page from the 1955 Cub operator's manual showing the engine, and the choke rod is just above the tubes.

To fix it, you will need to disconnect the rod from the carburetor, and bend it at the bend shown in the pic. Increasing the bend should raise the rod up above the tubes.
The arm on the engine side of the carburetor that the choke rod connects to should be facing about straight down when the choke is fully open, and the rod is the original length. The arm can loosen on the shaft, be sure it is tight.
Below is a picture of the choke rod. :)
 

Attachments

  • Cub.jpg
    Cub.jpg
    99.2 KB · Views: 5
Last edited:
I can't see the connecting fittings between the two parts well enough to tell how they are put together (tubing/screwed pipe, etc) but that being said you might consider extending the outlet connecting point horizontally from the second filter far enough to clear the manifold/exhaust, then making a 90 degree turn downward with an ell so that the line to the carb connects to the ell from the bottom in a straight line position rather than the short radius bend in the tubing as it is. That would allow you to keep the second filter in the position that it is now located if you prefer to keep it there. JMHO Stan
 
Hi,
It looks like the choke rod is down rubbing on the Touch Control tubes.
The rod is supposed to be up, just above the tubes.
The rod can wear into the tubes from engine vibration over time if it is rubbing on the tubes.
Below is a page from the 1955 Cub operator's manual showing the engine, and the choke rod is just above the tubes.

To fix it, you will need to disconnect the rod from the carburetor, and bend it at the bend shown in the pic. Increasing the bend should raise the rod up above the tubes.
The arm on the engine side of the carburetor that the choke rod connects to should be facing about straight down when the choke is fully open, and the rod is the original length. The arm can loosen on the shaft, be sure it is tight.
Below is a picture of the choke rod. :)
Yea my ear off the carb that the choke rod goes into broke off awhile back, I plan on getting a new one at some point. I will take it out just to be safe until I can get a new one.
 
I can't see the connecting fittings between the two parts well enough to tell how they are put together (tubing/screwed pipe, etc) but that being said you might consider extending the outlet connecting point horizontally from the second filter far enough to clear the manifold/exhaust, then making a 90 degree turn downward with an ell so that the line to the carb connects to the ell from the bottom in a straight line position rather than the short radius bend in the tubing as it is. That would allow you to keep the second filter in the position that it is now located if you prefer to keep it there. JMHO Stan
I can't do that because it will be in the way of the rock shaft. If I can get away with taking it off I'd rather do that instead. I was considering just putting a rubber hose on but I don't think I'll do that. Do you happen to know the size of line I need and the fittings?
 
......Do you happen to know the size of line I need and the fittings?
5/16 steel brake line is a good replacement if you want to make one. The male threads 1/2 x 20 NF bolt threads on the brake line are correct for both the OEM carb and sediment bowl if no one has changed them. The 5/16 ferrules provides the seal. My personal preference is to use a brass 5/16 compression union as a connector at the sediment bowl and carb. Rethread the male thread on one end with a 1/2 x 20 die nut so it will screw into the carb and sediment bowl and the 5/16 steel line with compression ferrules and nuts will make it a lot easier to remove the fuel line without damaging the soft metal of the carb and sediment bowl. JMHO Stan
EDIT: Reread your first post where you were dealing with npt, so you'll have to figure out what works. The appeal of the compression union that I described is you can seal it in place and probably not have to remove it again. Just remove the steel line at the compression nuts/ferrules. Also a tubing bender tool or a small diameter pulley helps to shape the line without flattening it in the bends. Good Luck!!
 

Attachments

  • Step 2 union.JPG
    Step 2 union.JPG
    34.7 KB · Views: 8
  • Vlave+1.JPG
    Vlave+1.JPG
    171.9 KB · Views: 8
  • Valve+2.JPG
    Valve+2.JPG
    60.2 KB · Views: 8
Last edited:
Back
Top