Compression test vs Leak down test

randyny

Active member
I learned something in real life today so I figured I'd share.

I had honed and re-ringed a cub a few years ago after which I had compression of ~120 in all cylinders. Over time and with just "fun" use -no real work- the blue smoke has gotten worse and worse. Lots of blue smoke at anything over idle, oil residue out of the muffler, and even oil on the head around the spark plugs. Don't know how that's possible, but there it is.

We all know that rings cause the burning oil but I did some research on the leak down test and was intrigued that I can check valve condition, head gasket, and rings. Check it out:

Cylinder compression Leak down test
1 105 40
2 112 85
3 110 32
4 110 94

So the compression is good but still bad shape on 2 cylinders. For the bad ones air was coming out the oil fill but also the valves, mostly exhaust. I did do a manual valve cut and lap but, you know, I'm an amateur and to my eyes it looked good. The compression test was done by spinning the motor with the starter. It makes sense that it is that high as each compression stroke bumps the pressure up a bit until it reaches steady state.

Regardless, the valves will improve power but that's not a problem. The oil burning is. I will replace the rings again. So what went wrong? I can't say for sure. I used plenty of assembly lube, but I gave lots of demos of engine operation to my kids (and me) by spinning the open motor with a right angle drill. Also, I know I did not prime the pump properly, although I was watching the pressure gauge on startup and it came up quickly.

I honed with the straight stone-type hone and did not get the nice cross-hatch pattern I get with the ball-type I use now. So that may have contributed.

The motor starts instantly and runs like a top. But the oil is bad enough now that we don't want to drive it. We will do the rings with the motor in place and will reveal results.
 
measure the bore to make sure it is within specs, it is worn or these old engines the cylinders tend to wear out tapered and need to be bored
 
What TST said.

With that kind of compression and pumping oil. My guess is the oil scrapper rings. Could be installed upside down.
 
Also check the fit of the rings in the ring grooves of the pistons. The grooves could be badly worn. Excess space there turns each piston ring into a little oil pump.
 
I didn't know the second ring was an oil wiper ring, I believe the manual merely said second compression ring. Researched how those rings work and wrong-way rings do describe my symptoms. I'm certain I did it the right way but there's only one way to prove it. I will also mic the cylinders now that I have real calipers and bore gauge as well.

Also found a terrific vid by Antique Cars and Stuff channel on YT and I am going to go over the valves again.
 
randyny":3le2k9sd said:
I didn't know the second ring was an oil wiper ring, I believe the manual merely said second compression ring.
Piston rings shape and design vary by manufacturer. Written instructions or marks on the rings are provided for proper installation.

Go by the provided instructions or marks, not the IH Service Manual.
 
We opened her up and mic'd the bores. Note that this motor probably has <50 hours on it since I replaced the rings. Oil all over but one cylinder on the head is dry but still messy. All the rings had the taper to the bottom which is anecdotally correct though I do not have the docs from the ring kit. The oil all over the cylinder walls I attribute to pumping 100psi into the block during the leakdown test. I should have fired it up again right after. After wiping down I don't see any crosshatch pattern.

The measurements are over the 2.627 max acceptable but is that really going to cause huge oil leakage?

My plan is to ball hone, check/lap valves, put new rings in. These ones says "STD TOP" on the 2nd rings so no confusion there. If this doesn't reduce smoke considerably I will bore the block but I'd rather not have to go that route. I'm not doing it now because I have another torn down motor in progress. One at a time... - this is just a normal service.
 

Attachments

  • 20240430191022_Vga.JPG
    20240430191022_Vga.JPG
    62.3 KB · Views: 270
  • 20240430191036_Vga.JPG
    20240430191036_Vga.JPG
    69.5 KB · Views: 269
  • Screenshot 2024-05-01 105925.jpg
    Screenshot 2024-05-01 105925.jpg
    76.5 KB · Views: 270
Slip your rings into the bores about 1/2" - 3/4" down from the top of the cylinder and again down near the bottom of the ring travel and measure the end gap. Excessive end gap will allow oil to enter the cylinder bore. When you adjust the end gap on your new rings, do it in the middle of the bore where the wear is minimal and adjust the end gap to the ring manufacturers specs.
 
Also, make sure that the ring gaps are clocked 180 degrees from each other when installing. This forces the compression to go around the piston to find the next ring gap.
Ya don't want both gaps lined up allowing a straight path for compression to access the bottom end of the block.
 
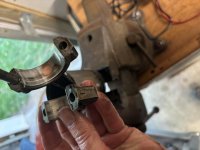
Ring gap calls for .007 - .017. The two worst ones here are .027. Also starting honing it up and it looked great compared to the before condition. I got to cylinder #3 and saw quite a rough patch in the wall. Fine, I need to bore it out. I was just going to hone it up and deal with a boring later in the season. Then I see the rod bearings with copper wear. What does that indicate? Just on the top center of each rod bearing. Oil pressure was good. I really don't get it. I try and do the right thing, got the time, the tools, micrometers, calipers, plastigauge, assembly lube, torque wrenches, service manuals, and I do tons of research on everything. Maybe it's like the guitar for me, and precision assembly is just not my thing. But I'm going to keep on going.

Anyway, I will bring it to the machine shop to see what's what.

Also check out the cylinder 2 piston. Something was bouncing around for quite some time. This was there the first time I took it apart but other than looks, didn't think much of it.
 

Attachments

  • 20240502194239_Vga.JPG
    20240502194239_Vga.JPG
    50.3 KB · Views: 169
  • 20240502193231_Vga.JPG
    20240502193231_Vga.JPG
    68.2 KB · Views: 170
  • 20240502192309_Vga.JPG
    20240502192309_Vga.JPG
    44.6 KB · Views: 172
  • 20240502193503_Vga.JPG
    20240502193503_Vga.JPG
    47.2 KB · Views: 171
  • 20240502185040_Vga.JPG
    20240502185040_Vga.JPG
    85.7 KB · Views: 171
randyny":18t7ozgg said:
. . . Then I see the rod bearings with copper wear. What does that indicate? Just on the top center of each rod bearing. Oil pressure was good. . . .
Those two things together make me wonder if somebody decided to make up for wear and get some more life out of the bearings by filing the rod caps down to reduce the clearance. I suggest that you take the connecting rods along to the machine shop so they can verify the condition.
 
piston something small was in the cylinder like a small nut/screw ??? probably and the piston took the beating, it most likely went out the exhaust at some point, , check the valve also,check valve side to side play for worn stems and guides, yes the bearing is worn out, rod bearing does not matter for oil pressure much, mostly the main bearings job, by the look of the wear on the bearing I bet that crankshaft journal is out of round
 
Looks to me like all the rod bearings showed a similar wear pattern. If only the tops are taking a beating, I'd bet that there are a couple of things are going on. TST mentioned a possible out of round crankshaft journal and I'd add to that a timing issue - where there is early timing (spark occurs prior to TDC) or pre-ignition (spark knock).
 
Back
Top