Clutch pedal adjustment

Posco

Well-known member
Didn't find anything in the archives dealing specifically with this though I imagine it's in there somewhere.

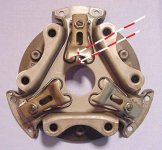
I have a 1950 Cub and my question has to do with the clutch pedal adjustment. I have that slotted adjuster under the pedal. I can't shift my cub while the tractor is running, all it will do is grind. When I turn the tractor off, put it in gear and hit the starter the tractor still wants to move even with the clutch pedal fully depressed. Any ideas?
 
Under the tractor view the distance from the throw out bearing to pressure plate fingers. You want about 1/4 inch distance.

Use something to wedge only the adjuster portion in place. Check gap again.

Once gap between throw bearing and pressure plates is correct. Loosen the bolt from the foot pedal and adjusting arm. Set the free travel distance of the pedal to 3/4 inch.

The entire process takes only a few minutes. And if you are an old guy, you only have to get on the floor once. You can adjust the wedge on the adjusting slot from the ground.
 
Hi,
There is supposed to be 1" of free play in the clutch pedal, measured at the top of it's travel, where your foot goes on the pedal.
When you set that, it also sets the distance between the throwout bearing and the pressure plate fingers.
There should be a return spring under the platform, to pull the pedal up against the edge of the platform. The 2 brake pedals should have springs too.

Below is a page from the 1950 Cub owner's manual showing the clutch and adjustment.

http://farmallcub.com/rudi_cub/www.clea ... e%2040.jpg

If it doesn't release after setting the free play, the pressure plate fingers may be adjusted too low, and need raising up.

The guys on here say the height should be 1 1/4" measured from the 2 places shown in the pic below.
The 3 fingers need to be exactly the same height, so it makes a flat surface for the throwout bearing to push on. The fingers can be adjusted through the hand hole. You need a good light for that.
The fingers are set with the pressure plate assembled on the flywheel, not off, like the pic shows.
Below is a post showing how to adjust the finger height. You have to make the tool shown in it.
Dale Finch has said that it is easier to adjust them if you loosen the free play adjustment bolt, at the clutch pedal base, and move the throwout bearing as far to the rear as it will go. This gives you more room to work.
Set the free play correctly when you are done setting the finger height. :)

viewtopic.php?f=141&t=66543
 

Attachments

  • Cub clutch 3.jpg
    Cub clutch 3.jpg
    31 KB · Views: 6,561
The problem was the throwout bearing, it was shot. Who would you recommend I get the replacement bearing from? Thanks for your help.
 
Hi,
The material sticks out of the original IH throwout bearings 5/16", it is hard to see exactly in TM Tractor's listing, but it looks like the material sticks out less than that. I don't know if that affects how they work or not. They have no side view of the bearing.
Below is a pic of a new Case IH bearing, from when they were still like the originals. :)
 

Attachments

  • Cub 2.jpg
    Cub 2.jpg
    65.8 KB · Views: 6,363
Glen":5vs1e8gy said:
Hi,
The material sticks out of the original IH throwout bearings 5/16", it is hard to see exactly in TM Tractor's listing, but it looks like the material sticks out less than that. I don't know if that affects how they work or not. They have no side view of the bearing.

Thanks for the pic, Glen. The pic from TM looks like their bearing has a projection on one side and it looks slightly recessed on the other. I assume it will work just fine, I don't want to do this again anytime soon.
 
Glen":3i9hnw3k said:
Hi,
The material sticks out of the original IH throwout bearings 5/16", it is hard to see exactly in TM Tractor's listing, but it looks like the material sticks out less than that. I don't know if that affects how they work or not. They have no side view of the bearing.
Below is a pic of a new Case IH bearing, from when they were still like the originals. :)

Bearing just arrived in the mail.
 

Attachments

  • IMG_0624.JPG
    IMG_0624.JPG
    121 KB · Views: 6,243
Hi,
Thanks for the pic of the new throwout bearing, looks like it has plenty of material.
You could check the material closely for cracks, the material is fragile, if it gets hit in the mail, it could crack. I don't know how much packing they use for mailing. :)
 
Soak it in oil first. That will get lube inside the graphite. After that regular maintenance with cheapest grease you can find. That way it will break down and separate oil into the graphite.
 
I wish I had read these last two posts earlier but the tractor is back together. Me and a fellow split it last week and put it back together this afternoon. The bearing comes greased from TM but there was no mention of soaking it in oil and consequently, I did not.

I do have another question you folks might be able to answer. We didn't notice it in time and the pivot pin the bearing yoke rides on is somewhat wallowed/worn where it rides in the yoke. I'm assuming this might lead to uneven wear and that brings me to my question. Has anyone ever replaced the pivot pin without splitting to tractor?

The clutch fingers were set at one inch. I adjusted them to an inch and a quarter.

And on closer inspection we noticed the left final drive wasn't mating. We pulled that and inserted some helicoils. One thing after the other.
 
Well.make sure you got a good bit of grease on the face of the graphite and you should be fine. The oil soak just helps soak in more lube for it.

The pivot pin you can make a way to attach the new pin to the old one like jb weld, epoxy, etc. Something that is easily removed and cleaned off. Make sure it's in line best as possible and tap it through. It is possible it will come loose from the other but at that point as long as 1 side is still held up with a bit of navy language you can finagle it through the other side.
 
Another question about the throwout bearing. The bearing has a grease fitting on the bottom of it, does the graphite absorb the grease over time? I see no outlet anywhere for the grease.
 
Hi,
Yes, the material is supposed to absorb the more liquid part of the grease.
The original bearings had a small hole at the top of the bearing to let out excess grease, as you pumped it into the grease fitting.

The holes in the throwout bearing holder, and the top pin wear should be inspected when the tractor is split, and the parts replaced if the holes are worn.
The holder has to hold the bearing in the proper position so it contacts the pressure plate fingers correctly.
If the holes and pin are worn, the holder and the bearing can move around, and the front of the bearing can wear wrong, because it is out of position.

You could reach through the hand hole and wiggle the holder, and see if the holder moves around.

TM Tractor has a new holder and pin.

http://www.tmtractor.com/new/cl/112fp.htm

http://www.tmtractor.com/new/cl/5327fp.htm
 
Thanks, Glen.
As I mentioned, the tractor is now back together. What kind of luck do you think I would have trying to replace the pivot pin without splitting the tractor again? I don't know if I can get my hands in there to manipulate the yoke or not. This is the first time I've ever split the tractor and I learned a lot.
 
Hi,
I have never replaced a top pin with the Cub together. I don't know how hard it would be.

Sorry if I didn't mention the holder and pin in the earlier posts here. It has been talked of before in other posts.

If the holes and pin are not worn, and not bent wrong, they should be ok.
 
Here is a pic of the bearing I replaced. As you can see, it's shot. What a difference it made, I can shift the Cub without all of that grinding but I am noticing some noise that sounds like the new bearing might be chattering on the cutch fingers when the tractor is running but not in gear. Can I take that out with the clutch pedal adjustment? Thanks for the help.
 

Attachments

  • IMG_0625.JPG
    IMG_0625.JPG
    205.1 KB · Views: 351
  • IMG_0625.JPG
    IMG_0625.JPG
    205.1 KB · Views: 351
Back
Top