Clutch Inspection

DonMountain

Well-known member
After much toil, I finally got my 1959 Cub Lo-Boy apart due to a bad clutch. I don't really see what is wrong with it, so I guess I will just replace all the parts? And I see there were two makes of clutches on these tractors. Do either one fit? So, my major question is, what and how do I inspect the old parts to see what I need?
 
Hi,
Yes, either of the 2 brands of clutches fits the flywheel. The Rockford pressure plate has 6 coil springs, and is the more common one, I think.
Posting some pics of the parts would be helpful, so we can see them.

There is some reason the finger height kept changing, I think you said it kept changing. Look at the adjustment screws and lock nuts. The lock nuts should be tight.

The clutch parts should look in about the same condition as new parts to reuse them. :)
 
Ok, I took a close look at all the parts, and it seems like there is a combination of worn things. The release bearing is worn down to a little under 1/4". The clutch release yoke holes are all elongated where they hold the release bearing and at the pivot pin at the top. And I would guess the clutch disk itself is probably worn too. So, I had adjusted the clutch fingers several times trying to take up all of this slack and play in all the parts. So, for the $200 I am just going to replace all the parts. The next question is, how to take off and bolt the new pressure plate/clutch disk in? I am also going to order the plastic clutch alignment tool because I can't seem to find my old tool set I bought 50 years ago. Funny how that stuff seems to disappear just when you need it. So, can I just loosen up the pressure plate bolts until it releases? Or do I need to take every other bolt out and thread in maybe a half inch longer bolt to release it completely?
 
Hi,
Just unscrew the 6 bolts that hold the pressure plate on the flywheel. The tension will go off the springs as the bolts are unscrewed.
You could unscrew them sort of evenly, but not important with one you aren't going to use again.

Tighten the bolts evenly when putting the new pressure plate on, it loads the springs as you tighten the bolts.
The longer side of the spline hole in the clutch disc goes to the rear.
Check the lining on the disc for wear, they have rivets, the lining is only a little above the rivet heads on a new disc. You can see the pics at TM Tractor's listing for a new disc.

The throwout bearing holder, and long pin at the top of it, should not be worn, or have loose fitting holes. The bearing needs to be held so it can't move around side to side.

If the rear engine seal is leaking, this is a good time to repair it. I think I wrote that before. The tractor has to be split to replace it.
Read my posts from your other post for info, before putting the clutch together, if needed.
 
I checked the clutch disk and the rivets are only 0.005" or so off of the rivets. So, I think it needs to be replaced also. Another question is, are the pressure plate fingers adjusted properly to receive the new disk at the correct dimension? Or do I need to adjust them after installation of the new pressure plate/disk?
 
I also measured the transmission shaft end that fits into the bushing on the end of the crankshaft, and it measures 0.621" with a micrometer. The book value is 0.621"=0.622", so I am good there. The inside of the bushing measures 0.628", with the allowable clearance of 0.006" between the two, that puts the bushing at only 0.001" away from acceptable. Of course that number is probably a ream-to clearance for a new tractor. So, should I leave the old one in there or try to replace it?
 
I ordered a bunch of parts for the clutch and supporting stuff from TM Tractor. I wonder how long it takes for orders to get to Mid-Missouri from them? Now I need to find all of the torque specs to put it back together. Clutch pressure plate hold-down bolts, bell-housing to engine bolts, hydraulic line bolts, and etc.
 
Hi,
They have said on here before that a new pressure plate needs the finger height set, after you assemble it on the flywheel, before putting the clutch housing on.
Set them to 1 1/4" high from the surface below, you probably know.

You could phone them and ask how long it takes parts to get to you.

It sounds like the pilot bushing is getting worn to the upper specs. If you don't feel comfortable with replacing it, you could leave it there, it won't wear much probably for a while if you grease it, before putting the clutch on.
It would be better to replace it, but you may need to ream it after installation. Don't leave it too small an ID, it won't work. You've probably read about it before.

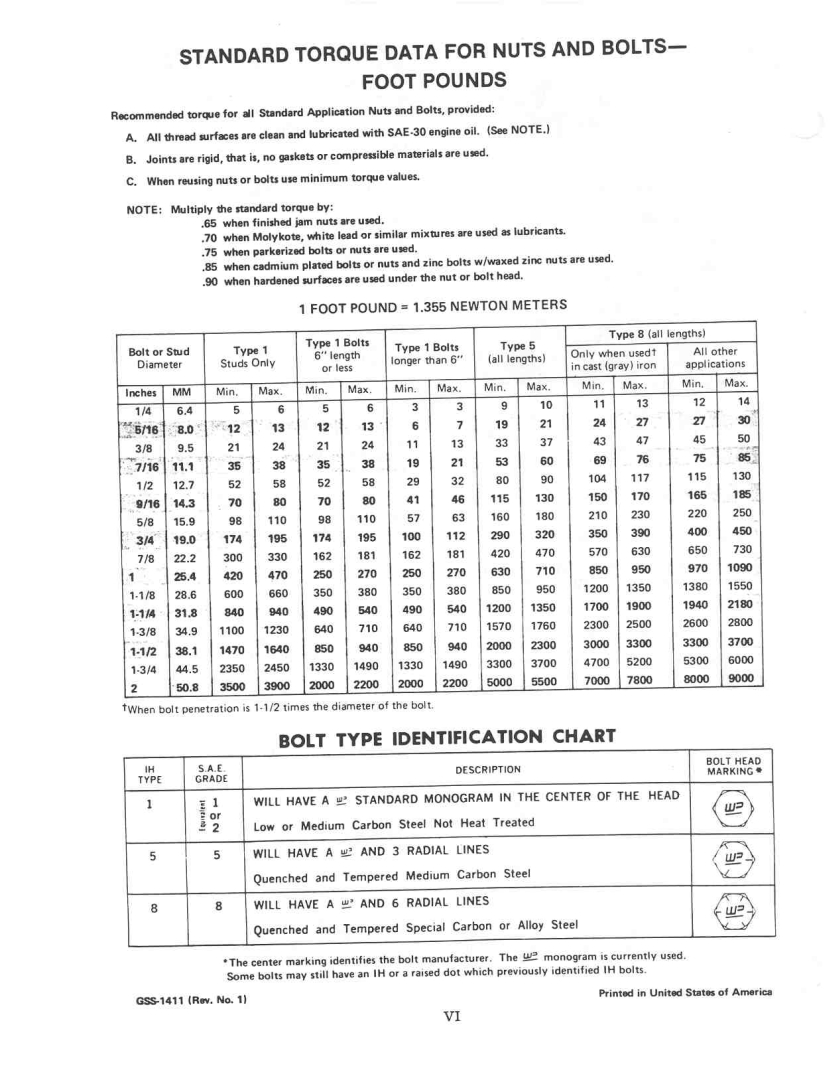
The torque table for bolts is in the Cub service manual, GSS-1411, on page 6, at the front of the manual.
I posted the manual before, Dale posted it above.
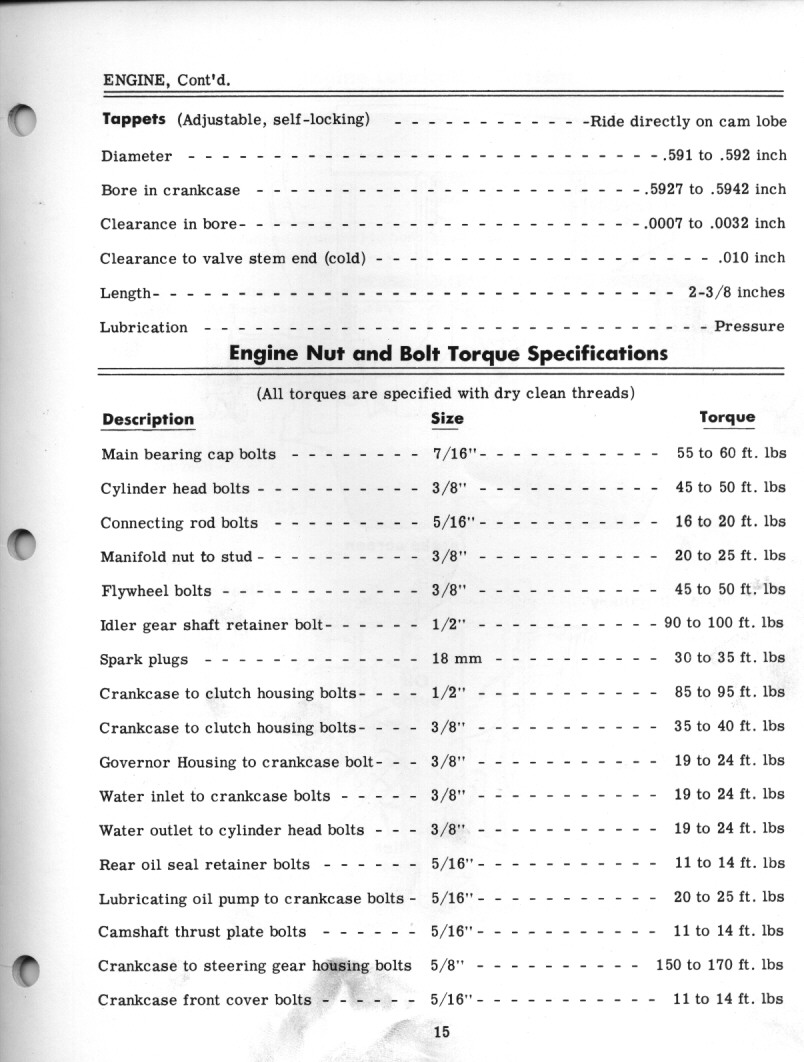
There are bolts that are not listed specifically in the manual. For those, use the table. The table is for modern bolts, with modern markings on the heads. It is shown at the lower right of the page. The clutch pressure plate bolts are probably grade 5. Don't overtighten them. They are 5/16" bolts, the table say about 20 ft lbs.
The Touch Control tubes upper end, 3 bolts would be 20 ft lbs.
The lower end, 2 bolts are 3/8", they go into the aluminum pump, so not as tight as the table says, maybe 25 ft lbs. :)

http://farmallcub.com/rudi_cub/www.clea ... age-06.jpg

Check the 4 flywheel bolts, be sure they are tight, while you can get to them.
 
Thanks for all of this bolt information. On taking the pressure plate hold-down bolts off I kind of rounded the corners on a couple until I figured out that my half inch drive socket didn't fit down square on the heads of some of them. But they are original IH bolts and I would like to save them if I can by touching up the heads with a file. If not, now I can purchase the proper strength bolts from the machine shop.
 
If for some reason you take out the flywheel bolts reseal the threads on the bolts as they go into the crankcase and oil can follow the threads out and get on the clutch.
 
I would have no problem leaving that original pilot bushing in the crankshaft at .001 out of tolerance. Noting all I have read about trouble with gears grinding after installing a new bushing. (Too tight of tolerance) If you are equipped to handle reaming the bushing to the correct specs go for it if you want. This is only my opinion. Take it for what it’s worth.
 
I decided to leave that pilot bushing in the flywheel instead of purchasing the reamer to install a new one. Another question I have is, since I had to disconnect all the wiring harness when splitting the tractor, will I need to polarize the generator when I put it all back together?
 
Hi,
Yes, good idea to polarize the system when it is together again, before starting the engine.
You probably know how.
For the original 6 volt, positive ground system, it can be done at the voltage regulator, with a short piece of electrical wire, touch the Bat and Gen posts for 1 second, there should be a small spark. :)

Below is a page from the 1957 LoBoy owner's manual telling how, the info begins at the lower left of the page.

http://farmallcub.com/rudi_cub/www.clea ... e%2052.jpg
 
I received all of my clutch and tune up parts from TM Tractor today (Monday) after just ordering them this last Friday. So, they are very quick on delivery. And I was amazed after comparing the old clutch disk and throw-out bearing to the new ones. No wonder I was having clutch troubles. Now I need to study all the book information given above for the clean-up and reassembly.
 
Hi,
Good to teach the other drivers of the LoBoy to not ride the clutch pedal as they are using the tractor.
That means only have a foot on the pedal when stopping or shifting. :)
 
Cubfriend":2ieu82ue said:
If for some reason you take out the flywheel bolts reseal the threads on the bolts as they go into the crankcase and oil can follow the threads out and get on the clutch.
:? Can you be a little more specific on how this happens, I'm not familiar with this problem. Are you possibly talking about the loctite on the threads to give them extra grip to keep them from loosening?

mountain4don":2ieu82ue said:
...... Another question is, are the pressure plate fingers adjusted properly to receive the new disk at the correct dimension? Or do I need to adjust them after installation of the new pressure plate/disk?
You definitely need to check them. You have to install it on the flywheel and have it tightened down first. It's a very easy job with the tractor split. Much easier than through the hand hole. This same pressure plate and clutch is used on Massey Harris Pony and Pacer tractors and possibly something else. It just depends on which spec the builder or remanufacturer is using as to whether it will be adjusted correctly. That's why it's best to check after install, and before "unsplitting" the tractor.
 
Scrivet":14llsgs3 said:
Cubfriend":14llsgs3 said:
If for some reason you take out the flywheel bolts reseal the threads on the bolts as they go into the crankcase and oil can follow the threads out and get on the clutch.
:? Can you be a little more specific on how this happens, I'm not familiar with this problem. Are you possibly talking about the loctite on the threads to give them extra grip to keep them from loosening?

mountain4don":14llsgs3 said:
...... Another question is, are the pressure plate fingers adjusted properly to receive the new disk at the correct dimension? Or do I need to adjust them after installation of the new pressure plate/disk?
You definitely need to check them. You have to install it on the flywheel and have it tightened down first. It's a very easy job with the tractor split. Much easier than through the hand hole. This same pressure plate and clutch is used on Massey Harris Pony and Pacer tractors and possibly something else. It just depends on which spec the builder or remanufacturer is using as to whether it will be adjusted correctly. That's why it's best to check after install, and before "unsplitting" the tractor.

The oil can come out of the flywheel to crankshaft bolts along the threads the same as antifreeze comes out of the head bolts that aren’t sealed when installed. The lock washer has a split in so it can get out and once out it is free to travel up the flywheel to the clutch surface. I’m sure it could take awhile but why chance it.
 
Glen":2jjvji76 said:
Hi,
Good to teach the other drivers of the LoBoy to not ride the clutch pedal as they are using the tractor.
That means only have a foot on the pedal when stopping or shifting. :)

I tried to teach the "girls" for years not to use the clutch for "speed control" and maneuvering around things, but they did it anyway. I always told them to fill up the tank. Start the Cub and put the mower deck in gear, then let out the clutch. And not to touch the clutch until it runs out of gas. Then walk back to the shop to get another two 6 gallon jugs of gas and fill it up again and continue. The cub has functional lights on it so they can mow after dark if it hasn't run out of gas yet. But do you think they ever paid attention to me?
 
I have another problem here on this clutch replacement. I bought the two pins that link the clutch pedal arm to the throw-out bearing frame, because there was much play in both of those end links. Of course the one on the forward end was easy to get out with a mirror. But I am having trouble getting the rear pin out as I can't seem to unfold the cotter pin that holds the pivot pin in place. I can reach back there and put my hands and fingers around the entire joint, but I can't grip the pin so that I can unfold the cotter pin ends to pull it out. Any ideas? I tried to grip the head of the pivot pin with a pair of small vise-grips and then rotate the pin so the vice-grips hit the top of the tube and then I can unbend the cotter pin. But there is not enough room in there to even get the vice-grips on the head of the pivot pin?
 
Back
Top