1-point Fast Hitch for Cub - Installation

lakesurfer

Active member
Full disclosure, this post is my second by which I'm hoping to get access to the manuals to hopefully read how to install the single point fast hitch I just bought. However, I'd be grateful for any other suggestions or pointers to resources to help install it correctly. I just bought several single point fast hitch implements (plow, disc cultivator, and harrow) and am hoping to help work some ground for a small community garden soon. Thanks for all.
 
WOW! That "manuals" section is INSANE! I wish the forums for my other "Vintage Technology" vehicles and tools were half as amazing as that!! I am stoked to dig into what I just downloaded!
 
Hi,
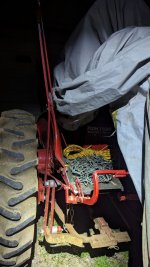
The Cub looks good in your picture.
You can find the year of it using the tractor serial number, if you didn't do it that way.
There is a list of serial numbers and years at the top of the page at Cub Info.
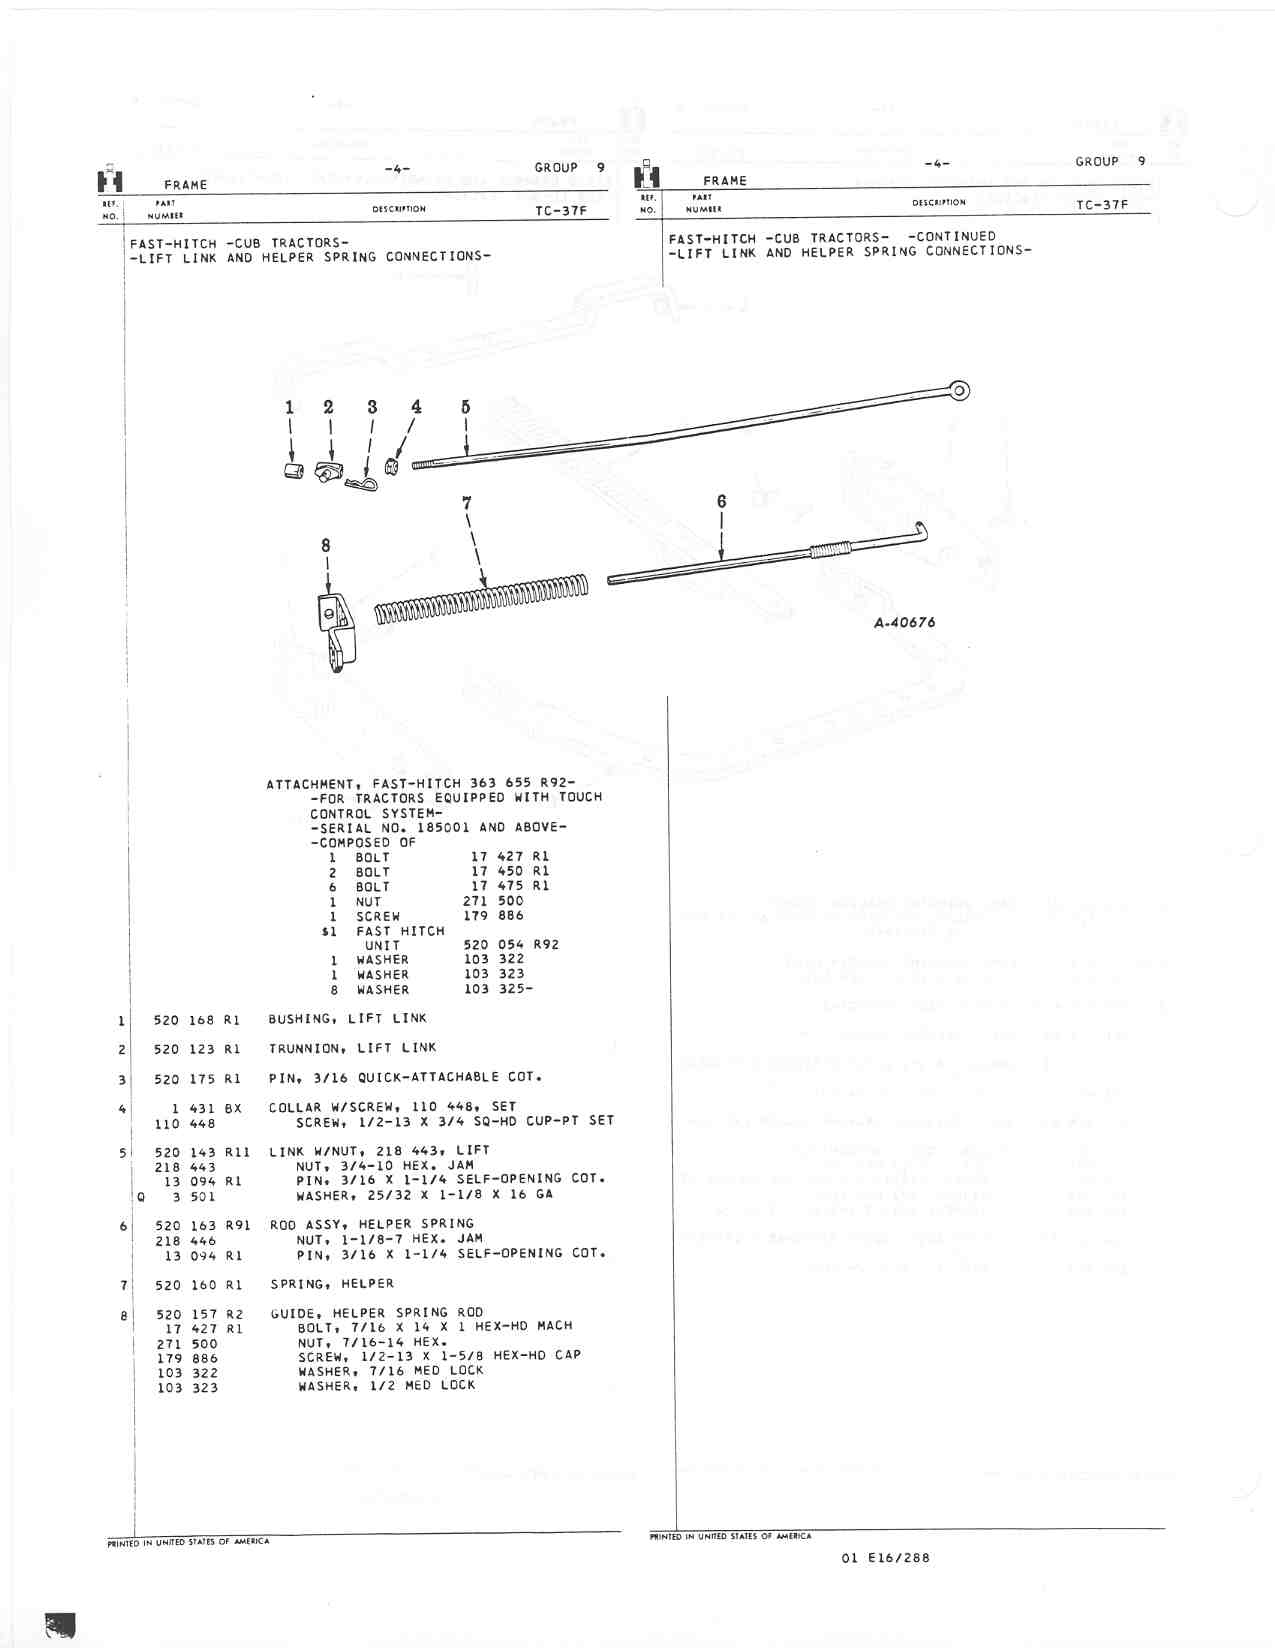
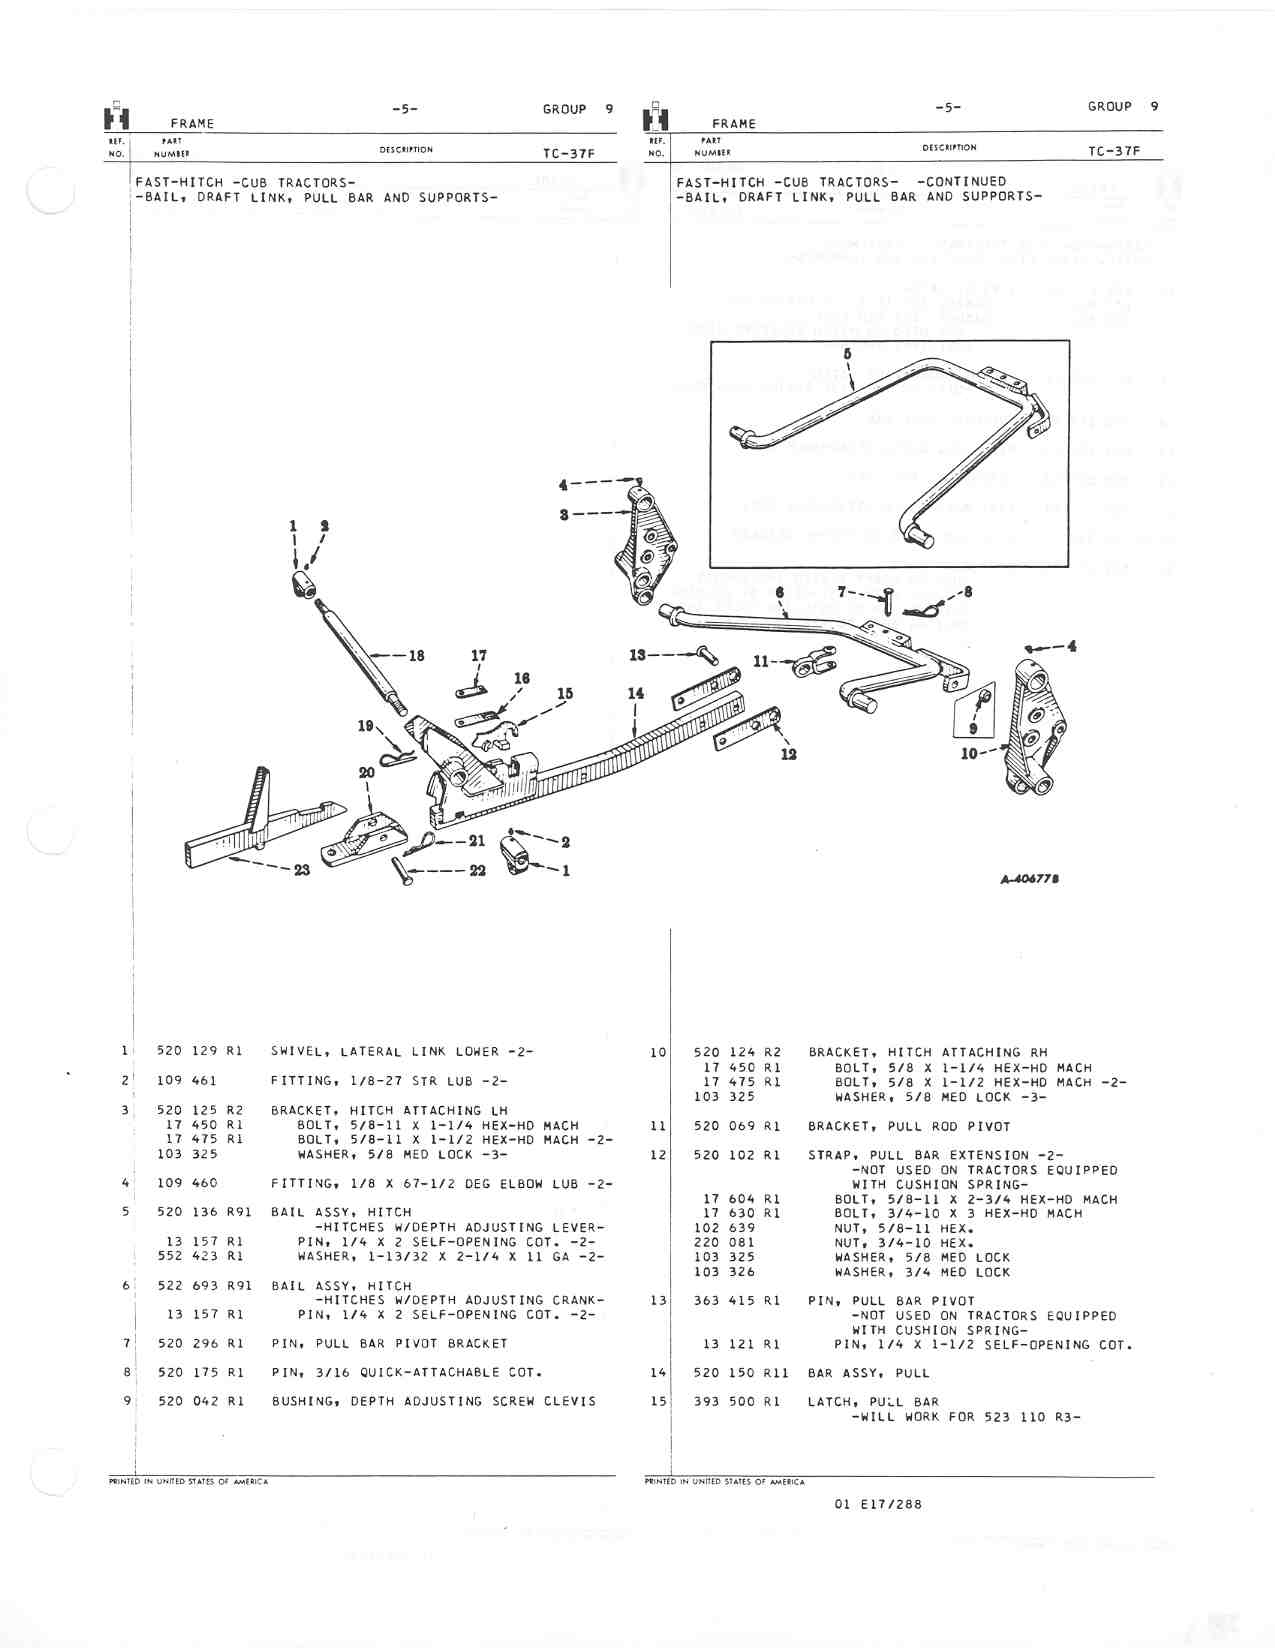
If you are putting a Fast Hitch on the Cub, you will need to remove the rotary mower first.
The rotary mower you have won't work with a Fast Hitch. The drive mechanism at the rear is different for a Fast Hitch Cub.
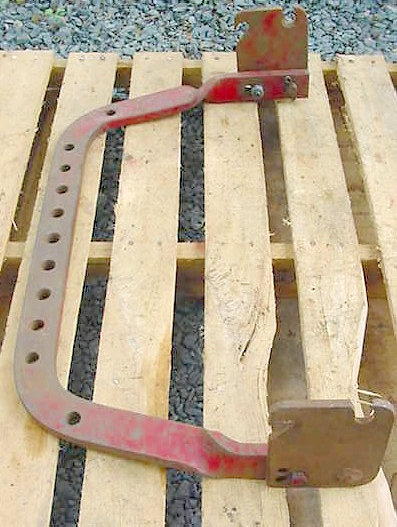
The parts you have fit only a Cub with a drawbar. Woods had different parts for use with a Fast Hitch.
I think the mower part of it is the same with a Fast Hitch, but I'm not sure.

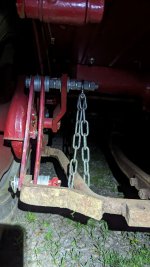
When you remove the mower and drawbar, it is a good time to check the final drive oil levels.
There are 2 final drives. There is a plug on each final drive.
The left plug is behind the drawbar mounting bracket. Fill both final drives to the level of the plug holes. The plugs usually have a square hole, a ratchet with no socket usually fits them. Clean any dirt out of the square holes, so the ratchet goes fully into the plugs.
The operator's manual tells how to check or change the oils.
The transmission and final drives on that age of Cub use Case IH Hy-Tran fluid, it is sold at Case IH dealers. There are other brands, be sure it works with IH hydraulic systems before buying it, since the fluid can be used in the Touch Control also.
I sent you a PM, you get to it at the top of the page. :)
 
lakesurfer":jiqig0bl said:
However, I'd be grateful for any other suggestions or pointers to resources to help install it correctly.
Below are pages from the Cub and LoBoy parts manual showing the parts of the Fast Hitch. You can check what you have and see if it is all there, like tst said above.

The page below shows the helper spring, it goes on the left side of the Cub, and attaches to the short arm on the left side of the Touch Control rockshaft.
https://farmallcub.com/rudi_cub/www.cle ... 009-04.jpg

You will need to buy bolts to hold the brackets onto the final drives, if you don't have them. It tells the size and length of them below at the descriptions for numbers 3 and 10 in the pic. They should be regular bolts, with lock washers, not the IH tapered head bolts. The dealer sold me grade 5 bolts for it in the past.
There are 2 different bales shown. A cub the year of yours should have a Fast Hitch with a crank to the right of the seat. That is the depth adjustment. The hitches had a lever from about 1954 - 1957.
The brackets on the bales are different.
https://farmallcub.com/rudi_cub/www.cle ... 009-05.jpg

https://farmallcub.com/rudi_cub/www.cle ... 009-06.jpg

https://farmallcub.com/rudi_cub/www.cle ... 009-07.jpg

The bolts for holding the crank onto the final drive are shown at 9 on the page below.
https://farmallcub.com/rudi_cub/www.cle ... 009-08.jpg

I use a large punch in holes of the right and left brackets, to help hold the hitch up in position, after lifting it up, to put the bolts in.
 
Once you determine the parts needed to use the mower with a FH, you can place a Wanted add in the VINE, Classified subforum. Someone might have one for sale. I've successfully bought some needed mower drive parts using that method. JMHO Stan
 
Don't forget your Son in law as a resource at installation time.
He knows his way around your Cub and some of it's quirks.

Congrats. Stay patient with the getting it prepped. And when switching things over .
 
I'd be surprised if you found concise step-by-step instructions. If these were installed outside of the factory they were almost always installed at the IH dealership by an experienced mechanic or someone who had access to an experienced mechanic for guidance. Instructions were probably along the lines of "Step 1. Install Fast Hitch. Step 2. Return tractor to customer."

Installing is a bit awkward because it all needs to go on pretty much as one piece. The side plates, bail, and rockshaft have to be all together at least because once the side plates are bolted to the final drives, you can't install anything that isn't already installed. You also can't lift one side into place then the other. Both sides need to be brought up into position at the same time. Some help or creative use of ratchet straps is required to hold things somewhere near where they should be until you can get at least one bolt in each side.

Really it's not that complicated, just awkward. Look at the pictures. Look at what you have. Make what you have look like the pictures.
 
Matt is correct. Those three pieces have to be installed as a unit. BUT, everything else can be removed and installed later to reduce the weight that needs to be supported. The pull bar is especially heavy.
 
You may already have discovered or know this, but a regular FCub FH is different from a Cub LoBoy FH and they must be used on the tractor that they were designed to fit.
 
Thanks to all. Got it installed, and used it Saturday to plow and disc a good sized garden. Discovered that as a newbie to this stuff, I think I got a little taken advantage of though. The draw bar did not match up to the depth adjust lever linkage. After looking at the drawings closer, I see that the depth lever attaches to a slightly different draw bar. No sweat...I was able to use "improvised engineering" to adapt an acceptable solution. What really torqued me off was that I discovered the sleeve over the horizontal bar at the hitch itself was supposed to adjust right/left. Not only is mine seized in place, but now I notice that the horizontal bar itself is *bent* on the left side. Once I feel I'm "done for the season" I'll remove that and take it to a friend's house to apply some "persuasion".

Shame on me for not knowing exactly what I was buying. Fool me once......
 
Not sure what you mean when you use the term “drawbar”. But, the Fast Hitch does not use the drawbar pictured below. Perhaps some photos of your setup would help.

drbar001001.jpg

Photo courtesy TM Tractor Parts
 
Don and Jim, Apologies. Language matters and I am still learning tractor vocabulary:

The depth lever needs a different *hitch bail* than the one I was provided. As far as the bent rod at the rear of the tractor near the hitch itself, I could not find a name for it, but the Pull Bar can be adjusted back and forth on it via the "sleeve" that is part of the hitch. I attached three pics. One showing the bent rod. One showing the depth lever attached to the hitch bail, and a closeup of the alternative engineering solution I used to make the offset lever linkage work with the hitch bail I have.
 

Attachments

  • Bent bar n Seized Pull Bar Sleeve.jpg
    Bent bar n Seized Pull Bar Sleeve.jpg
    194.6 KB · Views: 343
  • Lever to hitch bail.jpg
    Lever to hitch bail.jpg
    151.6 KB · Views: 342
  • Improvised hitch bail linkage.jpg
    Improvised hitch bail linkage.jpg
    125.9 KB · Views: 343
Yes, the bail that you have is for a later version crank handle depth adjuster.
The bent pull bar might straighten in a hydraulic press but you need to disassemble the parts. Heating the “sleeve” portion followed by a liberal application of PB Blaster or other penetrant and persuasion with a sledge hammer may break the rust free. There is a grease fitting on the sleeve that didn’t get used frequently enough.
 
lakesurfer":3mklakwr said:
I see that the depth lever attaches to a slightly different draw bar. No sweat...
A 1970 Cub is supposed to have the depth adjusting crank, to the right of the seat.
The lever was used from late 1954 - about 1957. Then the crank was used.
They use different brackets on the bail.
Maybe you can find a crank assembly somewhere.
J P Tractor Salvage, at the bottom of the page, might have a used crank, if you have any interest in changing it.
Below are pages from the 1955 Cub operator's manual, telling about the Fast Hitch with the lever.
https://farmallcub.com/rudi_cub/www.cle ... e%2018.jpg

https://farmallcub.com/rudi_cub/www.cle ... e%2019.jpg

The page below shows about adjusting the links.
https://farmallcub.com/rudi_cub/www.cle ... e%2020.jpg

The pull bar support in your pic should be straight.
The pull bar is supposed to slide easily right and left on the pull bar support, the round bar. The name is in the parts manual.
Working oil or grease into the them, when the pull bar will slide left and right, helps keep the parts from rusting.
A 1970 Cub is called an International Cub, not a Farmall Cub. IH stopped using the Farmall name on them in 1964.
Peter, I don't see any mention in the Cub parts manual of a grease fitting on the pull bar support. :)
 
No need for an apology.
There were three different versions of the Fast Hitch. Two for the Cub and one for the LoBoy. What you seem to have is a conglomeration of parts for one or more. The "U" shaped part, called the bail, is incorrect for the early Cub version that you have. The horizontal round bar, called the pull bar support, is definitely bent. It can be straightened using a press and maybe some heat.
 
Your bent part is properly called a "pull bar support". It definitely should be straight. Looks like the right end may be bend a little too. (The part stuck to it is the "pull bar assembly".) It would be nice if you could find a crank style depth adjuster that matches your hitch bail.
 
lakesurfer":zgjkaszu said:
............. What really torqued me off was that I discovered the sleeve over the horizontal bar at the hitch itself was supposed to adjust right/left. Not only is mine seized in place, but now I notice that the horizontal bar itself is *bent* on the left side. Once I feel I'm "done for the season" I'll remove that and take it to a friend's house to apply some "persuasion".....
I experienced the same "frozen up" problem with my FH installation and had to resort to disassembly and get it into a press to get the force applied to the needed points. I used pipe spacers on the "rod" to keep from deforming the "slide" part. I would not advise just heating and hammering on the part because it will probably deform and make the situation worse. JMHO, Stan. :hattip: FH 3 LoBoy.JPG FH+mule drive rearview.JPG
 
Back
Top