Marked the front hole and welded a nut to it. Had just enough room.
Stripped it all down and decided to paint it black instead of red.
Was pleased how it worked out.


Dale Finch wrote:Looks really nice! Will you clearcoat it now, to protect the metal from corroding?
A bunch of years ago, my ex-boyfriend and I were restoring a WWII SNJ (military trainer plane). It had several intricate "data plates" with instructions and system diagrams, etc. The reproductions were awful...silkscreened on flat metal plates. The originals were photo-etched, so the lettering was raised. So we stripped off what was left of the paint, and primed and painted them like you did, and for days I was bent over those things scraping off each 1/16-1/8" letter or hydraulic system diagram with a scalpel!Thought I would go cross-eyed! When finished, I sprayed it with a satin clearcoat. They did look great, though, when finished!


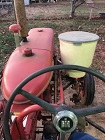
Stanton wrote:. . .
Battery fits very nicely and I can remove the battery without removing the box. Objective achieved.
Jim Becker wrote:Stanton wrote:. . .
Battery fits very nicely and I can remove the battery without removing the box. Objective achieved.
Will you have to remove the fender?


Return to “Farmall A, Super A, AV, 100, 130 & 140”
Users browsing this forum: No registered users and 9 guests


