TM's TOB:
http://www.tmtractor.com/new/cl/378fp.htm
A couple clutch adjustment HOW TO's:
http://farmallcub.com/phpBB2/viewtopic.php?f=141&t=6994
http://farmallcub.com/phpBB2/viewtopic.php?f=141&t=66543
This site uses cookies to maintain login information on FarmallCub.Com. Click the X in the banner upper right corner to close this notice. For more information on our privacy policy, visit this link: Privacy Policy
NEW REGISTERED MEMBERS: Be sure to check your SPAM/JUNK folders for the activation email.
PTO / Gear grinding
Forum rules
Notice: For sale and wanted posts are not allowed in this forum. Please use our free classifieds or one of our site sponsors for your tractor and parts needs.
Notice: For sale and wanted posts are not allowed in this forum. Please use our free classifieds or one of our site sponsors for your tractor and parts needs.
-
Dale Finch

- 10+ Years

- Posts: 6684
- Joined: Tue Apr 27, 2010 11:34 am
- Zip Code: 27517
- Tractors Owned: '51 Cub #140966 "Bruno" with Woods 59 mower
'55 Cub #187541 "Betty" with Fast Hitch
'55 Cub #190482 "Ben" with Woods 42 mower
'55 Cub #191739 "Bertha" with Woods 42 mower
'56 Cub #194370 "Boris" with Mott Flail mower - Circle of Safety: Y
- Location: NC, Chapel Hill
Re: PTO / Gear grinding
Dale Finch


-
Glen

- 10+ Years
- Posts: 6151
- Joined: Mon Mar 19, 2012 7:33 pm
- Zip Code: 00000
- Tractors Owned: 1956 Farmall Cub with Fast Hitch, F-11 plow, Disc, Cultivator, Cub-22 mower
- Circle of Safety: Y
- Location: Wa.
Re: PTO / Gear grinding
Hi,
The 2nd post Dale posted above about adjusting the clutch fingers has a tool for setting the fingers exactly the right height, I would suggest using that.
You will need to make the tool from something.
You need an angled screwdriver like in the pics he posted.
NAPA or other auto parts store might sell the angled screwdrivers.
You have to lie down under the Cub, where the clutch hand hole is, under the clutch area, and use a light to see up in the hole to adjust the fingers.
I suggest having the Cub in a building, so you don't look up at the bright sky.
You have to turn the engine about 1/3 of a turn to get to each finger's adjustment screw, so each adjustment screw is down by the hand hole.
If the Cub has a mower or something under where the hand hole is, you will need to remove the implement to get under the Cub.
Be sure to tighten the lock nuts tight when done adjusting the screws.
Right, you can't replace the release bearing without splitting the Cub where the clutch is.
The graphite sticks out of a new release bearing 5/16", the material can wear down from use.
If the bearing in your Cub has half or more of that left, it is ok.
I've seen 1 work normally with less than that.
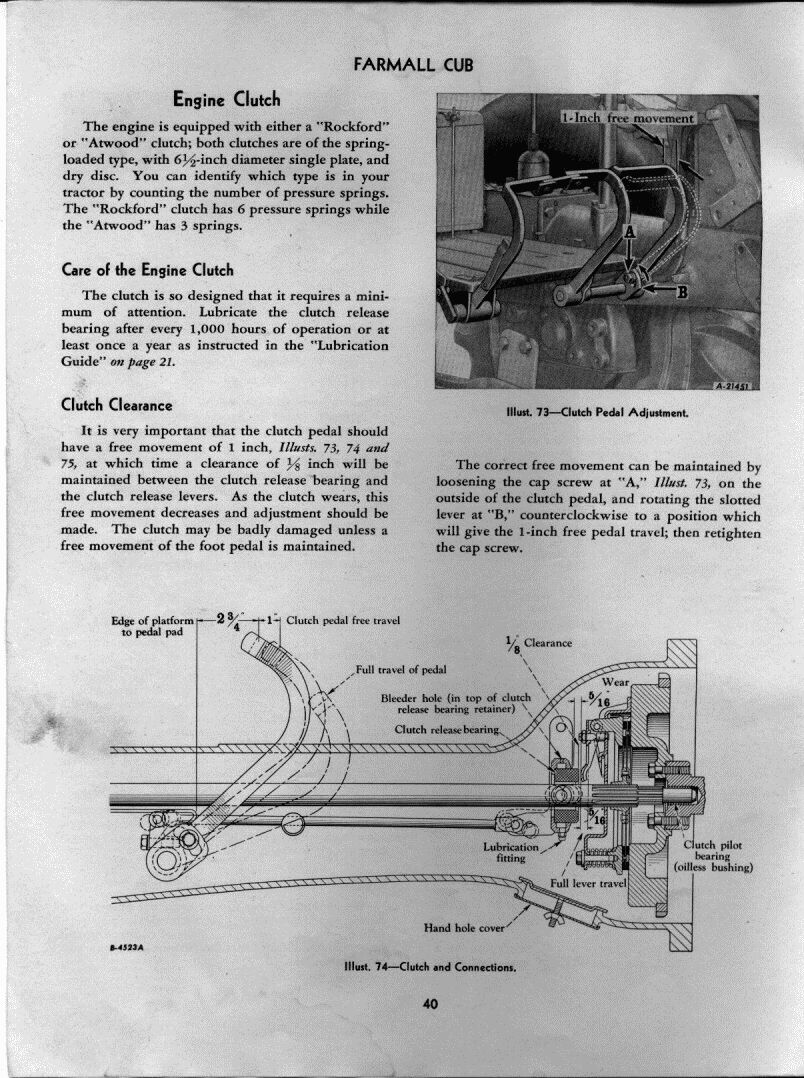
Below is a page from the 1950 Cub owner's manual showing the clutch in the bottom pic on the page.
I think I posted this page before.
It is a simple working clutch, the release bearing pushes ahead on the 3 pressure plate fingers and that makes the clutch release so the tractor stops moving.
http://farmallcub.com/rudi_cub/www.clea ... e%2040.jpg
Grease the fitting on the release bearing when under the Cub, if you haven't greased it lately.
There is a small hole on top of the bearing, grease it until grease comes out the hole.
The grease that comes out the hole may fall down, then you can see it has enough.
They say on here to use cheap grease, so the oil in it absorbs into the graphite.
The 2nd post Dale posted above about adjusting the clutch fingers has a tool for setting the fingers exactly the right height, I would suggest using that.
You will need to make the tool from something.
You need an angled screwdriver like in the pics he posted.
NAPA or other auto parts store might sell the angled screwdrivers.
You have to lie down under the Cub, where the clutch hand hole is, under the clutch area, and use a light to see up in the hole to adjust the fingers.
I suggest having the Cub in a building, so you don't look up at the bright sky.
You have to turn the engine about 1/3 of a turn to get to each finger's adjustment screw, so each adjustment screw is down by the hand hole.
If the Cub has a mower or something under where the hand hole is, you will need to remove the implement to get under the Cub.
Be sure to tighten the lock nuts tight when done adjusting the screws.
Right, you can't replace the release bearing without splitting the Cub where the clutch is.
The graphite sticks out of a new release bearing 5/16", the material can wear down from use.
If the bearing in your Cub has half or more of that left, it is ok.
I've seen 1 work normally with less than that.
Below is a page from the 1950 Cub owner's manual showing the clutch in the bottom pic on the page.
I think I posted this page before.
It is a simple working clutch, the release bearing pushes ahead on the 3 pressure plate fingers and that makes the clutch release so the tractor stops moving.
http://farmallcub.com/rudi_cub/www.clea ... e%2040.jpg
Grease the fitting on the release bearing when under the Cub, if you haven't greased it lately.
There is a small hole on top of the bearing, grease it until grease comes out the hole.
The grease that comes out the hole may fall down, then you can see it has enough.
They say on here to use cheap grease, so the oil in it absorbs into the graphite.
Who is online
Users browsing this forum: No registered users and 45 guests


