This site uses cookies to maintain login information on FarmallCub.Com. Click the X in the banner upper right corner to close this notice. For more information on our privacy policy, visit this link: Privacy Policy
NEW REGISTERED MEMBERS: Be sure to check your SPAM/JUNK folders for the activation email.
Freeze plug and steering gear
Forum rules
Notice: For sale and wanted posts are not allowed in this forum. Please use our free classifieds or one of our site sponsors for your tractor and parts needs.
Notice: For sale and wanted posts are not allowed in this forum. Please use our free classifieds or one of our site sponsors for your tractor and parts needs.
-
pett3227b
- 5+ Years

- Posts: 116
- Joined: Tue Nov 27, 2018 7:28 am
- Zip Code: 28327
Freeze plug and steering gear
I am wondering the process for replacing the freeze plug? which parts of the cub have to come apart to access it and replace it? Should a rebuild include replacing the freeze plug? I am not having any problems with it currently it is fine. I am wondering if they rust over time or if they are made of something like copper and they don't rust. I am also wondering the steps that it takes to get to the bushings inside the steering gear and likely to turn the gear around to the unused side. which parts of the cub are removed to get inside? Thanks
-
tst
- 10+ Years

- Posts: 5214
- Joined: Tue Jan 12, 2010 2:08 pm
- Zip Code: 12514
- Circle of Safety: Y
Re: Freeze plug and steering gear
if there is nothing wrong with the plug, leave it alone
-
Glen

- 10+ Years
- Posts: 6151
- Joined: Mon Mar 19, 2012 7:33 pm
- Zip Code: 00000
- Tractors Owned: 1956 Farmall Cub with Fast Hitch, F-11 plow, Disc, Cultivator, Cub-22 mower
- Circle of Safety: Y
- Location: Wa.
Re: Freeze plug and steering gear
Hi,
The large expansion plug on the front of the steering gear can be replaced without taking the steering gear apart, but if yours is ok, it doesn't need disturbing.
Here is info for the steering gear.
You have to jack up the front of the Cub, remove the front axle, at the center pivot, and remove the steering gear base to get into the steering gear.
I would remove the upper, long steering shaft first.
Worn bushings in the steering gear make more free play in the steering wheel's movement.
You didn't say how much free play the steering wheel has, turning right to left.
It can be measured at the outer edge of the steering wheel with a tape.
There is an oil seal at the lower end of the upper steering shaft, and a seal at the bottom of the steering gear.
TM Tractor has new bushings, and oil seals for it.
I would read the steering section in the Cub and LoBoy service manual before taking the front end apart.
The manual has lots of info. It has pics of inside the steering gear.
Below is the manual.
There is a table of contents beginning on page 1 of most sections, it makes it easier to use online.
http://farmallcub.com/rudi_cub/www.clea ... index.html
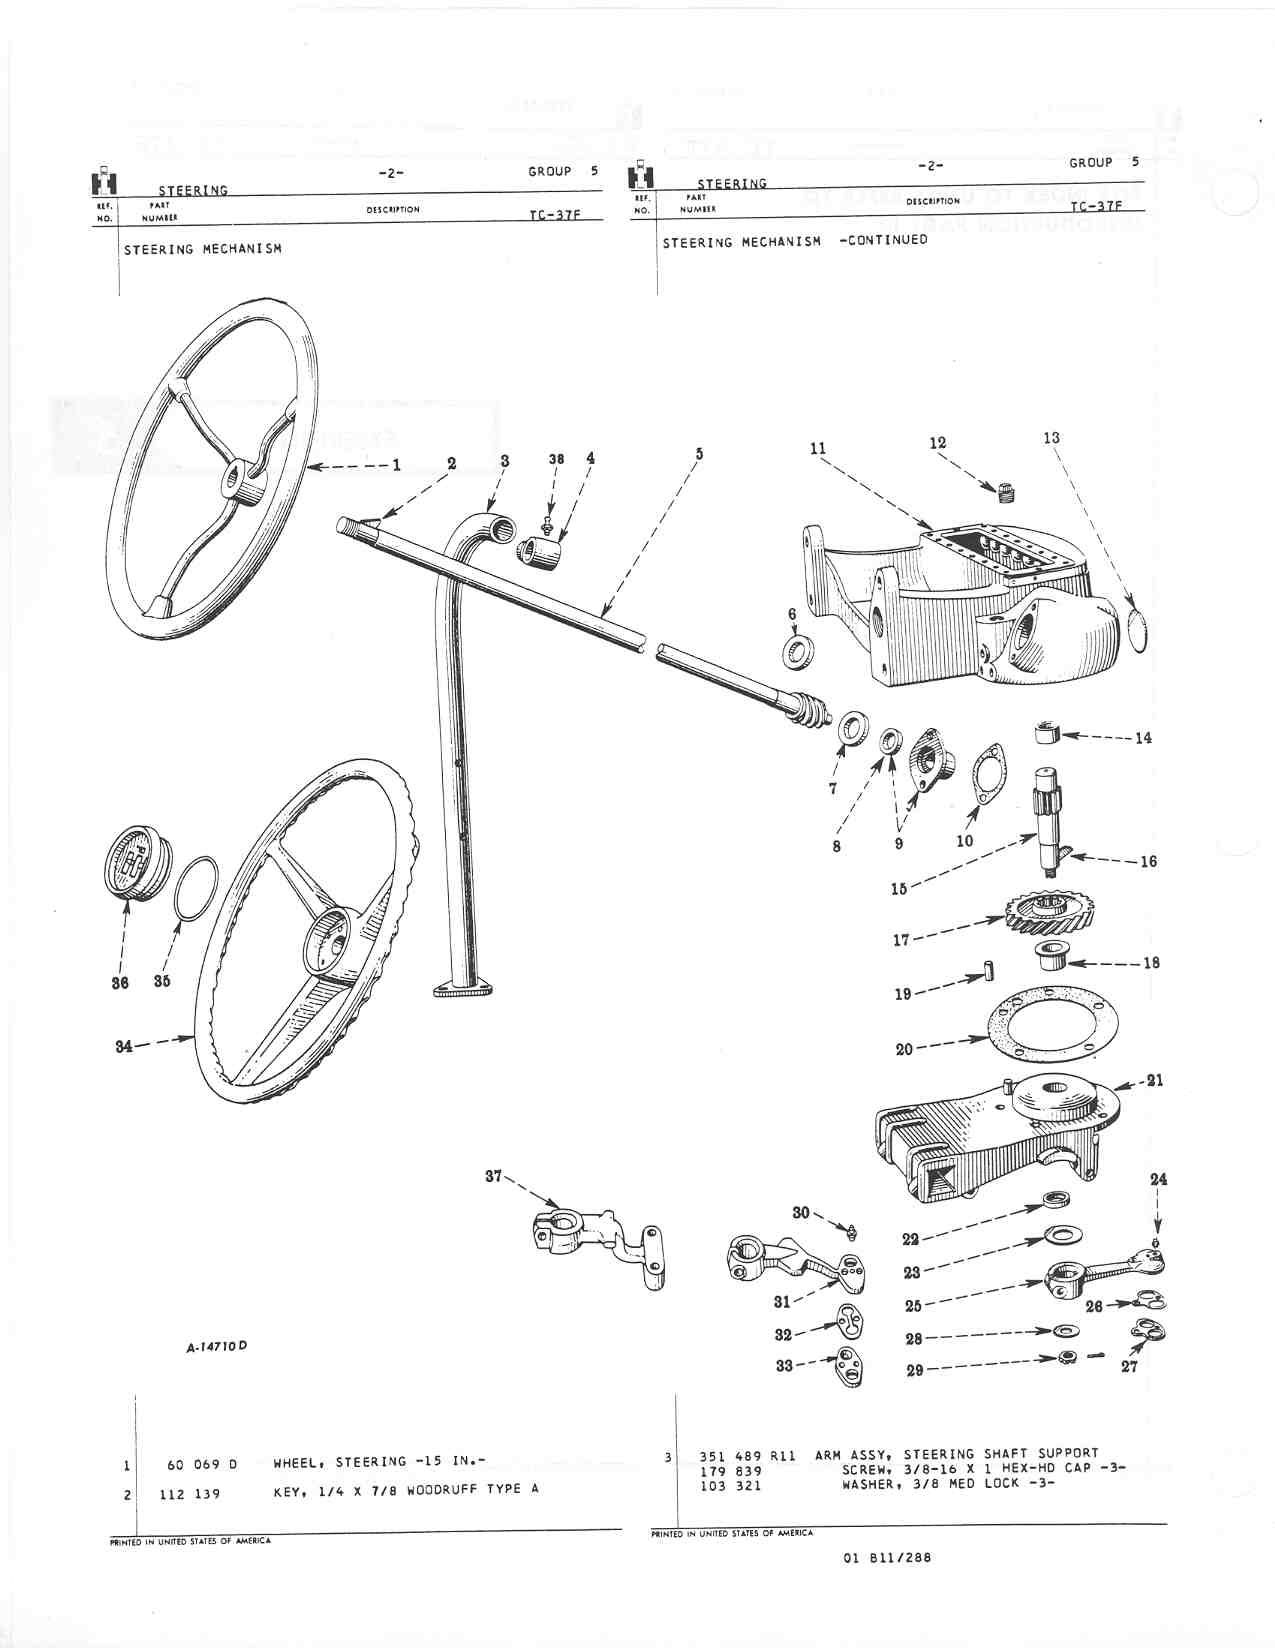
Below are pages from the Cub and LoBoy parts manual.
There are bushings for the vertical shaft, they are numbers 14 and 18.
The lower oil seal is number 22.
There are thick washers at the gear on the upper shaft, numbers 6 and 7, they might need replacing if worn.
Washer 7 can fall off the end of the upper shaft when removing it from the steering gear.
When putting the upper shaft in the steering gear, be careful washer 7 doesn't fall off the end of the shaft.
Turn the shaft to remove it, or put it in again.
http://www.farmallcub.info/manuals/cub_ ... 005-02.jpg
http://www.farmallcub.info/manuals/cub_ ... 005-03.jpg
http://www.farmallcub.info/manuals/cub_ ... 005-04.jpg
You have to remove the steering wheel to replace the upper washer, or the upper oil seal.
The steering wheel can be tight, and need a puller to remove.
You can turn the large gear 1/2 turn on the splines and it will use teeth that a unused.
Look closely at the gear teeth and see if someone turned it around before, or if the teeth are unused.
When the steering gear is apart, you can look in with a light and see if the inside of the expansion plug is rusted. If it looks good, it doesn't need replacing.
Below is TM Tractor's page of steering parts, you can look at the pics.
The washers for the upper shaft are in the 2nd row.
The bushings for the vertical shaft are in the 9th row.
http://www.tmtractor.com/new/st/st_001newparts.htm
After the steering gear is together, the nut holding the arm on the bottom of the shaft needs adjusting.
Don't tighten the nut too tight, it will make the gear bind.
The bolt through the arm has to be loose, so the arm will move on the shaft.
When adjusting it, I jack up the front of the Cub, so the front wheels are just off the ground, then the steering wheel will turn freely from side to side.
Tighten the nut until the play is gone, but not so tight that the steering binds.
The nut and shaft only have a few positions where the cotter key will go through, so you may not be able to remove all up and down movement of the shaft, to put the key in.
Tighten the bolt and nut through the arm when done adjusting the nut.
Below is a pic from TM Tractor of the steering gear base. It is held on with 5 bolts in a circle.
The oil seal is in the shiny area.
The bolts can come loose from use, and the bolt threads in the upper housing get worn from using the Cub with the bolts loose.
People on here have had to repair the threads, or replace the housings because of worn threads.
The large expansion plug on the front of the steering gear can be replaced without taking the steering gear apart, but if yours is ok, it doesn't need disturbing.
Here is info for the steering gear.
You have to jack up the front of the Cub, remove the front axle, at the center pivot, and remove the steering gear base to get into the steering gear.
I would remove the upper, long steering shaft first.
Worn bushings in the steering gear make more free play in the steering wheel's movement.
You didn't say how much free play the steering wheel has, turning right to left.
It can be measured at the outer edge of the steering wheel with a tape.
There is an oil seal at the lower end of the upper steering shaft, and a seal at the bottom of the steering gear.
TM Tractor has new bushings, and oil seals for it.
I would read the steering section in the Cub and LoBoy service manual before taking the front end apart.
The manual has lots of info. It has pics of inside the steering gear.
Below is the manual.
There is a table of contents beginning on page 1 of most sections, it makes it easier to use online.
http://farmallcub.com/rudi_cub/www.clea ... index.html
Below are pages from the Cub and LoBoy parts manual.
There are bushings for the vertical shaft, they are numbers 14 and 18.
The lower oil seal is number 22.
There are thick washers at the gear on the upper shaft, numbers 6 and 7, they might need replacing if worn.
Washer 7 can fall off the end of the upper shaft when removing it from the steering gear.
When putting the upper shaft in the steering gear, be careful washer 7 doesn't fall off the end of the shaft.
Turn the shaft to remove it, or put it in again.
http://www.farmallcub.info/manuals/cub_ ... 005-02.jpg
http://www.farmallcub.info/manuals/cub_ ... 005-03.jpg
http://www.farmallcub.info/manuals/cub_ ... 005-04.jpg
You have to remove the steering wheel to replace the upper washer, or the upper oil seal.
The steering wheel can be tight, and need a puller to remove.
You can turn the large gear 1/2 turn on the splines and it will use teeth that a unused.
Look closely at the gear teeth and see if someone turned it around before, or if the teeth are unused.
When the steering gear is apart, you can look in with a light and see if the inside of the expansion plug is rusted. If it looks good, it doesn't need replacing.
Below is TM Tractor's page of steering parts, you can look at the pics.
The washers for the upper shaft are in the 2nd row.
The bushings for the vertical shaft are in the 9th row.
http://www.tmtractor.com/new/st/st_001newparts.htm
After the steering gear is together, the nut holding the arm on the bottom of the shaft needs adjusting.
Don't tighten the nut too tight, it will make the gear bind.
The bolt through the arm has to be loose, so the arm will move on the shaft.
When adjusting it, I jack up the front of the Cub, so the front wheels are just off the ground, then the steering wheel will turn freely from side to side.
Tighten the nut until the play is gone, but not so tight that the steering binds.
The nut and shaft only have a few positions where the cotter key will go through, so you may not be able to remove all up and down movement of the shaft, to put the key in.
Tighten the bolt and nut through the arm when done adjusting the nut.
Below is a pic from TM Tractor of the steering gear base. It is held on with 5 bolts in a circle.
The oil seal is in the shiny area.
The bolts can come loose from use, and the bolt threads in the upper housing get worn from using the Cub with the bolts loose.
People on here have had to repair the threads, or replace the housings because of worn threads.
- Attachments
-
-
- Similar Topics
- Replies
- Views
- Last post
-
- 14
- 329
-
by Pap
Tue Sep 07, 2021 6:24 pm
-
- 3
- 368
-
by Glen
Tue Mar 22, 2022 10:10 pm
-
- 11
- 362
-
by Schu
Mon Nov 14, 2022 10:00 pm
-
-
Steering rod removal from worm gear. Attachment(s)
by Tractor Rod » Wed Dec 15, 2021 10:42 pm » in Farmall Cub - 3
- 289
-
by Tractor Rod
Thu Dec 16, 2021 6:21 am
-
-
-
47 Cub steering leak and hard steering Attachment(s)
by AHS » Sun Jun 05, 2022 6:27 am » in Farmall Cub - 10
- 509
-
by Glen
Tue Jun 14, 2022 7:14 pm
-
Who is online
Users browsing this forum: No registered users and 5 guests


