This site uses cookies to maintain login information on FarmallCub.Com. Click the X in the banner upper right corner to close this notice. For more information on our privacy policy, visit this link: Privacy Policy
NEW REGISTERED MEMBERS: Be sure to check your SPAM/JUNK folders for the activation email.
Paint removal
Forum rules
Notice: For sale and wanted posts are not allowed in this forum. Please use our free classifieds or one of our site sponsors for your tractor and parts needs.
Notice: For sale and wanted posts are not allowed in this forum. Please use our free classifieds or one of our site sponsors for your tractor and parts needs.
-
bw1982
- 10+ Years

- Posts: 26
- Joined: Fri Jul 12, 2013 2:19 pm
- Zip Code: 23832
Paint removal
Hello all I’m about to remove paint off the cub. should I be worried about lead in the paint and if so what precautions should I take? For what it’s worth I will be using needle scaler and a wire wheel thanks in advance.
-
ricky racer

- 10+ Years
- Posts: 6338
- Joined: Wed Sep 12, 2007 8:40 pm
- Zip Code: 49120
- Circle of Safety: Y
- Location: Niles / Buchanan, Michigan
Re: Paint removal
A good heavy duty wire cup brush on an angle grinder is what I used on most of my Cub. Yes, lead in the paint is a reality and a good dust mask should be worn when creating the dust you will make with the wire brush. Also keep that in mind when you are sweeping up the paint dust and debris from the floor too. Remember to take "before" pictures of your Cub and "in process" pictures too! If you don't you'll wish you had...  Oh, post pictures here so we can watch along with you and see the progress you make. We like pictures!!
1929 Farmall Regular
1935 John Deere B
1937 John Deere A
1941 John Deere H
1952 John Deere B
1953 Farmall Cub
1935 John Deere B
1937 John Deere A
1941 John Deere H
1952 John Deere B
1953 Farmall Cub
-
Floater
- Posts: 21
- Joined: Mon Oct 04, 2021 5:27 pm
- Zip Code: 12944
- Tractors Owned: 1956 Farmall Cub
- Location: Plattsburgh, NY
Re: Paint removal
I'm stripping my 1956 Cub, and I'm a big fan of an electrolysis tank for paint (and rust) removal.
After a day in the tank, the majority of paint on any part will be bubbled off in large sheets. The WIND from the angle grinder will actually blow off a lot of the paint before the wire wheel even touches the part! I usually scrape the paint off into a trash bag first and seal it up. No dust.
Anyway, removing the paint in large sheets means very little toxic lead dust. If you simply go at a part with the wheel, ALL of the paint is converted to lead dust. Not good.
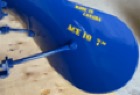
I also like how the e-tank works 24/7 on stripping parts, when I can't. Here's a photo of my wheel centers, one of which has been in the tank for about 36 hours. Pretty easy getting the old paint off!
Lots of posts here about setting up an electrolysis tank. If you need any info, I'm happy to help.

After a day in the tank, the majority of paint on any part will be bubbled off in large sheets. The WIND from the angle grinder will actually blow off a lot of the paint before the wire wheel even touches the part! I usually scrape the paint off into a trash bag first and seal it up. No dust.
Anyway, removing the paint in large sheets means very little toxic lead dust. If you simply go at a part with the wheel, ALL of the paint is converted to lead dust. Not good.
I also like how the e-tank works 24/7 on stripping parts, when I can't. Here's a photo of my wheel centers, one of which has been in the tank for about 36 hours. Pretty easy getting the old paint off!
Lots of posts here about setting up an electrolysis tank. If you need any info, I'm happy to help.
-
Mht
- 5+ Years

- Posts: 408
- Joined: Sun Jul 08, 2018 9:02 pm
- Zip Code: 27606
- Tractors Owned: 1949 farmall cub(building from parts) 1950 farmall cub
1971 David Brown 880 selectamatic - Circle of Safety: Y
Re: Paint removal
I agree 100 percent with the previous post about electrolysis. An electrolysis tank and a pressure washer are two tools I couldn’t imagine being without when restoring old equipment. With a 55 gallon tank I can do any part of a cub. Even a fuel tank/hood or a torque tube can be done by immersing half of it at a time. I’m restoring my fourth cub now and I would have quit after the first one if not for my electrolysis tank and pressure washer
-
Stevetractor
- 5+ Years
- Posts: 233
- Joined: Wed Apr 08, 2015 1:03 pm
- Zip Code: B0v1a0
- Tractors Owned: 1952 Farmall Cub
1955 Farmall Cub
1968 International Cub
Re: Paint removal
Wow Floater. That’s impressive paint and rust removal on those wheel centres. Please post a picture of your electrolysis tank and solution mixture. What’s your power supply? I experimented with a smaller tank with variable results. Want to build a larger and obviously more effective one by the looks of those centres. Great job.
-
Mht
- 5+ Years
- Posts: 408
- Joined: Sun Jul 08, 2018 9:02 pm
- Zip Code: 27606
- Tractors Owned: 1949 farmall cub(building from parts) 1950 farmall cub
1971 David Brown 880 selectamatic - Circle of Safety: Y
Re: Paint removal
- Attachments
-
-
-
-
-
69ranger
- 10+ Years
- Posts: 227
- Joined: Sun Jan 20, 2013 10:36 pm
- Zip Code: 67357
- Tractors Owned: 1948 Cub, 1952 Cub, 1953 Cub, 1946 Farmall A, 1949 Farmall M, 1956 IH 130, 1979 IH 140, 1959 Farmall 240.
Several Brand X Green tractors that sound strange when they run.
1969 F-100 fully restored, 1969 F 100 original paint, 1973 F 100, 50 K original miles all original, 1978 F250 repainted, 1978 Bronco, 1967 Mustang, 1973 Mach ! Mustang.
Several single cylinder Honda motorcycles from the early 70's. Adding more junk all the time. - Location: Parsons, Kansas
Re: Paint removal
Anything you can do to protect your self from the dust and lead paint exposure is a good idea.
Perhaps equally or even more important is protection from the hazards of applying the new paint.
Any paint or primer that has a catalyst in it to help with drying or to add to the gloss, contains chemicals that can damage your body way worse than lead paint dust.
Charcoal filters offer very little if any protection from these hazards, and that is what most of us use, because that all we have.
I do all may painting out in the drive way anymore, so as to limit my exposure. I do paint the hoods and fuel tanks, fenders and things that really show inside, to keep the dirt down.
When I was in auto body school close to 40 years ago, our instructor used to raise hell with us for now wearing gloves when cleaning paint guns, and wiping panels off with lacquer thinner. He said it only takes 15 seconds for lacquer thinner to go through your skin and to your liver.
Pretty unsettling. When I got out of school I went into a safer line of work, but continue to paint a little once in a while.
Have not done an over all paint job on a car in 15 years or longer, and will never do another one. Exposure is too long, and I will let guys with the proper equipment to it for me.
Thats just my thoughts.. Your mileage may vary.
-
Floater
- Posts: 21
- Joined: Mon Oct 04, 2021 5:27 pm
- Zip Code: 12944
- Tractors Owned: 1956 Farmall Cub
- Location: Plattsburgh, NY
Re: Paint removal
My electrolysis tank is pretty simple, and on a much smaller scale than Mht's. I bought a plastic tub for $15. I drilled a couple of holes near the ends of a wooden stake to hold my anode(s), and screwed a (conductive) hook through the center to hang or wire the cathode.
The cathode is the NEGATIVE, the anode is the POSITIVE. My anodes are rebar. My power supply began as a 12V smart charger. You can see the charger leads hooked up to the hook (Neg) and the rebar (Pos) in this first photo, but the smart charger tried to out-smart me - it faulted after about ten minutes when hooked up to the e-tank directly.

So to get around the charger fault, I put a 12V battery between the charger and the e-tank (charger to battery, and jumper cables from the battery to the cathode/anode). I use 2-3 heaping cups of Washing Soda to make the water conductive (same as Mht). I put the washing soda in a jug, fill the jug with hot water and shake vigorously to make sure the washing soda is completely dissolved. That's why the water in the first photo looks so cloudy. The part submerged in the photo is a final drive, sitting on the bottom of the tub and a piece of mechanic's wire wiring it to the hook. The anode (rebar) should never touch the part being "cooked". Also - a member here (Rudi) is a fervent believer in adding TSP (trisodium phosphate) to the water to prevent flash rust after the part is removed from the tank. I added a cup of TSP to my water, and I think it definitely helps. Thanks Rudi!

The second photo shows the jumper cables from the battery (green leads). I made a little "Faraday Cage" and tried some rusty bolts in with the final drive. Not so great on straight rust, but really good results blowing off paint.
One final important tip - the CLEANER the anode, the better the reaction. And by clean I mean bare metal. I use only one rebar anode at a time, and switch it for a clean rebar about every 12 hours. I rinse off the old rebar (the sludge which forms during electrolysis rinses right off), let the rebar dry and the WIRE WHEEL the REBAR, back down to bare metal. This is very important.
Another thing I do is run the tank using just the battery during the day (with a fresh anode). Then in the evening, replace the anode again and plug in the charger (to recharge the battery overnight). This seems to work well.

Any questions, let me know. I've been using the tank for almost three weeks now. The water is pretty nasty, but it still bubbles nicely, especially when I put a clean anode in. I do know my wife is pretty impressed!
Reg
The cathode is the NEGATIVE, the anode is the POSITIVE. My anodes are rebar. My power supply began as a 12V smart charger. You can see the charger leads hooked up to the hook (Neg) and the rebar (Pos) in this first photo, but the smart charger tried to out-smart me - it faulted after about ten minutes when hooked up to the e-tank directly.
So to get around the charger fault, I put a 12V battery between the charger and the e-tank (charger to battery, and jumper cables from the battery to the cathode/anode). I use 2-3 heaping cups of Washing Soda to make the water conductive (same as Mht). I put the washing soda in a jug, fill the jug with hot water and shake vigorously to make sure the washing soda is completely dissolved. That's why the water in the first photo looks so cloudy. The part submerged in the photo is a final drive, sitting on the bottom of the tub and a piece of mechanic's wire wiring it to the hook. The anode (rebar) should never touch the part being "cooked". Also - a member here (Rudi) is a fervent believer in adding TSP (trisodium phosphate) to the water to prevent flash rust after the part is removed from the tank. I added a cup of TSP to my water, and I think it definitely helps. Thanks Rudi!
The second photo shows the jumper cables from the battery (green leads). I made a little "Faraday Cage" and tried some rusty bolts in with the final drive. Not so great on straight rust, but really good results blowing off paint.
One final important tip - the CLEANER the anode, the better the reaction. And by clean I mean bare metal. I use only one rebar anode at a time, and switch it for a clean rebar about every 12 hours. I rinse off the old rebar (the sludge which forms during electrolysis rinses right off), let the rebar dry and the WIRE WHEEL the REBAR, back down to bare metal. This is very important.
Another thing I do is run the tank using just the battery during the day (with a fresh anode). Then in the evening, replace the anode again and plug in the charger (to recharge the battery overnight). This seems to work well.
Any questions, let me know. I've been using the tank for almost three weeks now. The water is pretty nasty, but it still bubbles nicely, especially when I put a clean anode in. I do know my wife is pretty impressed!
Reg
-
conservationman
- Posts: 18
- Joined: Wed Oct 23, 2019 7:41 pm
- Zip Code: 53126
- Tractors Owned: 1947 case VAC
1961 Ford641
1948 c-60 from 50-T Baler - Circle of Safety: Y
- Location: S.E.WISCONSIN
Re: Paint removal
Does anyone know definitively that there is lead in the paint?
I used a test kit; it showed no lead but it hard to tell if there is lead or not. ( "If the swap turns orange there is lead" , not much help)
Thanks
Wally
I used a test kit; it showed no lead but it hard to tell if there is lead or not. ( "If the swap turns orange there is lead" , not much help)
Thanks
Wally
-
conservationman
- Posts: 18
- Joined: Wed Oct 23, 2019 7:41 pm
- Zip Code: 53126
- Tractors Owned: 1947 case VAC
1961 Ford641
1948 c-60 from 50-T Baler - Circle of Safety: Y
- Location: S.E.WISCONSIN
Re: Paint removal
That is, I couldn't tell if it was orange or light red
-
Don McCombs

- Team Cub Mentor

- Posts: 17488
- Joined: Mon Feb 03, 2003 6:45 am
- Zip Code: 21550
- Tractors Owned: "1950 Something" Farmall Cub
1957 Farmall Cub w/FH
1977 International Cub w/FH
1978 International Cub
1948 Farmall Super A - Circle of Safety: Y
- Location: MD, Deep Creek Lake
Re: Paint removal
I think the safest bet is to assume that the paint has lead in it, if it is the original paint.
Don McCombs
MD, Deep Creek Lake

Proud Member of Maryland Chapter 39
The best teachers are those who show you where to look, but don't tell you what to see.
A. K. Trenfor
MD, Deep Creek Lake
Proud Member of Maryland Chapter 39
The best teachers are those who show you where to look, but don't tell you what to see.
A. K. Trenfor
-
Clemsonfor
- 501 Club

- Posts: 1118
- Joined: Sun Nov 10, 2019 5:14 pm
- Zip Code: 29848
- Tractors Owned: Yanmar YM2000
Yanmar YM186 (non running)
1952 Farmall Cub - Circle of Safety: Y
- Location: Greenwood County SC
Re: Paint removal
Our tree marking paint in forestry had lead in it till not that many decades ago.....I'm would be surprised if there wasn't lead in it.
-
Jim Becker
- Team Cub

- Posts: 17278
- Joined: Sun Feb 02, 2003 2:59 pm
- Zip Code: 55319
- Circle of Safety: Y
- Location: MN
Re: Paint removal
Wasn't it something like 1980 when they finally quit putting lead in interior house paint? Lead was included in industrial type paints until pretty recently. You can bet it is in any paint on an old piece of machinery.
-
smokinmad
- Posts: 6
- Joined: Sun Apr 17, 2022 10:48 pm
- Zip Code: 61841
Re: Paint removal
conservationman wrote:Does anyone know definitively that there is lead in the paint?
I used a test kit; it showed no lead but it hard to tell if there is lead or not. ( "If the swap turns orange there is lead" , not much help)
Thanks
Wally
Conservationman:....its like my ole granddad always said..."Son, when you wire electricity, Always work like dem wires are Hot, it will save yo life".
-
- Similar Topics
- Replies
- Views
- Last post
-
- 3
- 268
-
by AL Farmall Boy
Wed Mar 06, 2024 12:14 pm
-
- 15
- 793
-
by Don McCombs
Fri Nov 05, 2021 9:40 pm
-
- 6
- 254
-
by k hutchins
Thu Apr 04, 2024 7:33 pm
-
- 3
- 242
-
by Glen
Sat Feb 05, 2022 7:10 pm
-
- 4
- 224
-
by CharlieK
Fri Dec 02, 2022 6:53 pm
Who is online
Users browsing this forum: CaperKen, ericofmaine, ghanlin and 0 guests


