Page 7 of 16
Re: Engine Work - Update
Posted: Mon Jan 31, 2022 12:26 pm
by 69ranger
Good work! Glad to hear that you are making progress. Keep pecking away at it, lots of winter, working in the shop weather coming to the midwest this week. That is if your shop is heated..

Re: Engine Work - Update
Posted: Mon Jan 31, 2022 1:50 pm
by ricky racer
Hopefully your ring end gaps fall in the correct range and you won't have to adjust them by filing.
Re: Engine Work - Update
Posted: Mon Jan 31, 2022 5:43 pm
by Stanton
Looks like ring (Hastings) end gaps are within spec. Clearances were .010 for the top rings, .009" for all four bottom rings, and .035" for all the spacers (above/below oil retainer spring). All ring end gaps were consistent at same location in each bore. I took a top ring and placed it into the bore, squared it with the piston, then measured the end gap.
Hastings manufacturer info sheet spoke of a dot, laser mark, or no mark on the rings. If dot or laser, then that went up; if no mark, then it didn't matter which way was up. Mine didn't have any discernable marks on them.
Re: Engine Work - Update
Posted: Mon Jan 31, 2022 5:56 pm
by ricky racer
Looking good. It's always nice when you don't have to file the rings to size.
Re: Engine Work - Update
Posted: Tue Feb 01, 2022 5:54 pm
by Stanton
Re: Engine Work - Update
Posted: Tue Feb 01, 2022 6:06 pm
by SamsFarm
Stanton wrote: an amateur like me.

Coming together nicely!
It is lookin like a pro is doing it!
Re: Engine Work - Update
Posted: Tue Feb 01, 2022 6:21 pm
by ricky racer
Everything looks great! I love doing the assembly of an engine. It's therapy for me. I enjoy fitting everything together and making sure everything is just right.
Re: Engine Work - Update
Posted: Tue Feb 01, 2022 6:23 pm
by Clemsonfor
Stanton wrote:Had a big ol' time in the shop this afternoon. Wanted to take advantage of feeling good and having the time and warm weather. Supposed to get 6"-12" of the white stuff tomorrow.
Since all my bores/rings were within spec, I got the pistons loaded up with rings and upper bearing.
IMG_4767.JPG
IMG_4771.JPG
IMG_4768.JPG
IMG_4769.JPG
Once piston was in, installed the connecting rod with new bearing, hand tightening the nuts. Engine assembly lube was used.
IMG_4770.JPG
Once everything was in place, I torqued the connecting rod nuts to 20 lbs/in per the Specs. Here's the finished install of the pistons:
IMG_4772.JPG
IMG_4773.JPG
Next, was getting the exhaust/intake valves installed. The machine shop did the initial work of grinding the seats and valves, but I still needed to lap them to fit. Did each one, got the valves installed, springs, caps and retainers in place.
IMG_4774.JPG
IMG_4775.JPG
IMG_4776.JPG
IMG_4777.JPG
I cranked it over several times by hand to do the valve clearances---IT CRANKS SO NICE AND SMOOTH. I'm looking forward to getting this engine up and running one day. Thanks to all who have advised and comments. You're a confidence booster to an amateur like me.

I have a feeling someone is being modest about their abilities here!!

Re: Engine Work - Update
Posted: Sun Feb 06, 2022 5:49 pm
by Stanton
Had some time and energy after church, lunch, and a nap to get the head installed.
Head bolts, thread sealant, and copper coat spray on hand to get this step done.
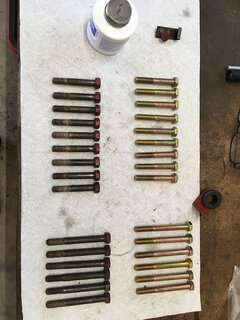
- New Grade 8 head bolts.
First, sealed the head bolt receiving threads in the crankcase using a pipe cleaner. I wanted to be sure sealant was there all the way to the bottom of the hole at the water jacket.
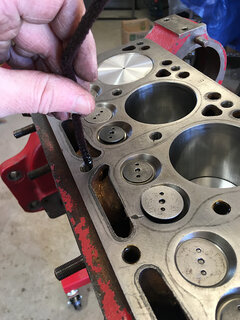
- Sealant for crankcase holes.
Next was sealing the bolts.
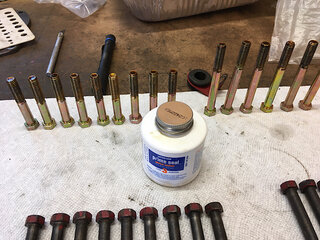
- Head bolts.
I sprayed 2-3 coats of copper sealant on each side of the head gasket.
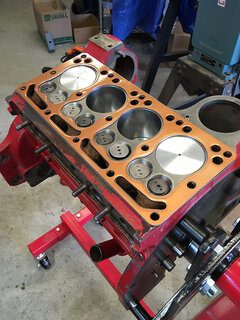
- Head gasket in place.
Lastly, installed head with new bolts torqued to 50 lbs. Taped off the water outlet and temporarily placed old spark plugs in to cover all the holes; don’t want debris getting into the rebuilt engine.
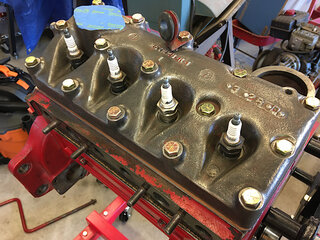
- Head complete.
Re: Engine Work - Update
Posted: Sun Feb 06, 2022 6:02 pm
by Don McCombs
Good work, Stanton.
Re: Engine Work - Update
Posted: Sun Feb 06, 2022 6:49 pm
by Dale Finch
Stanton, I sure wish I lived close enough to you to have watched & learned from this project. Engine rebuild is about the only major task I haven't tackled, and I find it daunting, but from watching your work, feel it would be extremely rewarding.

Re: Engine Work - Update
Posted: Sun Feb 06, 2022 7:20 pm
by tst
are those the correct rod nuts, they should be a locking style nut ? yours looked like a normal nut
Re: Engine Work - Update
Posted: Mon Feb 07, 2022 8:01 am
by ricky racer
The engine is looking good, Stanton! I hope you're enjoying the assembly process as much as I do. I've enjoyed watching your progress just like Dale said. You always do such good work.

Re: Engine Work - Update
Posted: Mon Feb 07, 2022 8:03 am
by Stanton
Dale Finch wrote:Stanton, I sure wish I lived close enough to you to have watched & learned from this project. Engine rebuild is about the only major task I haven't tackled, and I find it daunting, but from watching your work, feel it would be extremely rewarding.

You're too kind. I'm just trying to learn from others on here by heeding their advice and going along in the "Service Manual: Engine GSS-1007" on reassembling order. Certainly, if you were here, we could bounce thoughts off each other and I'd probably have this thing done by now. I'm very slow; tentative, but I'm glad to contribute (in a small way) to the overall knowledge base here on the Forum.

Re: Engine Work - Update
Posted: Mon Feb 07, 2022 8:04 am
by Stanton
ricky racer wrote:The engine is looking good, Stanton! I hope you're enjoying the assembly process as much as I do. I've enjoyed watching your progress just like Dale said. You always do such good work.

Again, kind words that I don't feel I'm qualified to receive. But they're appreciated nonetheless. Thanks, Ricky!


