Clancy radiator problems with fit.

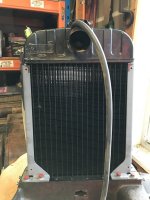
All they would have to do is buy 2 hood supports and cut the right size opening in a flat surface and set the radiator in it for a QA check to make sure everything lines up before they ship anything.

I have bought 2 Clancy radiators and they come well packaged in a shipping box so I’m sure TM or A&I is just putting a label on it and shipping it. I didn’t buy either of mine from TM because they were out of stock. The only way I’d buy another one is from TM only after Ron removes it from the box and checks it.

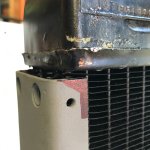
I hate the fact that I’m accepting a poorly assembled radiator but don’t think I have much choice since I bought it 6 months ago. I will let A&I know there is a quality problem. Since I didn’t buy from TM, I’m not really in a position to contact Ron about it. But it would be nice if he could remove everyone he has in stock from it’s box and set it between two hood supports. Send them back to Ireland at Clancy’s expense or ask for his money back if they aren’t straight. The issue wasn’t obvious when putting a square next to mine after Paul’s experience, but it’s real clear when set in the hood supports.

As I mentioned before, JP told me they sell a new radiator that is a good fit. He couldn’t tell me where it was manufactured so I went with Clancy based on their past reputation.
 
I'll dig out an email when I get to work and you should send the guy at Clancy your findings.
When I first emailed them they were going to remake me a radiator to the dimensions I got off my original IH item.
But funilly enough , they don't answer emails anymore.
 
goxu1":3orerbjz said:
When I first emailed them they were going to remake me a radiator to the dimensions I got off my original IH item.
Hmmmmm… Shouldn’t every radiator they make conform to those dimensions? :shock:
 
radioguy41":3excc1us said:
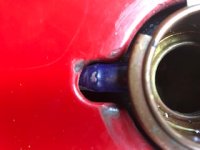
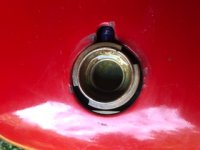
It took me a while to find it but I knew I had a photo of how far off the neck was from the hole. Once I had the side supports off and the rad bolted down it was easy to just pull it forward until it lined up. Then I took a piece of foam and cut holes for the rad neck and aircleaner to keep things aligned while I tightend everything down.

Click on image for a larger view.
radiator misaligned-s.jpg

1958 Farmall Loboy-103.jpg

Thanks for posting your photos and procedure. Mine, with regard to the radiator cap opening aligning with the hood, isn’t near as bad as yours. I bolted it down in front and back with the hold down plates leaving the side supports off. Pushed it forward until it looked good with the hood supports set in place. I didn’t have a piece of styrofoam so I just bolted it down. It’s better than it was but reverted back to a rearward lean just not quite as bad.

This is my backup Cub. I so much prefer to mow with my Lowboy (much stronger engine) that I only plan to use it enough to keep it running and freed up so it’s available as a backup if the Lowboy needs repair.

It now looks like I have about 1/4” space between the fan blades and the radiator. I’m thinking about bending the overflow pipe down a little bit to clear the hood without breaking where it’s connected.

I
 
I inserted the shank end of a drill bit and bent the overflow pipe down slightly. Pushed a clear drain tube on it and it goes under the hood without making contact.

F435E021-A9BB-47C7-A7FF-B0D78EBE19BA.jpeg

I pushed the hood back as far as I could and tightened the support bracket bolts. I do like the fact that the fill pipe comes up through the hood with plenty of room and the cap no longer scrapes it like with the old aftermarket radiator.

0AC27F5E-2E7D-4A54-A7EB-62FB8F53DFED.jpeg

The fan blades have about 1/4”-5/16” clearance at the top of the radiator. So, I don’t think I’m going to get it much better than this. I wasn’t planning to run the tractor yet since I have other stuff to work on, but I added about 1.3 gallons of hot water to the radiator and there are no leaks at this point.

It was 96° yesterday when I fastened the radiator down. I am a fan of Indianhead gasket shellac but I didn’t have any so I used Permatex gasket cement. Probably should have waited for a cooler day because my gasket seemed to be getting squeezed out faster than normal. I won’t know for sure if I have a good seal until I run it.

So, it looks like I’m going to be okay with this Clancy radiator but, I shouldn’t have to do what I did in order to get it to fit. I’ll repeat what I said before. If you want to buy a Clancy, buy from
TM but insist that the radiator is first removed from the shipping box and checked.
 
Well , I just received another radiator in the mail a few days ago.
I had a bit of spare time yesterday so I got it out of the box and bolted it onto the "new" bolster I have.
It all bolted up with no problems , sit nicely between the side supports with no interference anywhere.
Looking side on , the radiator sits vertical with no lean at all.
The only difference with this radiator is the rubber pipe for an overflow. I'm going to fight my OCD and leave it as it is.....
This radiator was a NOS item made in 1981.
The next step is to get the 'new' bolster on and see if the rest lines up...fingers crossed

IMG_7172.JPGIMG_7171.JPG
 
goxu1":1h0awa9e said:
Well , I just received another radiator in the mail a few days ago.
I had a bit of spare time yesterday so I got it out of the box and bolted it onto the "new" bolster I have.
It all bolted up with no problems , sit nicely between the side supports with no interference anywhere.
Looking side on , the radiator sits vertical with no lean at all.
The only difference with this radiator is the rubber pipe for an overflow. I'm going to fight my OCD and leave it as it is.....
This radiator was a NOS item made in 1981.
The next step is to get the 'new' bolster on and see if the rest lines up...fingers crossed

Congrats on this latest unit in this radiator saga. Maybe you've turned the corner on this and things will mate up better from here on out... :wink:
 
Hi,
I noticed in your pics, the radiator ID tag is on the rear side of the radiator, and you have the side panel in the pic facing with the hole with the threads for the hood bracket bolt, to the rear.
The hole has to be at the front, if the hood brackets are in the original position.
You need to change the side brackets to the opposite sides, so the threaded holes are at the front.

I wish someone would make replacement radiators that are exactly like the originals were. :)
 
Hi Glen , I’ll try and remember that when going back together
This all was just sitting on the bench
 
Hey everyone
Sorry to revive this old thread, but when getting my winter Cub ready for the season l noticed some moisture near the bottom of the radiator. This leads me to believe that l may have a small leak. Not so much that it drips onto the floor, (no wet spot there) but enough that there is moisture below it in the bolster.
I remembered this thread and decided to check for any more up dates.
Where do we stand on replacement radiators? Did Clancy ever fix their issues? What is the recommended fix at this point in time?

Thanks in advance for updated info
Hutch
 
Can’t answer your question, but I’ve been hearing good about the new radiators that JP Tractor Salvage sells. That may be the next good fitting radiator. I don’t have any personal experience with it, but many others have commented favorably.
 
Back
Top