Items used:
--24"x24"x1" high density foam (JoAnn Fabric Store)
--approx. 1 yd of black canvas material (JoAnn Fabric Store)
--Loctite 300 Professional Spray Adhesive
--smooth jaw channel locks
--electric knife
--0.120 window screen cording (rubber)
--blue tape, marker, ruler and all the other items necessary
--a helpful wife (or friend) who knows how to sew and is your 3rd hand
I purchased the foam, fabric and adhesive over the winter and left them in the plastic bag hanging on the back of a dining room chair for weeks. The foam was rolled up. This actually helped put a curve in the foam, so when I was ready to cut it, it contoured to the pan seat w/o much trouble. I like happy accidents.
Mark the center line on the foam.
Take the seat and cut two paper patterns out; one for the lower part and one for the upper back. These will represent the contour of the seat. You will notice I marked the center line of the upper and lower paper patterns so they would line up later. I also cut the outside edge of the paper right at the opening of the lip, then when my wife was ready to cut the fabric, she left a couple inches beyond that.
Next, transfer the paper pattern to the foam, lining it up with the center line. I used a Sharpie ink pen. Also decided to keep the upper and lower pieces of foam attached in the mid-section (for stability).
Tape off the lip of the seat--you don't want spray adhesive on it. Then, follow the manufacturer's recommendations of the Loctite 300. The stuff seemed pretty good. I applied 2 or 3 coats to both pan seat and back of foam. My wife provided a 3rd hand to help press the foam to the seat. This spray adhesive warns that touching it together will create a bond that cannot be repositioned. So, be sure to get it right the first time.
After the seat foam sat overnight, I used an electric knife to trim off the excess foam. This picture was taken "mid-trim", so it's not completely trimmed.
My wife did a great job on the canvas. She first used some old fabric and made a mock-up from the paper pattern, so we'd see how it lay. Then, she used the pattern to cut and sew the two pieces of black canvas together. She also marked the center line on the back, especially at the top and bottom of the fabric so we'd have a reference point when pressing it to the foam. Here's the fabric and foam with 2-3 coats of spray adhesive appiled. Again, my wife helped with lining it up and then pressing it in while I held the fabric up away from the foam.
After another day to let it cure, it was time to press the fabric into the lip of the seat. I used rubber window screen cording; the smallest diameter they sold. The purpose of the cording is to provide a physical element within the lip so the fabric can wrap around it. When the lip is pressed shut, the fabric plus the cord prevent the fabric from pulling out of the lip area. I found that the Loctite didn't stick that bad, so was able to lift it up and remove all the blue tape.
A pop sickle stick worked great as a push-stick. It was wide, rounded and blunt. Fortunately, we had two sizes and I used the larger size; about the size of a tongue depresser. Start at the top, back of the seat and gentle push the fabric from the foam side (not the excess fabric side) into the lip opening. By pushing from the foam side, you gently pull the canvas tight over the foam; makes a better appearance without any wrinkles. Don't misunderstand, some of the excess fabric will get pulled down inside the opening, but if you can try to pull from the seat side, I think the end result will be better.
I taped up the smooth jaws on the channel locks, but it still mared the paint. When you have an inch or two section inserted, use the pliers to close the lip. Using this method, work your way around the lip several inches, then switch to the other side of top center and work in that direction. This way, the fabric is evenly pulled around the seat.
When you've completed the whole seat, now comes the hardest part--trimming the excess fabric. I used a narrow blade, steel paint scraper as a shield against the good fabric and pressed it down as far as I could. Then, I used a couple of cutting tools--X-acto knife and single edge razor blade. The razor blade seemed to cut better, but had to use a couple due to cutting against the metal dulls the edge/corner of the blade. So, use new, very sharp blades because the canvas is tough and difficult to cut.
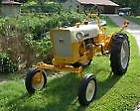
With a lot of patience, the finished result.
The seat turned out really nice and I was very pleased. I'd like to thank DustyB for sharing some pictures and advice on his seat reupholstry job. That gave me the confidence to try this. Hope this helps if you decide to tackle it yourself. Probably do this again for my '47 Circle Cub.