I've been muddling my way around bending small diameter steel tubing and EMT conduit for years, but never seem to develop good, reliable technique. I have a collection of manual (lever type) benders (Ridgid and Imperial Eastman), but would like to be better able to approach projects with confidence. For example, I know you have to subtract a bender offset for a right angle, but when I start getting into multiple bends where you have to reverse the bender, back to back bends, and offsets, it all gets pretty ugly. Can anyone recommend a good reference for tubing bending? I've got to make some 5/8 inch OD (steel, 0.035 wall) tubing bends to replace the hydraulic lines on my 340 Utility. I've searched via Google, and couldn't find anything. Maybe someone needs to write a "Tube Bending for Dummies" book. Any help would be appreciated!
You are using an out of date browser. It may not display this or other websites correctly.
You should upgrade or use an alternative browser.
You should upgrade or use an alternative browser.
Tube Bending
- Thread starter Paul_NJ
- Start date
Into Tractors
501 Club
Paul, not sure if this will help much, but here's a link to how to make a replacement fuel line for your cub. It might give you some idea's?
http://farmallcub.com/phpBB2/viewtopic.php?t=12917
http://farmallcub.com/phpBB2/viewtopic.php?t=12917
Rick Prentice
501 Club
Paul, I have one of these benders. http://www.hossfeldbender.com/tooling_options/basic_pipe_eye_bolts_rings.php#2
I'll try to find the manual and see if they show any tips.
Rick
I'll try to find the manual and see if they show any tips.
Rick
In machine building bending tubing is an art. Every piece of tubing on a machince that runs parallel has to have the same bends and look good too. Sometimes we ran up to 12 tubings together for 25' up vertical with bends all the way up.
I have seen the new guys we hired doing tube bending for the very first time have a garbage pail of scrap tubing by the end of the day. It takes a lot of practice to get the hang of bending tubing. We did have some old timers who just did tubing too they were label as "tubers". Its not easy when you start doing it but once you learn how to do you will get fast at it. I would invest in a good bending tool.
On adding hydraulic lines to a tractor you have to figure how many lines are needed and the route they need to go first. Then you need to think about the vertical steel plates you need to bolt or weld on to clamp the tubing to. Once the route and the clamping plates are done your ready to go and start bending. You can make a practice or sample bend out of a piece of cardboard too so you will have the exact bend thats needed and just match that and then tweek in to be perfectly aglined when you clamp it. Then use your first tubing as a sample and match that with the others. Using a proper bender makes the tubing look very professional too. Once its all clamped up you can use a block of wood to make them all even by lightly taping them down.(multiple tubings together)
You will be very proud of the end result when its done right.
I just purchased a pipe bender for doing subframes for loaders and backhoes. I'm bending 4" pipe and its one of those cheap benders too with a hydraulic jack that costs $99. I also bent a trailer draw bar out of square stock too with it.
Bill:
You know.. that kind of information is what is needed. How about writing up a nice How To Bend Tubing.. for those of us who haven't got a clue and are scared out of our collective wits to try this...
My Dad always said.. "if you can get a master to teach you it is better than all of the book learning in the world". He was right.. as usual :roll: :wink: :!:
:!:
You know.. that kind of information is what is needed. How about writing up a nice How To Bend Tubing.. for those of us who haven't got a clue and are scared out of our collective wits to try this...
My Dad always said.. "if you can get a master to teach you it is better than all of the book learning in the world". He was right.. as usual :roll: :wink:
:!:Rudi":53e533lp said:Bill:
You know.. that kind of information is what is needed. How about writing up a nice How To Bend Tubing.. for those of us who haven't got a clue and are scared out of our collective wits to try this...
My Dad always said.. "if you can get a master to teach you it is better than all of the book learning in the world". He was right.. as usual :roll: :wink:
First before you start bending tubing first plan on how its going to run from your starting point to the finish point. Then you have to figure out how many supports your going to add inbetween so the tubing will be clamped to it as it goes on its path. Thats the key to a neat tubing job. On a tractor we need some 1/4" thick steel x 2" wide to add for supports, the length is determined by how many tubes your running. You do need room between each tubing too. And don't forget the "RUB" points too. Down the raod over time if it rubs a spot it will wear thru the tubing and cause a leak at a bad time of course. Make sure your tubing runs freely from having any rub spots.
Rather than doing sharp 90 degree bends i like to try to keep the tubing at 45 degree bends were i can too. The less bends in degrees looks much better.
Now one thing to figure out in a bend is how much length will the bend add to the tubings length. You need to figure that into the straight length of the tubing too and start your bend farther back to compisate for the bend. You need to figure your bends into the straight runs so it will come out even. No "S" bends here, nice square bends and nice even angles thats the key to doing tubing. It has to be "PERFECT".......
I've bent some steel brake lines before but had not thought about all the things that BigBill mentioned like adding in the length for the bends, or using a jig to clamp the tubing on. This got me to thinking about copper tubing. While not cheap, it is very bendable and has many of the properties of the steel tubing needed for higher pressure.
Imagine some copper tubing marked off in feet or meters or whatever. Bend up the copper as a trial piece. Once all the bends are in the right place, you have had some practice making the bent tube and you have an idea how much tubing you will need.
Since I'm a cut-and-fit kinda guy, I could see using the copper trial piece to confirm that all the bends are fair and that there is no interference nor pinch points. Once the prototype is proven good, then start bending the steel tubing.
A woodworker friend of mine used a lot of jigs and fixtures when he was making cabinets. When I asked him about all the writing on these jigs, he said it was easier to keep notes on the jigs themselves rather than keep track of both jig and notes. I can see using the tube bending form/jig the same way. As you bend the copper, make notes on the jig for angles, sequence, whatever.
I'm not sure how much a trial piece would help, but I need all the help I can get.
Dr. Spiff
drspiff":4jm9uisy said:I've bent some steel brake lines before but had not thought about all the things that BigBill mentioned like adding in the length for the bends, or using a jig to clamp the tubing on. This got me to thinking about copper tubing. While not cheap, it is very bendable and has many of the properties of the steel tubing needed for higher pressure.
Imagine some copper tubing marked off in feet or meters or whatever. Bend up the copper as a trial piece. Once all the bends are in the right place, you have had some practice making the bent tube and you have an idea how much tubing you will need.
Since I'm a cut-and-fit kinda guy, I could see using the copper trial piece to confirm that all the bends are fair and that there is no interference nor pinch points. Once the prototype is proven good, then start bending the steel tubing.
A woodworker friend of mine used a lot of jigs and fixtures when he was making cabinets. When I asked him about all the writing on these jigs, he said it was easier to keep notes on the jigs themselves rather than keep track of both jig and notes. I can see using the tube bending form/jig the same way. As you bend the copper, make notes on the jig for angles, sequence, whatever.
I'm not sure how much a trial piece would help, but I need all the help I can get.
Dr. Spiff
Rick:
Copper tubing on a Cub is a no-no especially for the gas line. One of it's great strengths is it's pliability, but it becomes a liability on a Cub when used for the gas line. I have 2 cubs that had copper lines. Until I can properly bend the steel brake line replacement, I am using rubber gas line. It isn't much safer, but it does not become loose from movement like the copper will and leak.
Notes on Jigs is probably a very common habit for cabinetmakers. Especially when dealing with many different jigs and dies for building restaurants, banks, casino's etc. I have used that trick for almost 40 years now.. and it is invaluable. I have even gone to similar tricks on laminate and metal jigs by using paint pens to label and jot notes on jigs. Excellent habit to get into.
George Willer
501 Club
I understand that Drspiff's copper line wasn't intended for anything more than a trial piece before bending the actual steel line. The danger with copper line is that it can work harden from continual vibration and become brittle.
Too bad I don't have a better picture of the space jig Clem and I are using to make a steel line. It locates the two ends of the line relative to each other so when the line fits the jig it will also fit the tractor.
Sorry about the size of the picture.
Too bad I don't have a better picture of the space jig Clem and I are using to make a steel line. It locates the two ends of the line relative to each other so when the line fits the jig it will also fit the tractor.
Sorry about the size of the picture.
George:
Is there any way for that Jig to find it's way to paper or a CADD program? I have seen a couple of your other pictures, but how to make it is beyond me. Sure would be useful for those of us who a still newbies to this arcane art... I am one of em to be sure.
And George, you are right, Rick did mention it was a trial piece.. but it didn't register. Good safety reminder for the Safety Nut in Training...
 . The problem with the copper tube for a gas line needs to be brought up occassionally.
Is there any way for that Jig to find it's way to paper or a CADD program? I have seen a couple of your other pictures, but how to make it is beyond me. Sure would be useful for those of us who a still newbies to this arcane art... I am one of em to be sure.
And George, you are right, Rick did mention it was a trial piece.. but it didn't register. Good safety reminder for the Safety Nut in Training...
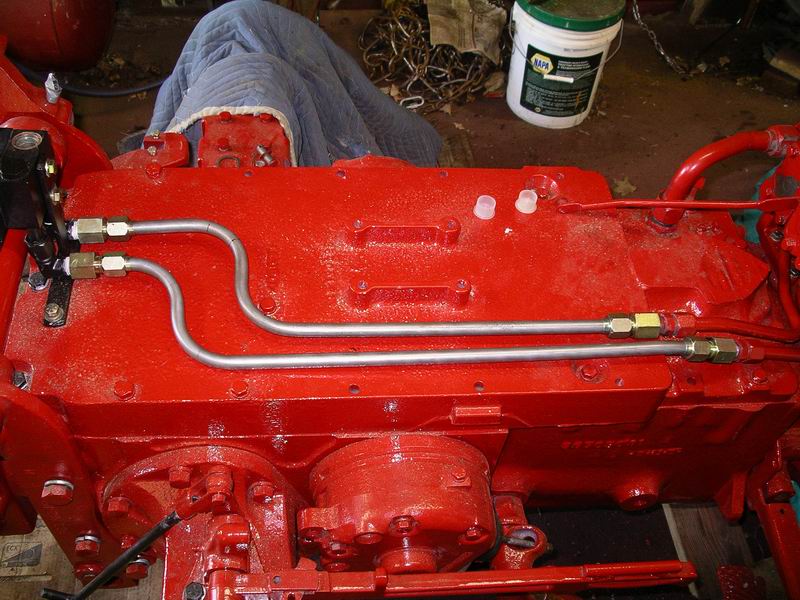
Well, they aren't perfect, but this is what I ended up with in attempting to replace the 5/8 inch tubes under the seat of my 340U. Some time back in the tractor's history, sections of the original tubes were cut out and replaced with hoses, which I wanted to remove.
Ha, there were several unintentional "trial versions" lying on the floor before I was done.
Ha, there were several unintentional "trial versions" lying on the floor before I was done.
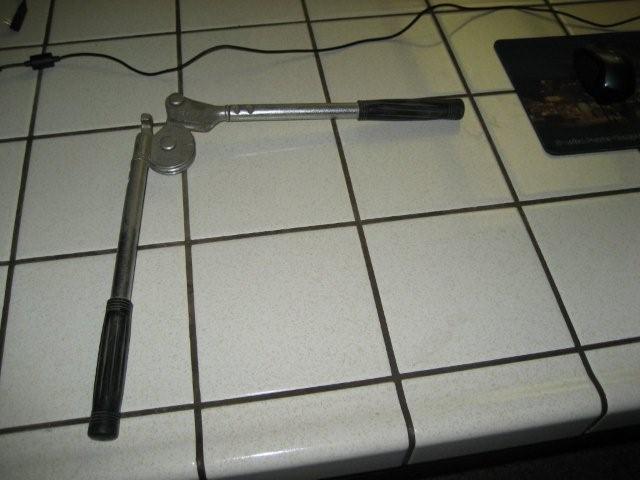
I used to be a master tubing bender....been 21 years since I did any....did alot of 1/4" & 3/8" stainless. The hand bender has marks on the handle to line up with the center of the bend. So when you measure tubing lenth I always marked the tubing and lined it up to the line then rotated it to where you need it to go...I will look in my tool box and see if I still have my bender and see if I can explain it with pictures....
Robert
Robert
Paul:
You and me too :!: :arrow: :idea:
Paul_NJ":1tedh9r2 said:I'd like to see that myself. I know how to make a right angle bend, but beyond that I'm a trial-and-error type and waste alot of tubing. I would like to learn the right way.
You and me too :!: :arrow: :idea:
Hi. In my time as a pipefitter, I bent miles of tubing offsets and multi runs. It takes time and practice. Sometimes you have to add the dia. other times subtract the dia. and sometimes add the space between the tubes your running. Where are you located? Buy extra and practice. Holman New Jersey
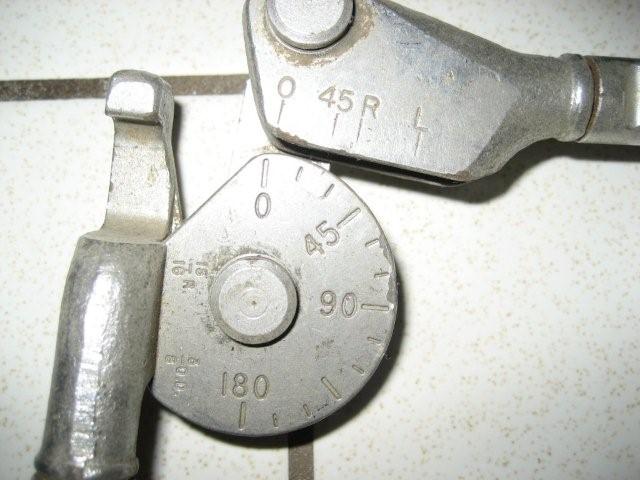
i am also a pipefitter and tubeing & instrument fitter. from my experance you can get a good idea of how it's done from a book but ( BIG BUT ) you will have to bend alot of tubeing to get good at it. there are many trick's to the trade that take time to learn. you must measure correctly to start with, you will have to consider the take-out of fitting's used. if lines are to be run side-by-side you must plan your bend's and add or subtract the o.d. of each line ( if lines are touching each other ).alway start at one end of line and never reverse the bender unless you have to. alway's use the center to center measure to make your bends. use a speed square to check your bends and adjust as needed, you will have to go past the marks on the bender ( a little )as the tube will tend to spring back a little. some things are only learned by hands on experance! bend a coat hanger like you need the tube and look at it before you make each bend. use a sharpie marker to mark where you need line up the bender on the tube. here is the easy way to do it .....example...two bend's with center of bends 12" apart in a run of tubing...mark a tube with the sharpie where where you want the first bend,place tube in bender with sharpie mark at the the two zero's on bender lined up, bend your 90 , next measure from center of that bend and place a mark at 12" and line that mark up with the 0 dagree line again and bend another 90. you can do this also on 45's. this way you do not have to add or subtract for the radius of of the bend. do not reverse the bender when you do it this way. aint it easy. ") edit..the bender in the above photo has an L where on some benders there would be a 90, just depends on the brand of bender.
edit..the bender in the above photo has an L where on some benders there would be a 90, just depends on the brand of bender.
edit..the bender in the above photo has an L where on some benders there would be a 90, just depends on the brand of bender.John *.?-!.* cub owner
501 Club
One thing I learned while making gas lines for my cubs was that the brake lines from Autozone, or a nice black color and easier to bend than the ones from NAPA. By the same token, I think I would prefer brake lines made from the NAPA ones, but for gas lines, Autozone ones are good enough.
This looks like a great tubing bending instruction manual from Swagelok.
http://www.swagelok.com/downloads/webcatalogs/EN/ms-13-43.pdf
I work for 16 years at a power plant so I have done a ton of tubing bending. It takes a good deal of practice to turn out really nice multi tubing runs.
http://www.swagelok.com/downloads/webcatalogs/EN/ms-13-43.pdf
I work for 16 years at a power plant so I have done a ton of tubing bending. It takes a good deal of practice to turn out really nice multi tubing runs.