Page 2 of 3
Re: Euclid paint
Posted: Thu Aug 01, 2013 5:50 pm
by birddog
Thanks Rudi; but believe me up close, my welding,along with fit and finish leaves a lot to be desired. My goal is always so it looks good at 100 yards, in a blizzard, at midnight, during a new moon.

A little more background on the build. I started it in about 06 but quit when I couldn't get the steering to work. I was trying to use cables and thought I had it figured out. It would turn nice, but when I would try and turn back the cable would jump the pulleys. Then last summer I decided to try hydraulics. I had thought about it before but I didn't think I could get it to turn sharp enough. (it should make a 90) I figured though that I would give up the 90 degree hopes in order to finish it. I spent a lot of hours on it last year. Every time I got one thing working, I decided to make something else functional. This year has seen a lot of hours too, with finishing the year hydraulics, the hoods, and the paint. As you can see it still needs head lights and rear work lights, but I haven't figured out yet how to put round lights into rectangular holes.
You can't see it in the pics, but under the GT18 H in green it says "by Lawn Boy". (I thought seeing it gave up its life for this project I would at least acknowledge it)
Re: Euclid paint
Posted: Thu Aug 01, 2013 11:10 pm
by danovercash
What about lawn-boy green? Years ago I needed to paint a lawn-boy deck but for whatever reason I wound up using a DuPont aerosol called "parrot green" may not match Euclid, but close.
Re: Euclid paint
Posted: Fri Aug 02, 2013 8:40 am
by Smokeycub
Mark, That is fabulous! What on earth gave you the inspiration to build it? It looks like you have some space in the back to add another engine
. Now that would really be something special, not that it isn't already! I'm amazed! Great job.
Re: Euclid paint
Posted: Fri Aug 02, 2013 12:06 pm
by Bill E Bob
Another forum example of elegant engineering and fabrication

Re: Euclid paint
Posted: Fri Aug 02, 2013 2:17 pm
by Roy47
I had to edit my previous post
Re: Euclid paint
Posted: Fri Aug 02, 2013 2:35 pm
by Roy47
Rudi, you said you were going to look up LeTourneau so for a little history lesson. The LeTourneau plant was located in Toccoa Georgia. I have been in the old plant several times year ago and you could see the old conveyor tracks and massive hoist positions for moving the machines around. The buildings were designed to handle some massive equipment. The plant is located out at the airport and the last time I flew in there a few years back the buildings were still in good shape. Mr. LeTourneau was well known in this area for his generosity. As a kid we call all graders turnapulls no matter what they really were. I made the statement in my previous post that LeTourneau was gone but when I looked up LeTourneau on Google it appears the company name still exists. However LeTournea has been gone from Toccoa a lone time.
Roy
Re: Euclid paint
Posted: Fri Aug 02, 2013 5:50 pm
by birddog
Thanks all for your comments, I appreciate them. Kind words always help make a project like this, more worth while.
danovercash; I thought about Lawn Boy green, but it wasn't quite right and all I could find was spray cans and they weren't cheap. (from what I found looking for LB green, Rustoleum Grabber green engine paint is suppose to be a match)
Smokeycub; I'm not entirely sure about my inspiration. I did see one back in 04 at a tractor and engine show and that probably sealed the deal. I probably started thinking about it though when I saw other scale equipment. I had thought about making the rear axle powered as I have another hydrastatic Lawn Boy lawn tractor. There where two basic reasons I didn't though. First, it's my wet weather and back up mower. Second, I would have had to come up with a different way to move the extractor.
Re: Euclid paint
Posted: Fri Aug 02, 2013 6:33 pm
by Rudi
Roy:
I did look up Mr. LeTourneau (a very nice Acadian name btw)
and I enjoyed the read. And yeah, he apparently was a very generous man. To fund a University is really something. Also when I was googling - a lot of hits for LeTourneau equipment. Apparently there is someone building/rebuilding them ..
Steve's Sales and Service, I think that is pretty cool.
Mark:
birddog wrote:Thanks Rudi; but believe me up close, my welding,along with fit and finish leaves a lot to be desired. My goal is always so it looks good at 100 yards, in a blizzard, at midnight, during a new moon.
Nah, don't be so hard on yourself, that is really nice work and I would love to see it in person. The ability to see it in your head and then make it work is real talent... real honest to God talent and my friend you done gots some of dat dere

birddog wrote:As you can see it still needs head lights and rear work lights, but I haven't figured out yet how to put round lights into rectangular holes.
I am not sure either how you would do that. I am sure though that you WILL figure it out

Re: Euclid paint
Posted: Sat Aug 03, 2013 5:46 am
by Virginia Mike
When I went to heavy equipment operators school in Florida they had a wheel dozer made by Letourneau Westinghouse.
The diesel ran a big generator and the wheels were driven by electric motors.
It steered like a skid-steer, controlled by switches on the dash.
A strange beast.
Re: Euclid paint
Posted: Sun Aug 04, 2013 6:04 pm
by birddog
A big THANKS to Rudi. Because of his kind words, and confidence in me, I went out to the shop last night to tackle the lights. After a couple thoughts and tries that failed I came on the answer. So I'm happy to say that the headlight bezels and mounts are built and awaiting for the fronts to be painted. (pictures in a couple days when they get mounted) The rears are going to have to wait for a few days until I get more materials. I had to guess on the width (depth) of the bezels and my first try was 3/4 inch. It turns out that they needed to be 7/8, but to be safe I made them 1 inch. Guess what? Now I have a piece left that's only big enough to make 3/4 inch pieces, and the rears need to be at least 7/8 also. I may have needed more any way as I haven't decided if I want work lights on the back of the power unit. (more rectangular holes and more bulbs to buy)
Re: Euclid paint
Posted: Sun Aug 04, 2013 10:06 pm
by danovercash
How much work can you get out of that beautiful creation, or is it just for show?
Re: Euclid paint
Posted: Mon Aug 05, 2013 5:46 pm
by birddog
danovercash; It's mostly for show. I'd like to try it, but at this point I don't want to scratch up the paint. Maybe next year after it's made our local parade and celebration at least one time.
That being said, I really don't know if it would have enough traction and power to do any real work. Maybe some loose dirt on a paved surface. The biggest thing I would worry about though are the tires on the power unit. They're the original tires from the late 80's and they're pretty well cracked up. The other thing I'm not sure of is the hydraulics pushing the extractor forward. It's only a single acting cylinder and I don't know if the hydrastactic system has enough oil capacity to extend the cylinder and keep the scraper moving.
Re: Euclid paint
Posted: Mon Aug 05, 2013 7:19 pm
by danovercash
Either way it's a beautiful work of mechanical art!
Re: Euclid paint
Posted: Wed Aug 07, 2013 6:17 pm
by birddog
OK, here's the pictures of the lights as promised. The front and rears are both made from 4" sewer pipe with a couple differences. On the front I started with a 1" wide band cut from the flared end of the 10' pipe. This band was chucked in the wood lathe and a slightly tapered cut was made to remove about 1/2 the thickness from the inside. (the cut on the edge was about 1/2 the thickness and tapered to the outside) This allows the light to snap in to the band/bezel. I then bent a heavy duty piece of plumbers tape to fasten to the back of the bezel. (see picture 3) Then just a flat plate cut and drilled to fasten the bezel assembly to the original mounting bracket. For the wire cage I took some 1/2" mesh hardware cloth and formed it around the bezel and held it in place with a hose clamp. I'm not real happy with the look of the hose clamp, so I may make some other type of band to hold it together that doesn't look so bulky.
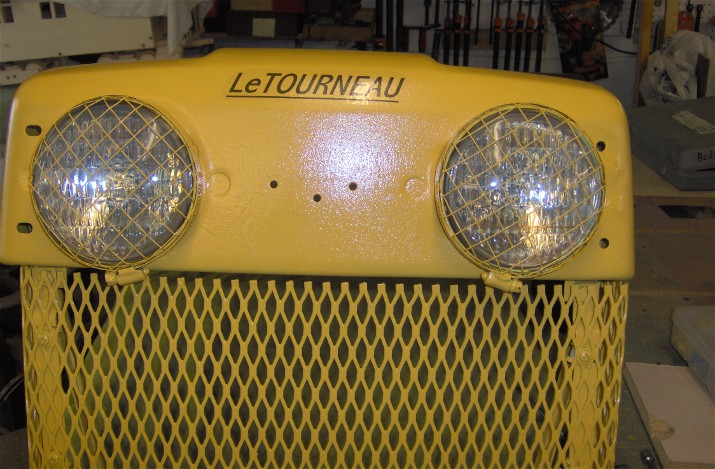
- IM000204.JPG (124.86 KiB) Viewed 271 times
I haven't figured out yet what to do with the excess holes in the grill.
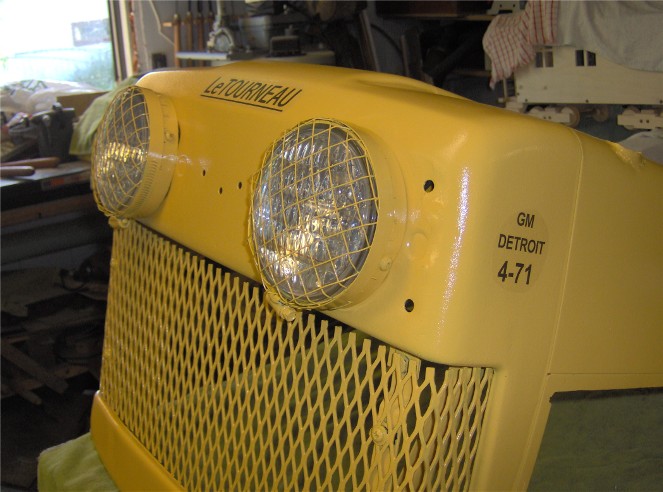
- IM000205.JPG (91.77 KiB) Viewed 271 times
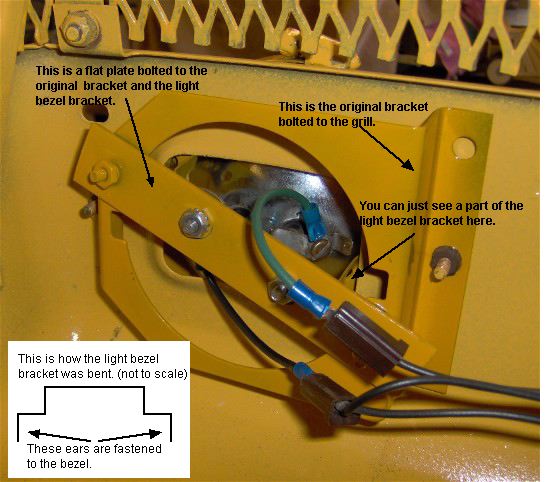
- light brackets.jpg (56.54 KiB) Viewed 271 times
Here's one of the rear work lights. I did come up with a plan here so I wouldn't have to buy more materials. I used the first set of bezels I made that were to narrow. I placed a bulb in the bezel then glued a 5/8" wide piece of the 4' pipe inside the bezel and against the back of the bulb (I had to notch the inner ring on the inside to allow for the alignment knob(?) on the bulb) I also notched the inner ring on the out side so that the attaching brackets (just a couple short L brackets I made) would fit flush. I still need to make the wire mesh for them, get bulbs and clamps. If I put work lights on the back of the power unit they probably will be very similar to the rears.

- IM000203.JPG (71.08 KiB) Viewed 271 times
Re: Euclid paint
Posted: Thu Aug 08, 2013 11:34 am
by Rudi
Mark:
What an elegant solution.

I knew you would come up with the fix to the round bulb in the square hole problem

This is a really project and the fit and finish is excellent. Never mind the 100ft thingy .. this is up close and it looks really good

Wow is all I can say
I agree, the hose clamps are a little off - but ... I would have to measure it but I would think some 16ga or 18ga 1/2" metal banding could be formed similar to the headlight rings and fastened together with a small say 6-32 machine screw and bolt? Or something like that.