Page 3 of 10

Posted: Sat Nov 03, 2007 11:38 pm
by drspiff
Rudi wrote: And I need sliding barn door hardware and the track. I remember seeing it at Princess last year ... seemed to be a stock item. Will have to check the Co-Op too I guess. I can't even remember what the stuff is actually called. All I know is that it uses a rectangular steel tube or inverted C-Channel.. has dolly wheels up top with levellers and guide wheels on the bottom that runs against the building... I want to build on 8 foot x 9 foot sliding door...


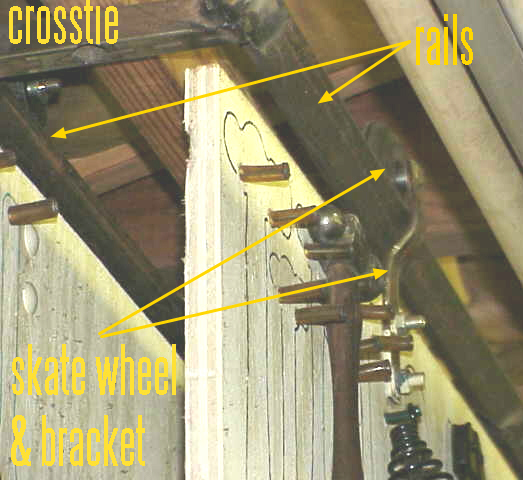
Have I got a deal for you! I needed to hang some panels in the shop for tools. The panels are 4'x8' 3/4' Ply and each probably has 200~300 pounds of tools hanging on. The panels hang from an overhead rail system and the rollers are inline skate wheels. The rails are 1" angle iron turned so they look like a "V" when seen end on. There are 2 rails 10" apart. I cut pieces of 1" square tubing 10" long with a 45 degree on each end. The cross pieces are welded every 4' and have a strap that extends from the center of the cross piece up to rafters. The rails hang below the rafters about 5". The skate wheels ride in the angle iron groove. The bracket connecting the skate wheels to the panels looks kinda' like a question mark. This allows the panels to hang straight down. If you need to support more weight add more wheels and put the crosspieces closer together.

But the neat trick for a sliding door is to have the rails angle away from the door opening. Imagine when the door is closed, the rail is 3" from the front of the building. Make each support a little longer as you move towards the "door open" end of the rail so that by the end the rail is 6" from the building. As you push the door open it moves away from the front of the building. The secret to success is to have the door flat to the building, not aligned with the rail. This way when the closes, it is tight on all 4 sides. Having an offset rail means no dragging seal, and a much better chance that you can actually get a good seal on the door.

I used this technique when I built my smelting furnace. The lid is 24"x36" of firebrick in a metal frame. Using the offset rails, I can move the lid easily but not tear up the high temp insulating rope used as the seal.

Rick (Shade Tree novice) Dulas

Posted: Sun Nov 04, 2007 10:42 am
by John *.?-!.* cub owner
Rick, that sounds like a great set up, but wouldn't it have saved a lot of time, and maybe not much higher to get regular door track and dolleys? The round track with the egg shaped wheels seems to work quite well.

Posted: Sun Nov 04, 2007 10:05 pm
by drspiff
There were several reasons I built my own track and trolley. The first was cost, my system cost about $15 dollars for the 16' angle iron and $3 for a pair of inline skates from the Mission. The rest I already had on hand. The second is quiet. There are no connectors, and the polyurethane skate wheels very quiet. They also come with ball bearings rather than the bronze bearings in the commercial trolleys. The third reason for DIY was that the rails and associated trolleys had to fit a particular space. The total time to build was about 4 hours.

For my purposes, what I built fits my needs much more closely than a commercial unit would have. If I were a building this for someone I would probably recommend the commercial unit because I could erect the commercial system is less time and would not have to around to hear the metal-on-metal noise.

If I have to admit it, I was pleased that I could design and build exactly what i was looking for. The value of being able to say "I did that." is pretty high for me.

Rick (looking for new challenges) Dulas

Posted: Sun Nov 04, 2007 11:59 pm
by Rudi
Rick:

Sounds neat. Image or two would be very very illuminating... :idea: :!: :big smile:

Posted: Mon Nov 05, 2007 9:48 am
by John(videodoc)
WOW, that is one sturdy looking building. Must be so sturdy because of the I Beam and the winter snow...... Looking Great. :!:

Posted: Mon Nov 05, 2007 8:01 pm
by drspiff
Rudi wrote:Rick:

Sounds neat. Image or two would be very very illuminating... :idea: :!: :big smile:
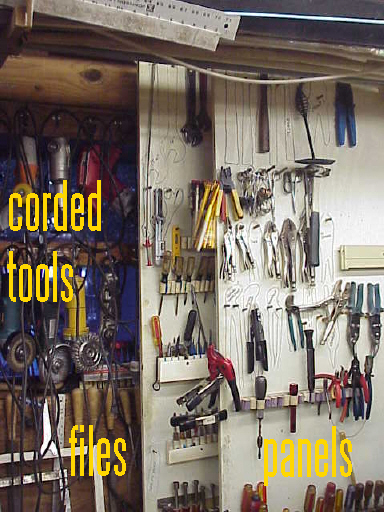

Ask and ye shall receive! (and as a special added bonus, a way to store tools with cords)

Here are the 2 hanging panels in front of the corded tool and file storage.

Image

Here is a closer look at the tracks and wheels

Image

The bracket is a piece of strap which was drilled in 3 places before being bent in the vise. The top hole has a piece of rod inserted for the axle and welded on the back side. The skate wheel bearings slide over this axle and retained with a circlip/e clip/semi-circular thingy. The lower 2 holes are the mounting holes for the panel which allow the panel to be bolted to the bracket with 5/16" carriage bolts. Notice the bend in the bracket. The bend keeps the weight of the panel directly under the wheel so the panel hangs vertically.

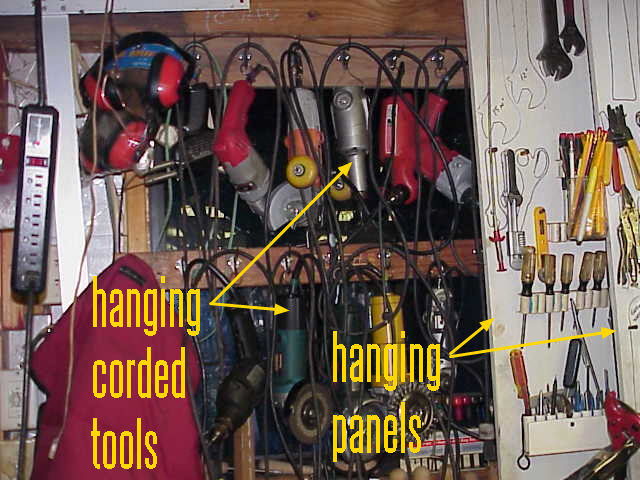
Here is a shot of the corded tool storage. I have tried probably a dozen different ways to store things like drill motors, grinders, etc. And this is the best I have come up with so far.

Image

I make some rings out of 1/8" welding rod and strapped a ring to the strain relief of each tool using nylon tiewraps. The board they hang on is scrounged from a Nordic-Track and has coat hooks every 8" screwed into the wood. There are 2 of these hanging boards screwed to the studs on either side of the window. I hang the tool's ring on the hook, and loop the extra cord up over the same hook. To use a tool, just grab it off the hook and the cord follows.

To make the rings, tightly wind the welding rod around a piece of 3/4" gas pipe making a coil. Cut the coil along its length and you get rings which are slightly warped. Get the BFH and pound them flat. When they are flat, weld or braze the ring ends where they butt up. You now have a bunch of rings that will take more weight than the coat hooks will support. I used 3 tiewraps on each tool and have not had a tool fall in the 2 years the boards have been up.

I hope these ideas may be of some use or give you another way to look at tool storage.

Rick (ALWAYS looking for better ideas) Dulas

Posted: Mon Nov 05, 2007 10:19 pm
by Rudi
Rick:

Thanks for the pics. Looks kinda nifty... and a good use of space. I can see the uses for it, especially if you are lacking room for wooden tool boxes. Wooden Tool Panels will suffice :big smile:

Now all:

I finally added some more pictures of the Pole Barn Project. They are not all captioned yet, but they are up. More pics to follow.

I am enjoying this project immensely. I love to build stuff and construction has always been my favourite right after cabinets and furniture. Now of course, metal working and implement fabrication is moving up the list fast :big afro: :big say what: :big smile:

Designing the beam pockets and and figuring out the beam requirements and how to build a Pole Barn are right up there in the satisfaction category... :!:

Here is a tease
Image

And we are worried about how much weight :?: :?: :wink: :brainfart: :big give up:

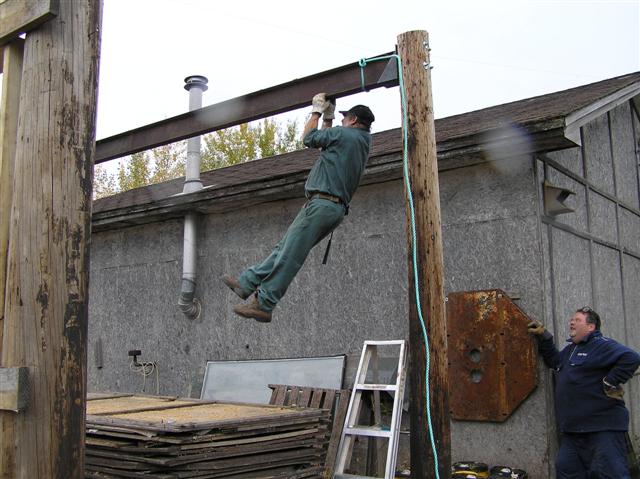
Em caught me as I was coming down from the last of 10 pull ups. Just to see if a guy with a split chest could do it...

Guess so :applause: :bellylaugh: I can't remember the last time I was able to do that.. probably somewhere around half my current age I think...

Posted: Mon Nov 05, 2007 10:25 pm
by Jason (IL)
That shed isn't goin anywhere. I built one 45 x 98 using all phone poles and it is solid. I think you may even out done yourself with that I beam. Makes as a good hoist for the E-Tank.

Enjoy and fill it with more cubs :lol: :lol:

Jason

Posted: Mon Nov 05, 2007 10:25 pm
by Redman
:?: :?:

Posted: Mon Nov 05, 2007 10:30 pm
by pete1941
Looking Good Rudi, just be careful of the pull ups, no need to rip a stitch and not be able to finish the barn. Sure looks like fun, Pete

Posted: Fri Nov 09, 2007 11:14 pm
by Rudi
Hmmm, been gone a few days and seems I gots a lot of reading to catch up on.. Been kinda busy the last few days. Been making some progress on the Pole Barn pProject and the repair the shop project. Yesterday and today I spent most of the time with my son Duane building new insulated pine doors for the main shop to replace the old overhead door which I have never liked. We alos built the new insert to strengthen the wall which has been damaged from a lot of frost heaving, truck traffic and a serious lack of coin 20 years ago when I built it.

Never ever pour a concret slab without lots and lots of re-bar and re-inforcing mesh otherwise you get what I gots -- Pangea :roll: :wink: :D :oops: :D :!:

No pics yet, but lots of sore muscles. Also have been hunting up deals and bargains. Another great deal on lumber and on rubber dam. I used what was left of my 45mil rubber pond liner protecting the bottom few inches of the pole barn and ensuring that no water gets into the barn, and have continued the practice around the old shop. Almost have enough scavenged heavy duty rubber to finish the project. I needed another 120 feet of 45mil rubber so I started looking at alternatives. Rubber pond liner which is $1.00/sq ft gets expensive :shock: Looked at eave dam -- but that works out ot $1.00/sq ft. So.... being frugal and a real practitioner of the 3 R's - Reduce, Re-Use and ReCycle... I hit the local heavy equipment tire repair shop that changes loader and tractor trailer tires out here when the guys get a flat.

They had some nice loaded loader tubes.... the CaCl sort of stings a bit, but the rubber is 45 mil which is ideal. One tube from a JD644D will provide almost 30 lineal feet of dam... Got another tube yesterday, hopefully another one tomorrow and maybe a couple beginning of theweek. That should about take care of my needs for the moment. May need some more for my small baby barn as we move that in 2 weeks.. but that is still 2 weeks away.

Hopefully postpics tomorrow or Sunday, until then, enjoy.. I gts to get back to work :!:

Posted: Fri Nov 09, 2007 11:33 pm
by Rudi
Darn:

Looks like we gots SNOW! It is currently snowing in Dieppe. We have almost 1/2 inch down it looks like.. but hopefully it will be gone sometime tomorrow. IF all goes well, it won't be a major problem..... sure is pretty though... 8) :wink: :big smile:

Oh checked with my local contractor.. and we can use Rick's idea. Now to find out how it will play out.. need 12AWG and it is currently on sale at Princess.. so maybe we will see......

Posted: Sat Nov 10, 2007 7:06 am
by pete1941
Sounds like you got it going on, Rudi, and have most of your ducks in a row. Sure sounds like fun :!: . Pete

Oh BTW, it was a balmy 69 degrees here yesterday with more warmer days predicted next week, like in the 70's. Oh well, one can't have everything I guess. Pete

Posted: Sat Nov 10, 2007 10:30 am
by beaconlight
You doing a fine job partner.

Posted: Sat Nov 10, 2007 11:19 pm
by Rudi
Thanks guys... it snowed again today.. and I gots no main door... just a hole... but it is coming along nicely.

Rick:

Can you post some more ideas on the drops.. remember I am a visual type person.. so you know... draw something ok??

Only got a week left before the Electrician gets here..

Cheers