I need some in interpreting the A-60 blade parts list for installing the substitute drawbar (not to be confused with the swinging drawbar anchor). The drawbar is listed with the following called out beneath it:
Bolt, 3/4-10 x 1-3/4 hex head (2)
Bolt, Hex, 3/4"-10 x 1.38 (2)
Lock Washer, 3/4" (2)
Bolt, Hex, 5/8"-11 x 3-1/4" (4)
amd 4 each 5/8" lock and flat washers
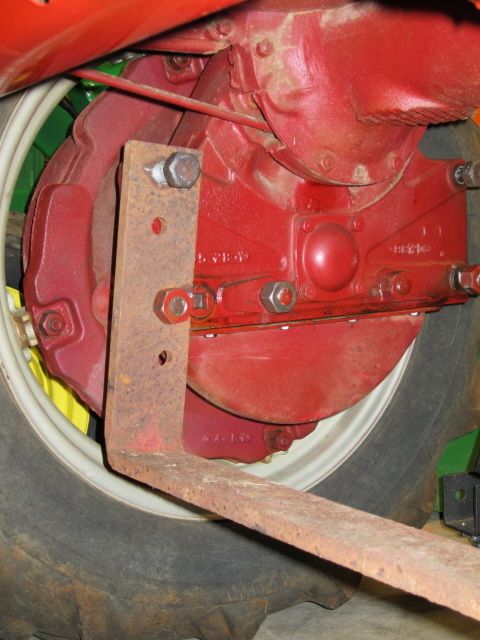
I am guessing that 2 tapered head bolts (or stud & tapered nuts) go into the chamfered (lower) holes and into the lower final holes, and that the top 2 holes (non-chamfered) get two regular 3/4" hex head bolts with lock washers.
I have no idea where (4) 5/8" bolts/washers go .
Does my temporary installation in the photo below look correct to you guys that have worked with these things?
This site uses cookies to maintain login information on FarmallCub.Com. Click the X in the banner upper right corner to close this notice. For more information on our privacy policy, visit this link: Privacy Policy
NEW REGISTERED MEMBERS: Be sure to check your SPAM/JUNK folders for the activation email.
Substitute Drawbar Installation
Forum rules
Notice: For sale and wanted posts are not allowed in this forum. Please use our free classifieds or one of our site sponsors for your tractor and parts needs.
-
- 10+ Years
- Posts: 279
- Joined: Sun Dec 07, 2008 6:03 pm
- Zip Code: 30134
- Tractors Owned: 1948 Farmall Cub
1953 Farmall Super A
1952 Ford 8N
1958 John Deere 320S
1958 John Deere 420S
2008 John Deere 3005 - Location: GA, Douglasville
Substitute Drawbar Installation
"One Cub leads to another..." -- old International Harvester proverb.
-
- Team Cub
- Posts: 17278
- Joined: Sun Feb 02, 2003 2:59 pm
- Zip Code: 55319
- Circle of Safety: Y
- Location: MN
Re: Substitute Drawbar Installation
You have it mounted correctly (unless maybe needs flipping end to end). My reference doesn't list the 4 5/8 bolts. I assume they are needed to mount it on an A (not Super) using the 4 unused holes in the drawbar.
-
- 10+ Years
- Posts: 279
- Joined: Sun Dec 07, 2008 6:03 pm
- Zip Code: 30134
- Tractors Owned: 1948 Farmall Cub
1953 Farmall Super A
1952 Ford 8N
1958 John Deere 320S
1958 John Deere 420S
2008 John Deere 3005 - Location: GA, Douglasville
Re: Substitute Drawbar Installation
Thanks for the response, Jim. I considered the "flipped" position which is shown in illustration 5 and the tractor photo (A-31329) of an original 1A-60 Operator's Manual Setting Up Instructions (no parts list). That position results in the slotted/chamfered hole with the slot toward the front and a slight downward slope to the horizontal member. That same position is "implied" in the Case IH parts illustration referenced in my above post.
An original 6-1/2" x 9-1/2" setting up and parts manual shows the slot installed toward the rear in illustration 4 and the parts illustration (and as in my photo), resulting in a slight upward slope to the horizontal member. It too only calls for (2) 3/4" bolts and washers (guessing that the chamfered hole would use the existing stud/tapered nut).
It boils down to much-to-do about nothing, so I may "flip" it anyway. I just didn't want to break something like a final drive housing.
"One Cub leads to another..." -- old International Harvester proverb.
Return to “Farmall A, Super A, AV, 100, 130 & 140”
Who is online
Users browsing this forum: No registered users and 15 guests