Ok guys. Hit my first road block. Trying to pull the engine. Have the front end removed and pulled 6" forward. Tranny is on a stand. 4 bolts holding the bell housing to block are out. Two bolts on gas tank bracket are out. Bottom access cover is off
Engine will seperate about 1/2" but just doesn't want to come all the way off
I removed the pin that holds the clutch linkage to the fork. But I dont think that did anything. Also the starter is removed
Is there something in the tranny I'm missing?
This site uses cookies to maintain login information on FarmallCub.Com. Click the X in the banner upper right corner to close this notice. For more information on our privacy policy, visit this link: Privacy Policy
NEW REGISTERED MEMBERS: Be sure to check your SPAM/JUNK folders for the activation email.
New here and new project
Forum rules
Notice: For sale and wanted posts are not allowed in this forum. Please use our free classifieds or one of our site sponsors for your tractor and parts needs.
Notice: For sale and wanted posts are not allowed in this forum. Please use our free classifieds or one of our site sponsors for your tractor and parts needs.
-
Bossman429
- 5+ Years

- Posts: 38
- Joined: Sun Aug 17, 2014 10:11 pm
- Zip Code: 07701
-
Bossman429
- 5+ Years
- Posts: 38
- Joined: Sun Aug 17, 2014 10:11 pm
- Zip Code: 07701
Re: New here and new project
Here's where I'm stuck at. If I pry any harder I'm gonna break a pry bar
- Attachments
-
- image.jpg (74.27 KiB) Viewed 250 times
-
- image.jpg (117.1 KiB) Viewed 250 times
-
- image.jpg (111.93 KiB) Viewed 250 times
-
- image.jpg (108.23 KiB) Viewed 250 times
-
Jim Becker
- Team Cub

- Posts: 17272
- Joined: Sun Feb 02, 2003 2:59 pm
- Zip Code: 55319
- Circle of Safety: Y
- Location: MN
Re: New here and new project
I suspect, and your pictures seem to confirm) that the transmission input shaft is rusted to the clutch disk. You should be able to shoot some penetrating oil onto the splines right next to the disk. Let it soak for a few days then try some more prying.
Two other suggestions come to mind. I don't know if you have enough gap available to do either one:
- unbolt the pressure plate.
- heat the hub of the clutch disk.
Two other suggestions come to mind. I don't know if you have enough gap available to do either one:
- unbolt the pressure plate.
- heat the hub of the clutch disk.
-
Bossman429
- 5+ Years
- Posts: 38
- Joined: Sun Aug 17, 2014 10:11 pm
- Zip Code: 07701
Re: New here and new project
I was worried that was the case
I don't know about Unbolting the pressure plate. Since the engine is seized I might not be able to get to some of the bolts
However. I can get to all the bolts on the backside of the engine which I think connects the flywheel to the crank. If I unbolted that would that work? At least to get the engine out then get more PB blaster where it needs to be. I tried soaking the splines with wd40. It I don't know what kind of coverage I got by spraying In The access holes
Tomorrow I'm going to try and make a press out of some large bolts and nuts, and force apart the block from the bell housing by tightening the bolts. Kind of like a pulley puller idea. Maybe with that constant force I can try and get some heat in there and see if it pops
-
Jim Becker
- Team Cub
- Posts: 17272
- Joined: Sun Feb 02, 2003 2:59 pm
- Zip Code: 55319
- Circle of Safety: Y
- Location: MN
Re: New here and new project
It looks like it would come apart if you could unbolt the flywheel from the crankshaft. Unfortunately, I don't think you can get at those bolts. They are in a fairly small circle on the back side of the flywheel, covered by the clutch parts. The pressure plate is held to the flywheel by 6 bolts around the edge of the pressure plate. The bolt at the bottom of your second picture is one of them. Can you get to any of them? Maybe through the hand hole? If so, maybe you can rotate the entire engine to access each one through the hand hole.
-
Bossman429
- 5+ Years
- Posts: 38
- Joined: Sun Aug 17, 2014 10:11 pm
- Zip Code: 07701
Re: New here and new project
Got the engine out. Nut and bolt trick worked. It was froze on there alright but eventually it popped
Now. The crank pulley is my newest enemy. Already chipped it using a pulley puller (even with a plate behind it)
Tried heating the snot out of it to no avail
Gonna let it soak and get a bearing splitter to try next
Now. The crank pulley is my newest enemy. Already chipped it using a pulley puller (even with a plate behind it)
Tried heating the snot out of it to no avail
Gonna let it soak and get a bearing splitter to try next
-
Bossman429
- 5+ Years
- Posts: 38
- Joined: Sun Aug 17, 2014 10:11 pm
- Zip Code: 07701
Re: New here and new project
Ok. Got that off. BFH and a BF PULLER with a 1/2" backing plate and it popped!
-
AL Farmall Boy

- 10+ Years

- Posts: 2555
- Joined: Tue Aug 10, 2010 6:38 pm
- Zip Code: 35630
- Circle of Safety: Y
Re: New here and new project
sounds like youre warming right up to the Farmall.
When you're ready to put the crank pulley back on, heat it in the oven for about 1 hr. on 300 degrees. Then quickly go out to your shop and put it on. The pulley is threaded in the outside end so you could put some all thread and a plate on there to push it back on the crank. It helps if you chase those threads to clean them up and try to get things back on before it cools off. The new crank oil seal should be fine as I think they are rated to withstand around 300 degrees and by the time you get to the tractor it has cooled a little. We just put one on today using that method and went on like a glove!! Much easier than taking off. I read where IH used to heat the pulleys in an electric oven type thing when installing them in the factory.
When you're ready to put the crank pulley back on, heat it in the oven for about 1 hr. on 300 degrees. Then quickly go out to your shop and put it on. The pulley is threaded in the outside end so you could put some all thread and a plate on there to push it back on the crank. It helps if you chase those threads to clean them up and try to get things back on before it cools off. The new crank oil seal should be fine as I think they are rated to withstand around 300 degrees and by the time you get to the tractor it has cooled a little. We just put one on today using that method and went on like a glove!! Much easier than taking off. I read where IH used to heat the pulleys in an electric oven type thing when installing them in the factory.
Regards,
Chase
205-368-5339
ihfarmallrtr@gmail.com
 Follow my page "Alabama Tractor Pickers" on YouTube & Facebook!
Chase
205-368-5339
ihfarmallrtr@gmail.com
Follow my page "Alabama Tractor Pickers" on YouTube & Facebook! -
Bossman429
- 5+ Years
- Posts: 38
- Joined: Sun Aug 17, 2014 10:11 pm
- Zip Code: 07701
Re: New here and new project
Yup I read about that trick. Id imagine it would help a lot.
-
Bossman429
- 5+ Years
- Posts: 38
- Joined: Sun Aug 17, 2014 10:11 pm
- Zip Code: 07701
Re: New here and new project
So have the engine pretty much apart. Only the number 1 piston was super seized. In fact, while wailing away on it the whole sleeve popped out. I think I'll just cut the sleeve off and extract that piston that way. I don't see it coming any other way
Plan is to do a total rebuild simply because I have it all apart. New bearings, gaskets, pistons sleeves. Probably even valves too while I'm at it
The crank looks good as do the rods , but I still need to clean it all down and thoroughly inspect everything
I'll make a sleeve puller for the other 3 sleeves, probably just a long threaded rod, some plates and washers and a lil welding....unless someone else has a better solution to pulling the other three
Lastly, any particular website to buy a rebuild kit from? I see yesterday's tractors comes up on google a lot. $500 is about what I was expecting on a total rebuild kit and that's what it is there
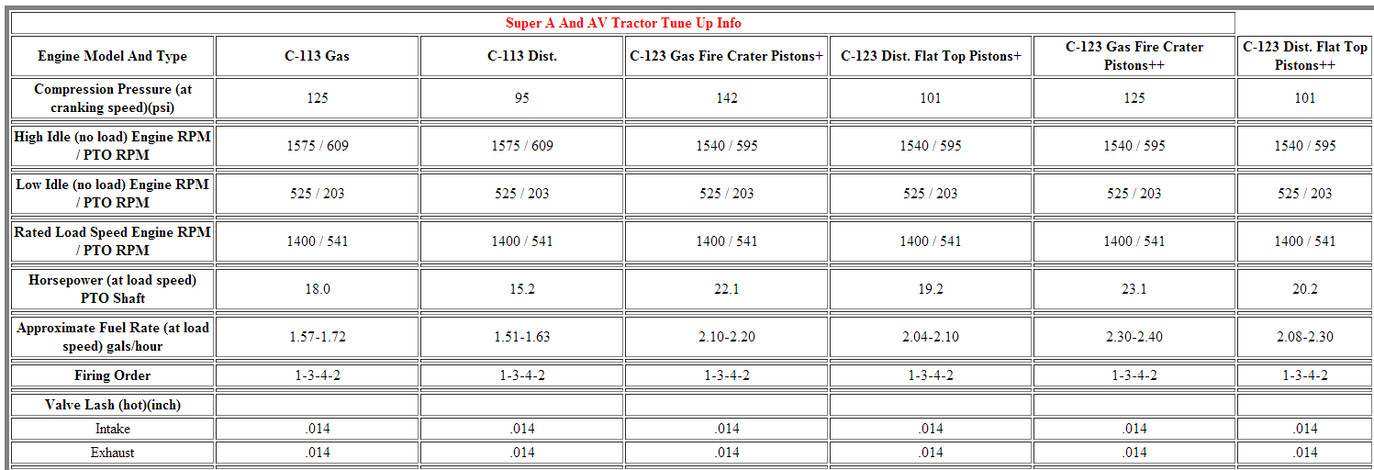
Oh yea. Anyone have a link for torque specs etc?
Plan is to do a total rebuild simply because I have it all apart. New bearings, gaskets, pistons sleeves. Probably even valves too while I'm at it
The crank looks good as do the rods , but I still need to clean it all down and thoroughly inspect everything
I'll make a sleeve puller for the other 3 sleeves, probably just a long threaded rod, some plates and washers and a lil welding....unless someone else has a better solution to pulling the other three
Lastly, any particular website to buy a rebuild kit from? I see yesterday's tractors comes up on google a lot. $500 is about what I was expecting on a total rebuild kit and that's what it is there
Oh yea. Anyone have a link for torque specs etc?
-
jeb2
- 10+ Years
- Posts: 20
- Joined: Thu Sep 05, 2013 12:40 pm
- Zip Code: 45601
- Tractors Owned: 1945 International A
1950 Super A Demonstrator Basket Case
1987 Cub Cadet 1810
1989 Cub Cadet 1811
1987 Cub Cadet 1812 - Location: Chillicothe, Oh
Re: New here and new project
torque specs here at this thread:
viewtopic.php?f=170&t=54578&p=451369&hilit=torque#p451369
flywheel torque is 37 ft. lbs. Since you are planning a rebuild I suggest you purchase a IH Service Manual. It has tons of info to help you with rebuilding and maintaining this tractor. The one I use is manual GSS-5031. I purchased it from Binder Books, about $25.
-
AL Farmall Boy
- 10+ Years
- Posts: 2555
- Joined: Tue Aug 10, 2010 6:38 pm
- Zip Code: 35630
- Circle of Safety: Y
Re: New here and new project
Personally I would go to a local engine machine shop for the rebuild parts, as you might use them for your head work anyways. They should have all of the parts you need or should be able to get them. Most of them are a bunch of old timers and know all about that stuff. We have an engine machine shop in downtown Birmingham that I buy all of my internal engine parts from. Not saying that YT doesn't have quality parts, it's just I trust the internal parts to come from a specialized shop that would sell me what they use.
Gasket Sets, bearings, seals, etc. can all be bought from your local Napa or equivalent.
Gasket Sets, bearings, seals, etc. can all be bought from your local Napa or equivalent.
Regards,
Chase
205-368-5339
ihfarmallrtr@gmail.com
Follow my page "Alabama Tractor Pickers" on YouTube & Facebook!
Chase
205-368-5339
ihfarmallrtr@gmail.com
Follow my page "Alabama Tractor Pickers" on YouTube & Facebook! -
havoc1482

- 10+ Years
- Posts: 987
- Joined: Fri Sep 20, 2013 11:17 am
- Zip Code: 01085
- eBay ID: havoc1482
- Tractors Owned: _______ 1948 Farmall Super A
- Circle of Safety: Y
- Twitter ID: @havoc1482
- Location: Westfield, MA
- Contact:
Re: New here and new project
Headbolt torque spec is 80ft-lbs. IH originally had it at 60, but they updated it later on, so some manuals will tell you 60 (and they are wrong) Manifold is 20ft lbs.
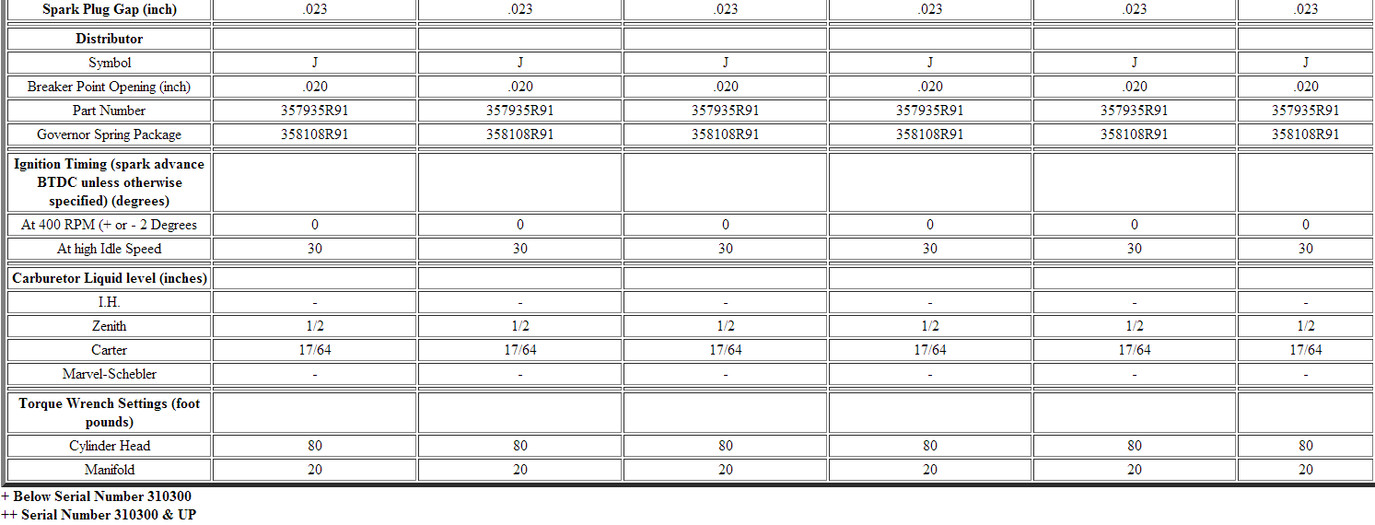
Let me know if the image is too small to read.
Let me know if the image is too small to read.
Mike

I bleed Black & Gold
IH Collectors Club New England (Chapter 18)
Western Mass. (The 413)
I bleed Black & Gold
IH Collectors Club New England (Chapter 18)
Western Mass. (The 413)
-
Bossman429
- 5+ Years
- Posts: 38
- Joined: Sun Aug 17, 2014 10:11 pm
- Zip Code: 07701
Re: New here and new project
thanks so much guys.
Brought the head and valves to the local machine shop, to have the seats recut and the valves lapped. costing me a fraction of what buying the tools needed to do it myself would cost.
I don't think any local auto parts store round here is going to have the parts i need, i don't think there is a farmall tractor within 30 miles of me…. I'm refurbing this in a less than rural area… I ordered the basic kit from YT based on convenience, i know its got everything i need and theres nothing worse than digging into working on something only to realize your missing that one thing you need to finish.
Torque specs are a huge help, thanks again for those!
Hopefully will have the engine buttoned up in a few weeks.
The clutch disk is actually in good shape, albeit the metal bits are a tad rusty. I think I'm going to just clean it up and reuse all those components. I'm trying to not spend money where i don't have to, but then again i don't want to do all this work only to have to re-do it bc i saved a few pennies. decisions decisions.
-
Bossman429
- 5+ Years
- Posts: 38
- Joined: Sun Aug 17, 2014 10:11 pm
- Zip Code: 07701
Re: New here and new project
Just a quick update, started putting things back together
Sleeves went in super easy, put em in the freezer for 30 min, they dropped in with just a little tap of a woodblock/lump hammer Probably could have just pushed em in
Got 3 of the pistons in, of course i snapped the oil ring on the last one putting it on, waiting on replacement to come in.
Crank, camshaft, lifters, rear main seal, oil pump are all back in. Went in rather easily.
Only issue Im a bit concerned with is it takes a considerable amount of force to rotate the assembly. The crank turned fine when it was not connected to anything, but once i put the number 1 cylinder in it got a lot harder. Part of it could be Im being forced to use the hand crank, instead of a decent size breaker bar since i don't want to snap a bolt in the crank or strip the threads, but i could not imagine being able to hand crank start this thing as is. The bearings all have plenty of lube (on the inside, not the backside!) The other 2 pistons didn't seem to add much resistance, so maybe the first one is too tight? Id say it takes ~100-120 ft/lbs to rotate the assembly. Mains are tq'ed to 75ft/lbs, rods 45. Maybe i should pop the #1 out again and check clearances?
Also - when re assembling the head and valves, i realized i lost (2) of those small alligator clip things that snap into the lower groove on the valve shaft. Im guessing those are only to keep a valve from dropping should a spring retainer break. Are these a big deal or would you just re-assemble without them?
Return to “Farmall A, Super A, AV, 100, 130 & 140”
Who is online
Users browsing this forum: No registered users and 8 guests


