This site uses cookies to maintain login information on FarmallCub.Com. Click the X in the banner upper right corner to close this notice. For more information on our privacy policy, visit this link: Privacy Policy
NEW REGISTERED MEMBERS: Be sure to check your SPAM/JUNK folders for the activation email.
R.O.C.K Restoration Project
Forum rules
Notice: For sale and wanted posts are not allowed in this forum. Please use our free classifieds or one of our site sponsors for your tractor and parts needs.
Notice: For sale and wanted posts are not allowed in this forum. Please use our free classifieds or one of our site sponsors for your tractor and parts needs.
-
tst
- 10+ Years

- Posts: 5209
- Joined: Tue Jan 12, 2010 2:08 pm
- Zip Code: 12514
- Circle of Safety: Y
Re: R.O.C.K Restoration Project
you can try just a jumper wire to a good ground to the magneto and see if that kills the engine, the switch may not have a good ground through the dash with all the fresh paint
-
Glen

- 10+ Years
- Posts: 6140
- Joined: Mon Mar 19, 2012 7:33 pm
- Zip Code: 00000
- Tractors Owned: 1956 Farmall Cub with Fast Hitch, F-11 plow, Disc, Cultivator, Cub-22 mower
- Circle of Safety: Y
- Location: Wa.
Re: R.O.C.K Restoration Project
Hi,
Great that you got it to run.
Too bad the head is leaking.
All the head bolts need sealer applied to the threads only, about the bottom 3/8" of the bolts.
I would use the Permatex Aviation Form A Gasket. Stir up the can good first.
Like they said above, drain the coolant, and remove a head bolt and see if it has sealer on it.
If you find that you need to put sealer on all of them, if there is none on them, you will need to remove the hood, so you can torque the bolts again, and I would run fresh water down the bolt holes, to wash them out some. There is more chance of the sealer sticking if the anti freeze is removed from the threads. Leave the radiator drain plug out when doing that.
It would help the sealer stick if the bolt hole threads were dry, after washing the holes, you could use air down the holes to dry them, you can't really see when they are dry though.
Wash the bolts in water first too, and dry them.
Use pliers and carefully tighten the strainer bowl nut, and see if it quits dripping gas. It is probably not tight enough if it drips. Move the Touch Control arms to the rear position first, it is easier to get to it.
Do not leave gas on the new paint, catch the dripping gas somehow, and wipe up any that dripped on the paint right away, before it ruins the paint.
If your Touch Control lever is fully ahead in the pic of the Cub, it looks like something is not adjusted right, the rockshaft is not far enough up. It should turn a little more clockwise, viewed from the right side.
-
Frozenstate
- 5+ Years

- Posts: 205
- Joined: Sat Sep 09, 2017 6:20 am
- Zip Code: 14414
- Tractors Owned: F- CUB Fast hitch 1955 #191991J
Snow plow
Super Chief moldboard plow
Spring tooth harrow
Disc
York rake
Carry all
Fast hitch Mott flail mower
Ferris IS 100 61" zero turn
Re: R.O.C.K Restoration Project
If you have the fuel screen with the white plastic edge, that might be the problem. I tried one of those and couldn't get a seal. I finally put in the screen without the edging, screen only and it sealed. May be a trick to it though. I would like to know if anyone else had luck with the plastic edged screen.
-
staninlowerAL
- 10+ Years
- Posts: 4988
- Joined: Fri Oct 29, 2010 11:34 pm
- Zip Code: 36558
- Tractors Owned: Cubs: (3)'49's, (1 is for parts), (1)'57 IH Cub LoBoy w/FH, (2)154 Number Series Loboys, (1 is for parts), '76 Longstripe w/FH, Mowers: C-22, Bush Hog 412, Pennington 59, Woods RM42CF, Woods 42, assorted FCub plows, planters, discs, etc. OTHERS: '49 AC B & Ind. Sickle mower, '61 AC D12 Ser 2, '52 8N, '56 Ferguson 35 Deluxe, '47 & '49 Avery V, '53 MM BG (offset), '51 JD M (regular), '56 JD 420C, with Blade and fire plow, '85 JD 850 (Yanmar) w/72" belly mower, '76? Yanmar 2TR15 1500 & Bush Hog SQ42S-2 mower, '78? FORD Dexta, '86 FORD LGT14D & 48" Mower, (2)Cub Cadets & Mowers (MTD), (4) Sears Surburban's, other MTD mowers, Jeeps & other misc. "treasures"
- Circle of Safety: Y
- Location: AL (Southwest)
Re: R.O.C.K Restoration Project
I have had better success with a nitrile gasket. It is petroleum resistant and more forgiving than cork. Beautiful restoration and top quality workmanship.
Stan in LA (lower AL)
USAF & Reserves, Reg ARMY, ARMY NG (AL)
USAF & Reserves, Reg ARMY, ARMY NG (AL)
-
rockfarmer

- 5+ Years
- Posts: 515
- Joined: Mon Apr 13, 2015 6:35 pm
- Zip Code: 78633
- Tractors Owned: 1947 Circle Cub
1948 Cub
1949 Cub (Rocky)
1950 Cub
1962 Cub - Circle of Safety: Y
Re: R.O.C.K Restoration Project
[quote="tst"]... air cleaner to head bolts need to be sealed also, .../quote]
Thank you for pointing that out. I would have never known.
I am pulling the hood off today and will remove the head bolts starting with the one that I pulled a few weeks ago to place the spark plug grommet clip. I don't remember re-applying sealant at that time.
Thank you for pointing that out. I would have never known.
I am pulling the hood off today and will remove the head bolts starting with the one that I pulled a few weeks ago to place the spark plug grommet clip. I don't remember re-applying sealant at that time.
-
Jim in SC

- 5+ Years
- Posts: 355
- Joined: Mon Sep 15, 2014 10:16 am
- Zip Code: 29527
- Tractors Owned: 1951 Farmall H - "Ray R." (SN FBH 366519)
1959 Farmall Cub - "Pea" (SN 211538 J)
1964 IH Cub Cadet 100 - (SN 92562)
1971 IH Cub Cadet 106 - (SN 380760)
2018 Husqvarna YTH18542
Tractor previously owned:
1951 Farmall Cub - "Johnny R." - Circle of Safety: Y
- Location: Conway, South Carolina
Re: R.O.C.K Restoration Project
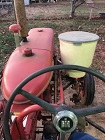
rockfarmer wrote:Spring Fever has hit central TX and Rocky is eat up with it.
Spring Fever.jpg
Notice the position of the hydraulic lever?
Static timed the magneto last night following the advice of several previous posts. Thank you to those of you who posted the how to's. Easiest thing I have done on this tractor, including applying decals. Fired him up today, after a prayer, and, he purrrrrrrrred like a fat kitten, even while the rear rockshaft slowly buried itself in the downward position. I am amazed at how smooth everything ran. Especially the engine. It would not crank or even cough until I let the choke in and immediately he fired up, without a hiccup. May have something to do with the high pressure 72 degree weather we had today. Great oil pressure, within 8 seconds of startup. Lot smoother than my other tractor with 12 volt electronic ignition and zenith carb. I might have just been sold on 6 volt magneto's.
I will post a video as soon as I can.
A few things that need immediate attention. Hopefully they are not too severe!
1. After the initial 5 minute run I pushed in the ignition and the tractor died. Second time I cranked it let it run for a few minutes, pushed in the ignition switch and the tractor kept running. Had to turn off fuel and let it run out to kill the engine. What should I check first?
2. I noticed a few small coolant droplets between the head and head gasket that appear to have small amounts of copper sealant mixed in.
Leak Head.jpg
Head leak.jpg
Behind the distributor is where coolant came out...enough to hit the ground, 1/2 teaspoon maybe. Re-torque the head bolts?
3. Fuel bowl leaking, not too bad. Could it be the new cork gasket needs time to swell or something? I changed bowls and same thing.
I am now, officially, hooked!
Wow. WOW! Beautiful!
"That's the great thing about a tractor. You can't really hear the phone ring."
Jeff Foxworthy
1951 Farmall H
1959 Farmall Cub
1964 IH Cub Cadet 100
1971 IH Cub Cadet 106
2018 Husqvarna YTH18542
-
rockfarmer
- 5+ Years
- Posts: 515
- Joined: Mon Apr 13, 2015 6:35 pm
- Zip Code: 78633
- Tractors Owned: 1947 Circle Cub
1948 Cub
1949 Cub (Rocky)
1950 Cub
1962 Cub - Circle of Safety: Y
Re: R.O.C.K Restoration Project
All of the head bolts had aviation sealer applied on them. Still tacky.
So I carefully pried the head off to look for evidence. Not as pretty as it was a couple days ago. Also, please keep in mind that the 3rd time we cranked and let the tractor idle, the choke had inadvertently been pulled out. It ran for a minute or less, until I figured it out with black smoke coming out of the exhaust, and pushed in the choke. Then smoooooth. It was then that I noticed the weeping and turned off the tractor.
There appears to be oil? in cylinders 2 and 3 while 1 and 4 were dry. Definitely a small amount of water present in cylinders 2 and 3.
Did I let the gasket sealer dry too much before installing?
-
rockfarmer
- 5+ Years
- Posts: 515
- Joined: Mon Apr 13, 2015 6:35 pm
- Zip Code: 78633
- Tractors Owned: 1947 Circle Cub
1948 Cub
1949 Cub (Rocky)
1950 Cub
1962 Cub - Circle of Safety: Y
Re: R.O.C.K Restoration Project
Could have been concentrated coolant, ethylene glycol, in the cylinders, which is a great solvent for carbon. No odor. Cleaned up things and I am prepared to install another head gasket and take two.
Note: It appears that where the weeps were, on each side of the "this side up" embossing, the leak on top of the gasket and the weep below the gasket. The area where the leak was, on the block, has the two - stamps side by side, between the coolant port and the side... not sure if this made a difference or just coincidence?
Question(s); Should I re-use the copper spray and install the head quickly? Did I use too much and would that cause the leakage? I am planning on using this gasket,
-
tst
- 10+ Years
- Posts: 5209
- Joined: Tue Jan 12, 2010 2:08 pm
- Zip Code: 12514
- Circle of Safety: Y
Re: R.O.C.K Restoration Project
I give them 3 coats and install while it is tacky, I use a Teflon sealer on the bolts, no paint on the bottom of the bolt heads or the head surface where the bolts seat
-
Glen
- 10+ Years
- Posts: 6140
- Joined: Mon Mar 19, 2012 7:33 pm
- Zip Code: 00000
- Tractors Owned: 1956 Farmall Cub with Fast Hitch, F-11 plow, Disc, Cultivator, Cub-22 mower
- Circle of Safety: Y
- Location: Wa.
Re: R.O.C.K Restoration Project
Hi,
If you still have it apart, I would use a long straight edge on the top of the block, after cleaning the block surface, and see if it is flat. You could also check the head with the straight edge.
One or both of them might not be flat.
While you are holding the edge tight against the parts, try sliding a .001" or .002" feeler gauge under the edge in many different places, and move the edge to different places also. The feeler gauge should not go in anywhere. If it does, try different thicker gauges and see how thick a gauge will go in the place. But the place could be narrower than a feeler gauge also.
You probably need another person to hold the edge down with both hands, while you use the feeler gauge.
You could also hold a light next to the edge while someone is holding it down tight, and see if you can see light under the edge, if you use something like a large building square.
-
k hutchins
- 10+ Years
- Posts: 685
- Joined: Tue Mar 27, 2012 5:48 pm
- Zip Code: 48843
- Tractors Owned: 1948 Farmall Cub
193 plow
1948 snow/grading blade
Woods 59 C3
Cub 144 cultivator
Cub 22 mower
Cub 172 one row planter
Original manuals for all the above - Circle of Safety: Y
Re: R.O.C.K Restoration Project
I didn't go bac through the old posts when you originally installed the head, but remember ther is a specific order to tighten the bolts in. Also it was suggested to me that you do them in increments. Say 25 then 35, then 45. Start and run it for l think 45 minutes, then go back and retorque to specs. Some of mine were off by nearly 15 ftlbs when l retorqued.
Good luck
Good luck
Why is there never enough time to do the job right, but always enough time to do it over. 
-
rockfarmer
- 5+ Years
- Posts: 515
- Joined: Mon Apr 13, 2015 6:35 pm
- Zip Code: 78633
- Tractors Owned: 1947 Circle Cub
1948 Cub
1949 Cub (Rocky)
1950 Cub
1962 Cub - Circle of Safety: Y
Re: R.O.C.K Restoration Project
It is still apart. I will check the flatness of both with a good straight edge. Don't have one now, but will start looking/asking.
I will re torque in 5 lb increments starting at 25 lbs and follow the proper sequence. No need to hurry. Originally, I torqued to 35, then 45, and probably should have re-torqued after running for a while. I saw the weeping and did not want to take any chances knowing I had another head gasket on hand.
Thank you all!
-
AL Farmall Boy

- 10+ Years
- Posts: 2555
- Joined: Tue Aug 10, 2010 6:38 pm
- Zip Code: 35630
- Circle of Safety: Y
Re: R.O.C.K Restoration Project
Very Nice. I would do what Bill suggested and use a pony tank to run/work a couple times and then retourque bolts. Looking forward to the video.
Regards,
Chase
205-368-5339
ihfarmallrtr@gmail.com
 Follow my page "Alabama Tractor Pickers" on YouTube & Facebook!
Chase
205-368-5339
ihfarmallrtr@gmail.com
Follow my page "Alabama Tractor Pickers" on YouTube & Facebook! -
Slim140
- 5+ Years
- Posts: 4908
- Joined: Wed Nov 22, 2017 6:24 am
- Zip Code: 00000
- Tractors Owned: .
1970 International 140
1972 International 140
1949 John Deere A
1993 Ford 4630 W/Loader
1965 John Deere 110
1961 Cub Cadet Original - Circle of Safety: Y
Re: R.O.C.K Restoration Project
Tim, what's the status on Rocky? He still in surgery?
Every home is a school, what are you teaching?

-
Stanton

- Cub Pro

- Posts: 7760
- Joined: Mon Jun 22, 2009 6:56 am
- Zip Code: 64070
- Tractors Owned: 1942 Farmall AV, serial #87025
1947 Farmall Circle Cub, serial #2116
1948 Farmall Cub, serial #46066 - Circle of Safety: Y
- Location: Lone Jack, MO
Re: R.O.C.K Restoration Project
Bummer on having the leaks, but I'm sure you'll get them fixed in short order. Nice work!
From the Farmall Cub Service Manaul-Engine, page 31:
From the Farmall Cub Service Manaul-Engine, page 31:
Stanton

Who is online
Users browsing this forum: No registered users and 41 guests


