rockfarmer wrote:Thank you all for the continued support and motivation!
Toolbox is on as good as new!
Tool Box install.jpg
Take 2 on the transmission shifter, since I missed the neutral slots the first go around and dinged the paint while removing. Had to get it re-painted.
Transmission shifter parts.jpg
Hardest part of the entire restoration may have been putting the lever guide into this housing,
Shifter Install 2.jpg
Cleaned off some really stuck on "Stuff" sealant and using a gasket added a small amount, again, to both sides.
Round 2 Install.jpg
Shifter installed.jpg
In neutral, this time!
Edit: I replaced both sliding gears since the old ones had lots of wear.
This site uses cookies to maintain login information on FarmallCub.Com. Click the X in the banner upper right corner to close this notice. For more information on our privacy policy, visit this link: Privacy Policy
NEW REGISTERED MEMBERS: Be sure to check your SPAM/JUNK folders for the activation email.
R.O.C.K Restoration Project
Forum rules
Notice: For sale and wanted posts are not allowed in this forum. Please use our free classifieds or one of our site sponsors for your tractor and parts needs.
Notice: For sale and wanted posts are not allowed in this forum. Please use our free classifieds or one of our site sponsors for your tractor and parts needs.
-
lliberto

- 10+ Years

- Posts: 222
- Joined: Wed Jul 08, 2009 2:05 pm
- Zip Code: 26062
- Tractors Owned: 1947 Farmall Cub
http://farmallcub.com/phpBB2/viewtopic.php?f=1&t=94614
1952 Farmall Cub
http://farmallcub.com/phpBB2/viewtopic.php?f=1&t=100147
2011 Husqvarna YTH24V42LS - Location: WV, Weirton
Re: R.O.C.K Restoration Project
How does the toolbox attach to the Cub? Mine was just wedged into place and stuck with rust. I took it off last night but can't figure out how it was really meant to be attached.
1947 Circle Cub Restoration http://farmallcub.com/phpBB2/viewtopic.php?f=1&t=94614
1952 Farmall Cub Project http://farmallcub.com/phpBB2/viewtopic.php?f=1&t=100147
1952 Farmall Cub Project http://farmallcub.com/phpBB2/viewtopic.php?f=1&t=100147
-
rockfarmer
- 5+ Years

- Posts: 515
- Joined: Mon Apr 13, 2015 6:35 pm
- Zip Code: 78633
- Tractors Owned: 1947 Circle Cub
1948 Cub
1949 Cub (Rocky)
1950 Cub
1962 Cub - Circle of Safety: Y
Re: R.O.C.K Restoration Project
I initially ordered an 8 wire harness to go with Rocky's original 4 position light switch. When I learned the difference between a cutout and voltage regulator, and that a regulator was used on our generator, I was pleased and ordered the 7 wire harness. The extra ground wire, included in the 8 wire harness, is not required when using a voltage regulator.
If I am correct, will use the 8 wire harness on the next project, minus the ground wire.
If I am correct, will use the 8 wire harness on the next project, minus the ground wire.
-
rockfarmer
- 5+ Years
- Posts: 515
- Joined: Mon Apr 13, 2015 6:35 pm
- Zip Code: 78633
- Tractors Owned: 1947 Circle Cub
1948 Cub
1949 Cub (Rocky)
1950 Cub
1962 Cub - Circle of Safety: Y
Re: R.O.C.K Restoration Project
lliberto wrote:How does the toolbox attach to the Cub? Mine was just wedged into place and stuck with rust. I took it off last night but can't figure out how it was really meant to be attached.
I think there is supposed to be a tab on the seat post with a 3/8" threaded hole. I was told they commonly rot and break off. Rocky's was missing also, so a cub enthusiast, and good man, fabricated and contributed the following part,
-
Jim Becker
- Team Cub

- Posts: 17272
- Joined: Sun Feb 02, 2003 2:59 pm
- Zip Code: 55319
- Circle of Safety: Y
- Location: MN
Re: R.O.C.K Restoration Project
The junction block was only on tractors that were factory equipped with the full voltage regulator and a magneto. With battery ignition, the ignition switch served as the junction point. Does your voltage regulator have a separate "L" terminal or does it only have the 3 Bat, Gen, and F? If there is no L, the L wire serves no purpose and both ends should be taped back out of the way. If there is one, you have a couple options.
One option is to ignore it anyway and leave things as they are. The other is to add a junction block (make, buy, whatever), attach the L wire and move the fuse wire from the ammeter to the junction block. The junction block just needs a stud to connect the 2 wires. The stud needs to be insulated from ground.
One option is to ignore it anyway and leave things as they are. The other is to add a junction block (make, buy, whatever), attach the L wire and move the fuse wire from the ammeter to the junction block. The junction block just needs a stud to connect the 2 wires. The stud needs to be insulated from ground.
-
rockfarmer
- 5+ Years
- Posts: 515
- Joined: Mon Apr 13, 2015 6:35 pm
- Zip Code: 78633
- Tractors Owned: 1947 Circle Cub
1948 Cub
1949 Cub (Rocky)
1950 Cub
1962 Cub - Circle of Safety: Y
Re: R.O.C.K Restoration Project
This is what we have,
-
tst
- 10+ Years
- Posts: 5208
- Joined: Tue Jan 12, 2010 2:08 pm
- Zip Code: 12514
- Circle of Safety: Y
Re: R.O.C.K Restoration Project
that was set up for a cut out relay, when they bolt to top of the generator, if it had a voltage regulator it would have been bolted to a separate bracket, one diagram shows it wired with a mag, the other a distributor
- Attachments
-
-
-
Jim Becker
- Team Cub
- Posts: 17272
- Joined: Sun Feb 02, 2003 2:59 pm
- Zip Code: 55319
- Circle of Safety: Y
- Location: MN
Re: R.O.C.K Restoration Project
That looks like one of the saddle mounted regulators that is designed to replace a cut-out. I assume the blue wire connects the generator "A" to a "GEN" terminal on the bottom side of the regulator. Looks like the terminal on the left is the "L". You can run the "L" wire from it to the fuse (via a junction block or not). Or you can leave the fuse connected as it is and tape the ends of the "L" wire back.
-
lliberto
- 10+ Years
- Posts: 222
- Joined: Wed Jul 08, 2009 2:05 pm
- Zip Code: 26062
- Tractors Owned: 1947 Farmall Cub
http://farmallcub.com/phpBB2/viewtopic.php?f=1&t=94614
1952 Farmall Cub
http://farmallcub.com/phpBB2/viewtopic.php?f=1&t=100147
2011 Husqvarna YTH24V42LS - Location: WV, Weirton
Re: R.O.C.K Restoration Project
Thanks
I guess ill have to do something similar.
I guess ill have to do something similar.
rockfarmer wrote:lliberto wrote:How does the toolbox attach to the Cub? Mine was just wedged into place and stuck with rust. I took it off last night but can't figure out how it was really meant to be attached.
I think there is supposed to be a tab on the seat post with a 3/8" threaded hole. I was told they commonly rot and break off. Rocky's was missing also, so a cub enthusiast, and good man, fabricated and contributed the following part,
New toolbox attachement.jpg
1947 Circle Cub Restoration http://farmallcub.com/phpBB2/viewtopic.php?f=1&t=94614
1952 Farmall Cub Project http://farmallcub.com/phpBB2/viewtopic.php?f=1&t=100147
1952 Farmall Cub Project http://farmallcub.com/phpBB2/viewtopic.php?f=1&t=100147
-
Glen

- 10+ Years
- Posts: 6139
- Joined: Mon Mar 19, 2012 7:33 pm
- Zip Code: 00000
- Tractors Owned: 1956 Farmall Cub with Fast Hitch, F-11 plow, Disc, Cultivator, Cub-22 mower
- Circle of Safety: Y
- Location: Wa.
Re: R.O.C.K Restoration Project
Hi,
You didn't say what year of Cub the wiring harness is for.
If you have changed to a voltage regulator, and a 3 position switch, that is newer than 1949, so the wiring harness is different than a 1949 Cub had.
The newer than 1950 Cubs with a magneto had a Junction Block on the backside of the dash.
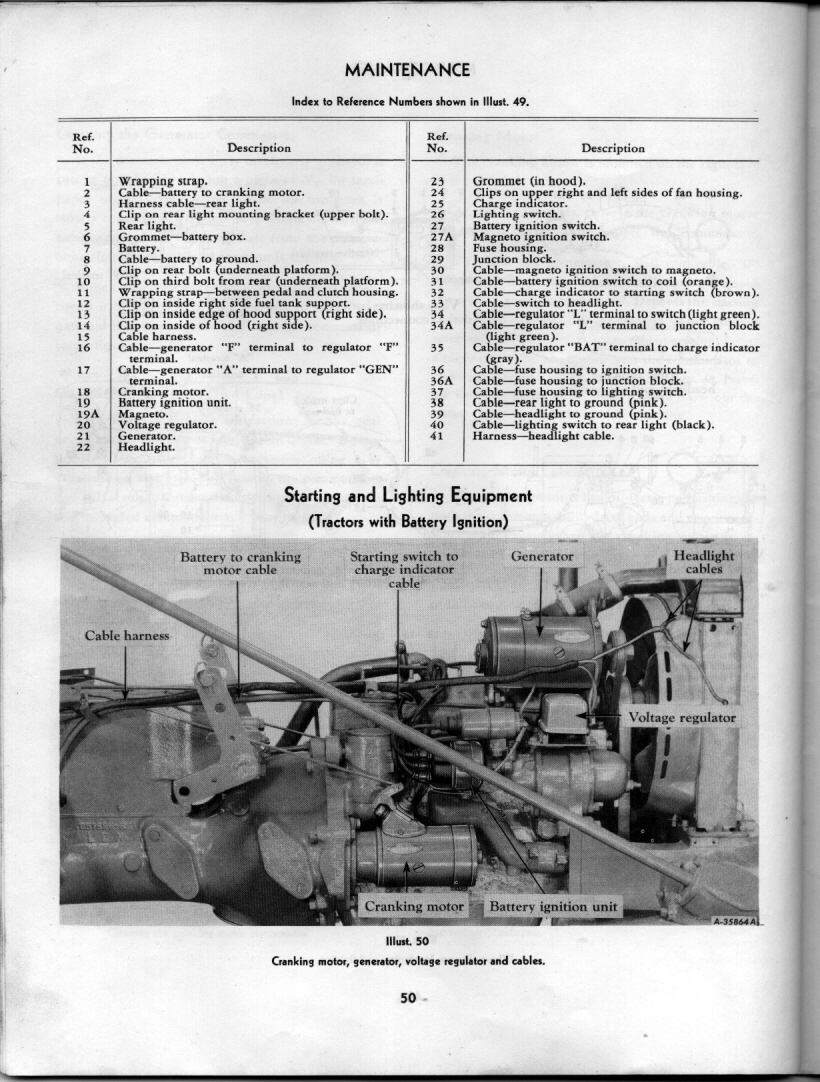
Below are pages from the 1955 Cub owner's manual, showing it at the bottom of the page, at the dash for the magneto. It is number 29 in the pic. Wire number 34 A goes to it, so does 36 A.
The second page tells what the numbers on the first page are. A 1955 Cub under the hood, looked like in the pic on the 2nd page. The voltage regulator came out in 1950, and was mounted like in the pic on the 2nd page.
http://farmallcub.com/rudi_cub/www.clea ... e%2049.jpg
http://farmallcub.com/rudi_cub/www.clea ... e%2050.jpg
It sounds like you have a wiring harness for one of those, but I'm not sure.
An original type voltage regulator has 4 wire connections, I don't know if yours does.
If you have a Cutout, or Relay IH called it, you will have to use the 4 position switch. That is what a 1949 Cub came with. You have to select the High or Low charge with the switch, they are not a voltage regulator.
What does the unit on top of the generator say that it is, a Voltage Regulator, or a Cutout, Relay, when you bought it, or are there papers with it.
The 1949 Cub owner's manual tells how to work the 4 position switch, and has a wiring diagram. This is from the 1950 Cub owner's manual, it is the same, and the pics are clearer to see.
http://farmallcub.com/rudi_cub/www.clea ... e%2034.jpg
http://farmallcub.com/rudi_cub/www.clea ... e%2035.jpg
You didn't say what year of Cub the wiring harness is for.
If you have changed to a voltage regulator, and a 3 position switch, that is newer than 1949, so the wiring harness is different than a 1949 Cub had.
The newer than 1950 Cubs with a magneto had a Junction Block on the backside of the dash.
Below are pages from the 1955 Cub owner's manual, showing it at the bottom of the page, at the dash for the magneto. It is number 29 in the pic. Wire number 34 A goes to it, so does 36 A.
The second page tells what the numbers on the first page are. A 1955 Cub under the hood, looked like in the pic on the 2nd page. The voltage regulator came out in 1950, and was mounted like in the pic on the 2nd page.
http://farmallcub.com/rudi_cub/www.clea ... e%2049.jpg
http://farmallcub.com/rudi_cub/www.clea ... e%2050.jpg
It sounds like you have a wiring harness for one of those, but I'm not sure.
An original type voltage regulator has 4 wire connections, I don't know if yours does.
If you have a Cutout, or Relay IH called it, you will have to use the 4 position switch. That is what a 1949 Cub came with. You have to select the High or Low charge with the switch, they are not a voltage regulator.
What does the unit on top of the generator say that it is, a Voltage Regulator, or a Cutout, Relay, when you bought it, or are there papers with it.
The 1949 Cub owner's manual tells how to work the 4 position switch, and has a wiring diagram. This is from the 1950 Cub owner's manual, it is the same, and the pics are clearer to see.
http://farmallcub.com/rudi_cub/www.clea ... e%2034.jpg
http://farmallcub.com/rudi_cub/www.clea ... e%2035.jpg
-
Glen
- 10+ Years
- Posts: 6139
- Joined: Mon Mar 19, 2012 7:33 pm
- Zip Code: 00000
- Tractors Owned: 1956 Farmall Cub with Fast Hitch, F-11 plow, Disc, Cultivator, Cub-22 mower
- Circle of Safety: Y
- Location: Wa.
Re: R.O.C.K Restoration Project
Hi,
lliberto, Below is a pic of the seat base reinforcement that Shane made, it is on page 22 of this post. They are originally welded onto the seat post base, I think.
They originally have a 3/8" 24, fine thread hole for the tool box bolt.
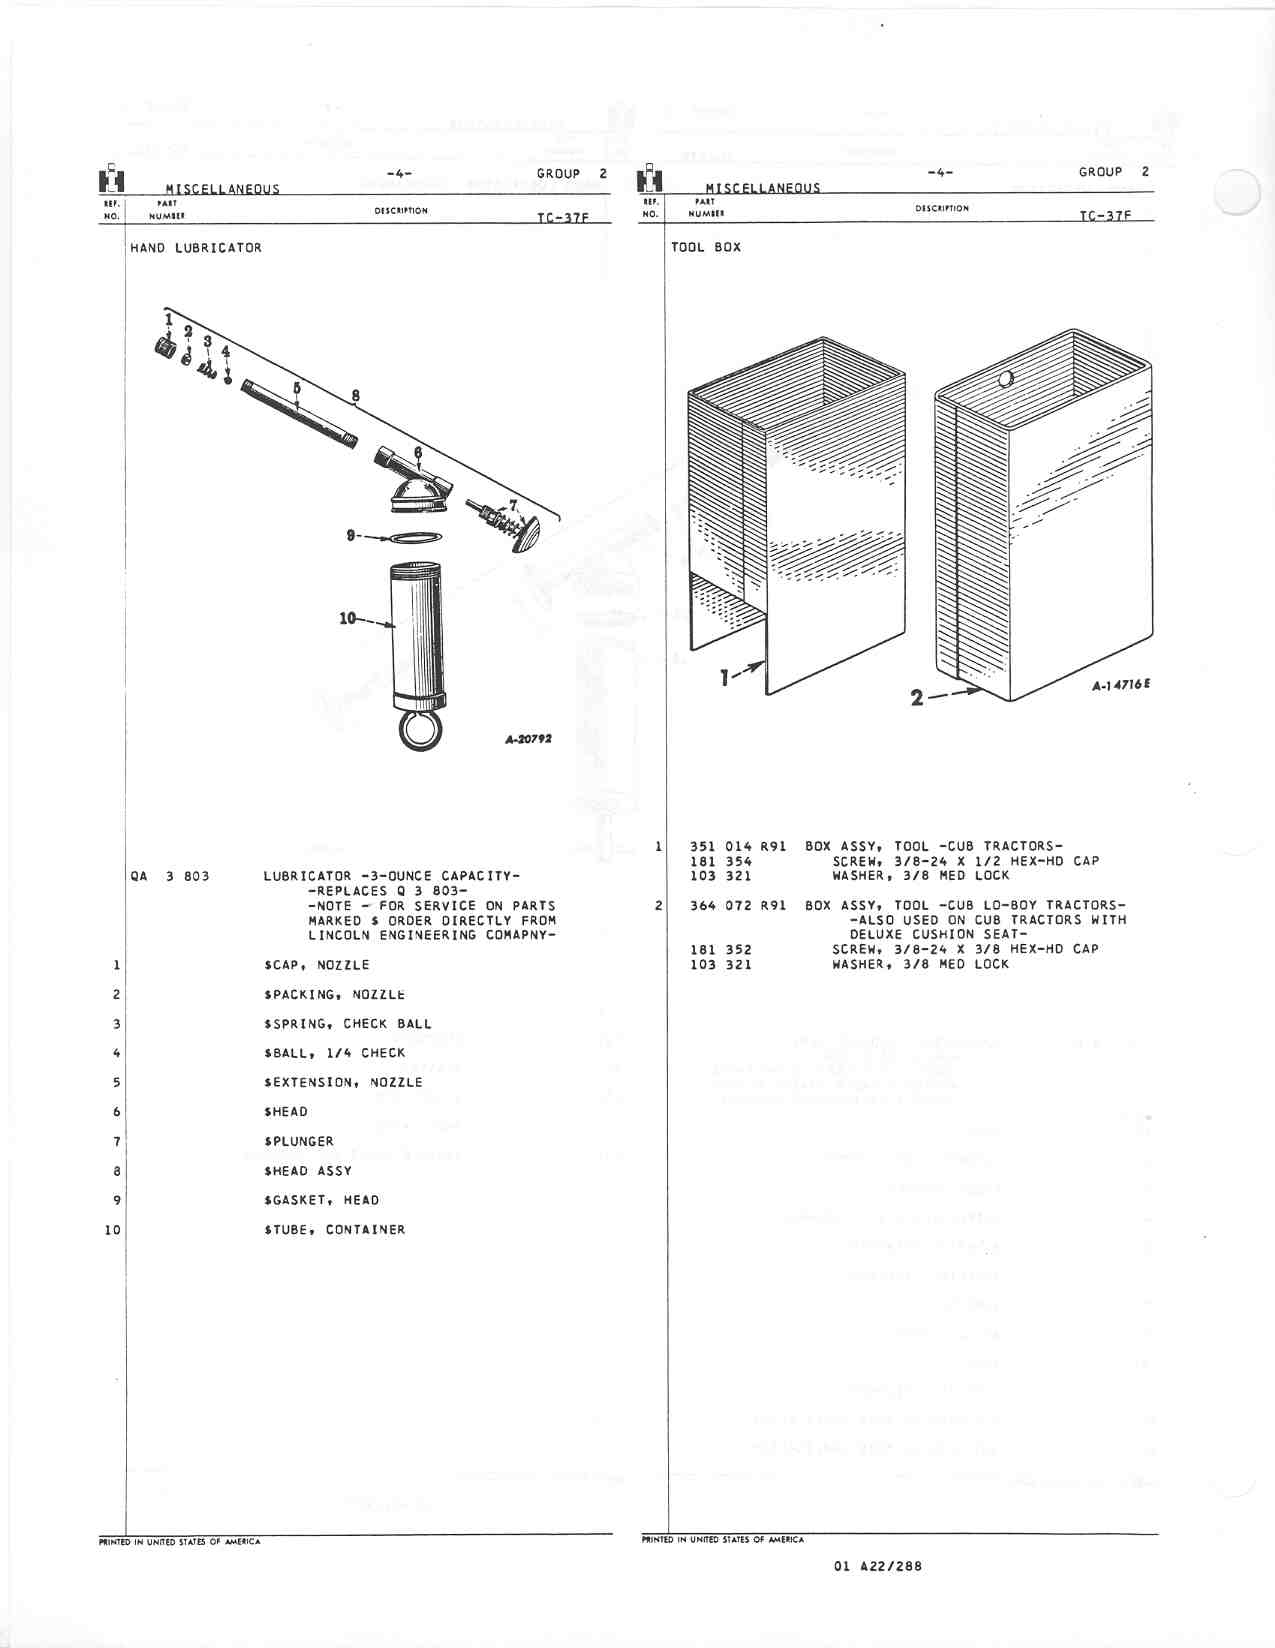
Below is a page from the Cub parts manual showing the tool box for the regular seat, number 1 in the pic. It uses a 1/2" long bolt it says, and a lock washer.
http://www.farmallcub.info/manuals/cub_ ... 002-04.jpg
Below is a listing at TM Tractor with pics.
http://www.tmtractor.com/new/sp/762fp.htm
lliberto, Below is a pic of the seat base reinforcement that Shane made, it is on page 22 of this post. They are originally welded onto the seat post base, I think.
They originally have a 3/8" 24, fine thread hole for the tool box bolt.
Below is a page from the Cub parts manual showing the tool box for the regular seat, number 1 in the pic. It uses a 1/2" long bolt it says, and a lock washer.
http://www.farmallcub.info/manuals/cub_ ... 002-04.jpg
Below is a listing at TM Tractor with pics.
http://www.tmtractor.com/new/sp/762fp.htm
- Attachments
-
-
rockfarmer
- 5+ Years
- Posts: 515
- Joined: Mon Apr 13, 2015 6:35 pm
- Zip Code: 78633
- Tractors Owned: 1947 Circle Cub
1948 Cub
1949 Cub (Rocky)
1950 Cub
1962 Cub - Circle of Safety: Y
Re: R.O.C.K Restoration Project
You are all correct in that the generator is set up with the new style regulator that works with the 3 position switch (you'll have to ask the generator expert for details). It is supposedly a little more user friendly but, not original to mid-1949 models.
Thank you for confirming the differences in 1949 vs 1950 regulators, as I was begrudgingly figuring it out over the past couple of days. I want to keep it original, since that is our goal. Maybe I can convert it using the following items:
If so, will the generator need to be "tweaked" in any other way?
This is how I currently have it wired, with the L terminal taped off.
-
Jim Becker
- Team Cub
- Posts: 17272
- Joined: Sun Feb 02, 2003 2:59 pm
- Zip Code: 55319
- Circle of Safety: Y
- Location: MN
Re: R.O.C.K Restoration Project
I'd probably leave it just as it is.
-
AL Farmall Boy

- 10+ Years
- Posts: 2555
- Joined: Tue Aug 10, 2010 6:38 pm
- Zip Code: 35630
- Circle of Safety: Y
Re: R.O.C.K Restoration Project
That light switch is designed for the Cut-out system with the fuse built in it. The Original Style 3 position light switch doesn't have the fuse built in, or the foil resistor for the charging circuit. Otherwise it looks identical to that one. You can still get new replacements for them.
Regards,
Chase
205-368-5339
ihfarmallrtr@gmail.com
 Follow my page "Alabama Tractor Pickers" on YouTube & Facebook!
Chase
205-368-5339
ihfarmallrtr@gmail.com
Follow my page "Alabama Tractor Pickers" on YouTube & Facebook! -
rockfarmer
- 5+ Years
- Posts: 515
- Joined: Mon Apr 13, 2015 6:35 pm
- Zip Code: 78633
- Tractors Owned: 1947 Circle Cub
1948 Cub
1949 Cub (Rocky)
1950 Cub
1962 Cub - Circle of Safety: Y
Re: R.O.C.K Restoration Project
Jim Becker wrote:I'd probably leave it just as it is.
Then I am finished with the dash. Thank you!
I will run the 6 wires to their respective locations and attach the hood, temporarily, for a requested photo op, to generate flyers for the auction. Then I will remove the hood and attach a pony tank for the initial startup.
-
staninlowerAL
- 10+ Years
- Posts: 4988
- Joined: Fri Oct 29, 2010 11:34 pm
- Zip Code: 36558
- Tractors Owned: Cubs: (3)'49's, (1 is for parts), (1)'57 IH Cub LoBoy w/FH, (2)154 Number Series Loboys, (1 is for parts), '76 Longstripe w/FH, Mowers: C-22, Bush Hog 412, Pennington 59, Woods RM42CF, Woods 42, assorted FCub plows, planters, discs, etc. OTHERS: '49 AC B & Ind. Sickle mower, '61 AC D12 Ser 2, '52 8N, '56 Ferguson 35 Deluxe, '47 & '49 Avery V, '53 MM BG (offset), '51 JD M (regular), '56 JD 420C, with Blade and fire plow, '85 JD 850 (Yanmar) w/72" belly mower, '76? Yanmar 2TR15 1500 & Bush Hog SQ42S-2 mower, '78? FORD Dexta, '86 FORD LGT14D & 48" Mower, (2)Cub Cadets & Mowers (MTD), (4) Sears Surburban's, other MTD mowers, Jeeps & other misc. "treasures"
- Circle of Safety: Y
- Location: AL (Southwest)
Re: R.O.C.K Restoration Project
Hey Tim, Congrats. Please include a picture here or a link to the auction flyer. TKS Stan
Stan in LA (lower AL)
USAF & Reserves, Reg ARMY, ARMY NG (AL)
USAF & Reserves, Reg ARMY, ARMY NG (AL)
Who is online
Users browsing this forum: No registered users and 49 guests


