This site uses cookies to maintain login information on FarmallCub.Com. Click the X in the banner upper right corner to close this notice. For more information on our privacy policy, visit this link: Privacy Policy
NEW REGISTERED MEMBERS: Be sure to check your SPAM/JUNK folders for the activation email.
R.O.C.K Restoration Project
Forum rules
Notice: For sale and wanted posts are not allowed in this forum. Please use our free classifieds or one of our site sponsors for your tractor and parts needs.
Notice: For sale and wanted posts are not allowed in this forum. Please use our free classifieds or one of our site sponsors for your tractor and parts needs.
-
Mike in Louisiana

- 10+ Years

- Posts: 7831
- Joined: Tue Feb 15, 2005 10:10 am
- Zip Code: 71023
- Circle of Safety: Y
- Location: LA, Doyline
Re: R.O.C.K Restoration Project
Tim, That's looking mighty fine.
1975 cub (LouAnn) serial # 245946, 1941 John Deere Model H
Good judgment comes from experience,
and a lot of that comes from bad judgment. Will Rogers
Good judgment comes from experience,
and a lot of that comes from bad judgment. Will Rogers
-
Glen

- 10+ Years
- Posts: 6149
- Joined: Mon Mar 19, 2012 7:33 pm
- Zip Code: 00000
- Tractors Owned: 1956 Farmall Cub with Fast Hitch, F-11 plow, Disc, Cultivator, Cub-22 mower
- Circle of Safety: Y
- Location: Wa.
Re: R.O.C.K Restoration Project
Hi,
Below is a page from the 1965 Cub owner's manual saying to re torque the head bolts after the first 50 hours of use. I think they did not have this info in the first manuals.
I would torque the bolts when the engine is cold, that is how they were torqued the first time.
http://farmallcub.com/rudi_cub/www.clea ... age-71.jpg
Here is the next page, for anyone wanting to see the service recommendations.
http://farmallcub.com/rudi_cub/www.clea ... age-72.jpg
-
Indy4570
- 5+ Years

- Posts: 961
- Joined: Tue Nov 28, 2017 2:12 am
- Zip Code: 65608
- Tractors Owned: 49 F cub, donor
50 Farmall Cub bugeyes(dead)
55 Farmall Cub Clementine
55 International loboy
62 140 Industrial The Beast
50s Allis Chalmers B
50 Ferguson TO20 Huppster
49 Ferguson TE20 Fergie
JD 790 4x4 w/backhoe
hinomoto diesel 4x4, early to mid 80s 20HP
73 Pasquali 4x4 diesel 33HP
74 Toro golf course tractor
Gilson 18HP - Circle of Safety: Y
- Location: Missouri Ozarks
Re: R.O.C.K Restoration Project
enjoying this thread! looking forward to seeing it all done!
better to have it and not need it than to need it and not have it...( YES this includes CUBS! )
-
rockfarmer

- 5+ Years
- Posts: 515
- Joined: Mon Apr 13, 2015 6:35 pm
- Zip Code: 78633
- Tractors Owned: 1947 Circle Cub
1948 Cub
1949 Cub (Rocky)
1950 Cub
1962 Cub - Circle of Safety: Y
Re: R.O.C.K Restoration Project
Lined up the punch marks on the idler, camshaft and crankshaft gears at TDC, marked the idler gear with white-out to install governor properly and cleaned the gasket mating surface.
Ready to put the front cover with new seal on, but before doing so, I want to ask about the governor seal placement. I will be using the J4 Magneto and currently have this much clearance,
which is between 27/32" and 28/32". Is it set too deep?
Not sure if there is a spec but I can easily slide a quarter between the seal and gear,
-
Slim140
- 5+ Years
- Posts: 4908
- Joined: Wed Nov 22, 2017 6:24 am
- Zip Code: 00000
- Tractors Owned: .
1970 International 140
1972 International 140
1949 John Deere A
1993 Ford 4630 W/Loader
1965 John Deere 110
1961 Cub Cadet Original - Circle of Safety: Y
Re: R.O.C.K Restoration Project
23/32” is the normal depth I believe.
Every home is a school, what are you teaching?

-
rockfarmer
- 5+ Years
- Posts: 515
- Joined: Mon Apr 13, 2015 6:35 pm
- Zip Code: 78633
- Tractors Owned: 1947 Circle Cub
1948 Cub
1949 Cub (Rocky)
1950 Cub
1962 Cub - Circle of Safety: Y
Re: R.O.C.K Restoration Project
your right...I drove it in too far! Now i need to figure out how to drive it back the other way, evenly.
-
Glen
- 10+ Years
- Posts: 6149
- Joined: Mon Mar 19, 2012 7:33 pm
- Zip Code: 00000
- Tractors Owned: 1956 Farmall Cub with Fast Hitch, F-11 plow, Disc, Cultivator, Cub-22 mower
- Circle of Safety: Y
- Location: Wa.
Re: R.O.C.K Restoration Project
Hi,
They have said on here before that the spec in the service manual for the depth of the governor gear oil seal was made when the seals were thicker, so it may need adjusting for modern thinner oil seals.
If needed, you might be able to change the position of the seal slightly if the governor gear is worn where the seal was before, to make it run on an unworn place on the gear surface.
I think the manual says leave the front cover bolts loose some, until after you put the front pulley on, so the oil seal can be centered on the pulley seal surface.
Below are pics from TM Tractor, of the governor gear and the idler gear.
The timing mark on the governor gear is on the edge of the tooth, on the left of the pic.
The timing mark for the governor gear is on the rear side of the idler gear. Look closely. It is on the right in the pic of the gear below. It should be shown in the manual.
- Attachments
-
-
Last edited by Glen on Sat Dec 30, 2017 6:49 pm, edited 1 time in total.
-
rockfarmer
- 5+ Years
- Posts: 515
- Joined: Mon Apr 13, 2015 6:35 pm
- Zip Code: 78633
- Tractors Owned: 1947 Circle Cub
1948 Cub
1949 Cub (Rocky)
1950 Cub
1962 Cub - Circle of Safety: Y
Re: R.O.C.K Restoration Project
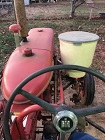
After inspecting the crankshaft pulley, I decided to install a new wear sleeve,
using my new sleeve installation tool.
(Roller type throw out bearing I decided not to use after reading many negative reviews). Worked perfectly!
Thanks to Glens' timely advice regarding the front cover, I loosened the bolts shortly after tightening them, and installed the pulley. I found it difficult to get the cover/seal aligned just right due to gravity, so I turned the engine like this,
This position allows the seal on the front cover to center itself around the pulley sleeve without any undue stresses, especially after rotating the crank shaft back and forth a few times. The cover can then be tightened.
As far as the pulley's final position, how far does the pulley need to go? Until it hits the crankshaft gear? There is currently about 1/8" gap between pulley and gear. The oil seal is riding about the same location as the original two grooves were, of course underneath the sleeve. Edit: The oil seal is now 1/4" closer to the pulley than the original groove closest to the pulley. Those 2 grooves look awful close to the tapered part of the pulley.
-
Glen
- 10+ Years
- Posts: 6149
- Joined: Mon Mar 19, 2012 7:33 pm
- Zip Code: 00000
- Tractors Owned: 1956 Farmall Cub with Fast Hitch, F-11 plow, Disc, Cultivator, Cub-22 mower
- Circle of Safety: Y
- Location: Wa.
Re: R.O.C.K Restoration Project
Hi,
yes, the pulley should go on all the way, until it hits the gear, then the fan belt should run straight in line with the upper pulley.
Put some motor oil on the rubber part of new seals, so they have lubrication.
yes, the pulley should go on all the way, until it hits the gear, then the fan belt should run straight in line with the upper pulley.
Put some motor oil on the rubber part of new seals, so they have lubrication.
-
rockfarmer
- 5+ Years
- Posts: 515
- Joined: Mon Apr 13, 2015 6:35 pm
- Zip Code: 78633
- Tractors Owned: 1947 Circle Cub
1948 Cub
1949 Cub (Rocky)
1950 Cub
1962 Cub - Circle of Safety: Y
Re: R.O.C.K Restoration Project
Crankshaft pulley is on all the way and the oil seal is running on a nice clean surface, barely.
Is this going to be a problem? I noticed two lips on the seal. The rear lip is good but the front lip is riding on the sleeve with not much room to spare. I could not get the wear sleeve on any further without risking possible damage.
I replaced the needle bearing in governor and have a question about the oil seal.
The original seal had a spring in it and the new one does not. Should I reuse the spring in the new seal?
-
Glen
- 10+ Years
- Posts: 6149
- Joined: Mon Mar 19, 2012 7:33 pm
- Zip Code: 00000
- Tractors Owned: 1956 Farmall Cub with Fast Hitch, F-11 plow, Disc, Cultivator, Cub-22 mower
- Circle of Safety: Y
- Location: Wa.
Re: R.O.C.K Restoration Project
Hi,
If you have an oil seal with 2 lips, the front lip was originally made to keep dirt out of the seal. The rear lip is the oil seal.
As long as the front lip is on the sleeve, it should work, it is not as important as the rear lip.
Several of the original seals on Cubs had the 2 lips, many of the new seals have 1 lip.
I would use the new seal for the governor the way it came.
The engine looks good in the pics.
-
rockfarmer
- 5+ Years
- Posts: 515
- Joined: Mon Apr 13, 2015 6:35 pm
- Zip Code: 78633
- Tractors Owned: 1947 Circle Cub
1948 Cub
1949 Cub (Rocky)
1950 Cub
1962 Cub - Circle of Safety: Y
Re: R.O.C.K Restoration Project
In rebuilding the governor, I replaced the internals with one that came off a newer model (same weight), because the original weights opened up so far they were making contact with the housing.
You can clearly see the wear on the outside of the weights and there was a distinct pattern mark on the inside of the housing where it was making contact...forgot to photo. Can this governor be re built?
You can clearly see the wear on the outside of the weights and there was a distinct pattern mark on the inside of the housing where it was making contact...forgot to photo. Can this governor be re built?
-
Bob McCarty
- Team Cub

- Posts: 11860
- Joined: Tue May 25, 2004 8:02 pm
- Zip Code: 80501
- Tractors Owned: Cubs, MH Pony, Shaw, Allis G, 1934 Silver King, JD LA and LI, Gibson D, David Bradley Tri-Trac
- Circle of Safety: Y
- Location: CO, Longmont
Re: R.O.C.K Restoration Project
Tim, I would suspect that either the pins through the weights are worn and grooved, and/or the holes are wallered out. You'll need to take it apart and see where the problem is.
"We don't need to think more,
we need to think differently."
-Albert Einstein
we need to think differently."
-Albert Einstein
-
rockfarmer
- 5+ Years
- Posts: 515
- Joined: Mon Apr 13, 2015 6:35 pm
- Zip Code: 78633
- Tractors Owned: 1947 Circle Cub
1948 Cub
1949 Cub (Rocky)
1950 Cub
1962 Cub - Circle of Safety: Y
Re: R.O.C.K Restoration Project
Thanks Bob. I took the governor apart and believe it is a case of wallered out holes.
The pins have no grooves and the weights are relatively tight on the pins. I will set this one aside and use it for parts in the future.
The pins have no grooves and the weights are relatively tight on the pins. I will set this one aside and use it for parts in the future.
-
Stanton

- Cub Pro

- Posts: 7760
- Joined: Mon Jun 22, 2009 6:56 am
- Zip Code: 64070
- Tractors Owned: 1942 Farmall AV, serial #87025
1947 Farmall Circle Cub, serial #2116
1948 Farmall Cub, serial #46066 - Circle of Safety: Y
- Location: Lone Jack, MO
Re: R.O.C.K Restoration Project
I believe those holes can be welded and re-drilled. I've read that in another thread, but can't find it at the moment. Here's a couple threads in the How To Forum that may offer additional info:
http://www.farmallcub.com/phpBB2/viewtopic.php?f=141&t=91319&p=512925&hilit=governor#p512925
http://www.farmallcub.com/phpBB2/viewtopic.php?f=141&t=44139&p=364892&hilit=governor#p364892
http://www.farmallcub.com/phpBB2/viewtopic.php?f=141&t=91319&p=512925&hilit=governor#p512925
http://www.farmallcub.com/phpBB2/viewtopic.php?f=141&t=44139&p=364892&hilit=governor#p364892
Stanton

Who is online
Users browsing this forum: Garvin Gatewood and 58 guests


