This site uses cookies to maintain login information on FarmallCub.Com. Click the X in the banner upper right corner to close this notice. For more information on our privacy policy, visit this link: Privacy Policy
NEW REGISTERED MEMBERS: Be sure to check your SPAM/JUNK folders for the activation email.
Restoration Project - Four digit Cub
Forum rules
Notice: For sale and wanted posts are not allowed in this forum. Please use our free classifieds or one of our site sponsors for your tractor and parts needs.
Notice: For sale and wanted posts are not allowed in this forum. Please use our free classifieds or one of our site sponsors for your tractor and parts needs.
-
Slim140
- 5+ Years

- Posts: 4908
- Joined: Wed Nov 22, 2017 6:24 am
- Zip Code: 00000
- Tractors Owned: .
1970 International 140
1972 International 140
1949 John Deere A
1993 Ford 4630 W/Loader
1965 John Deere 110
1961 Cub Cadet Original - Circle of Safety: Y
Re: Restoration Project - Four digit Cub
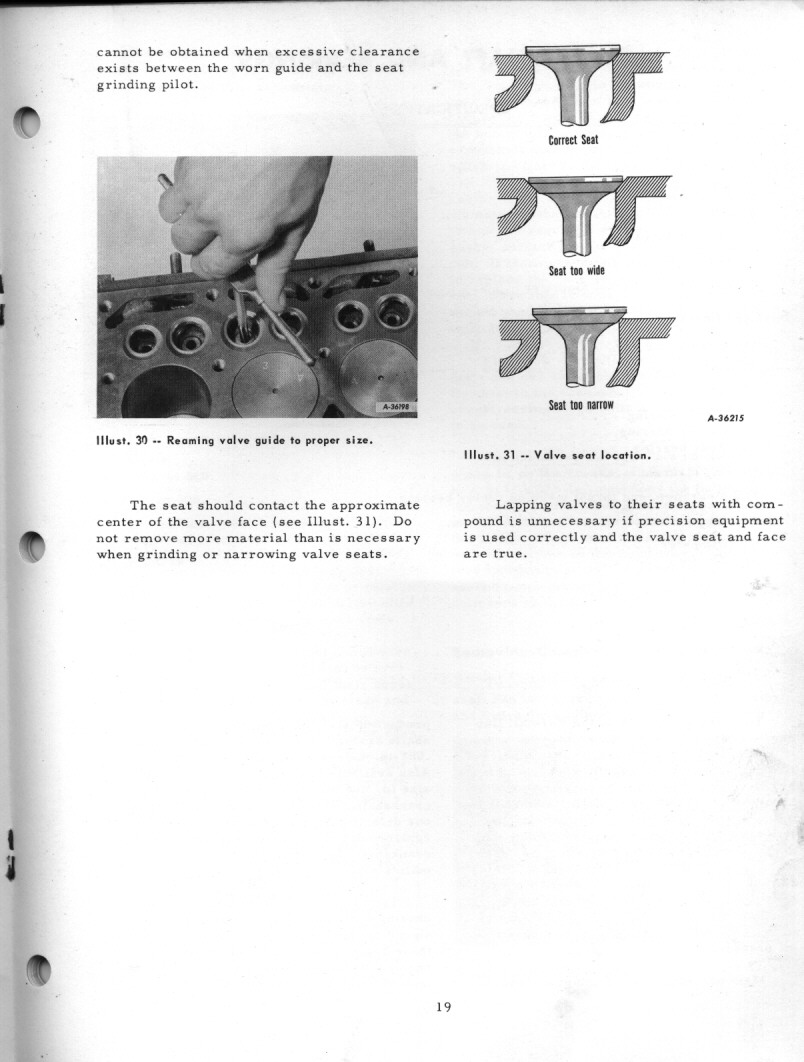
# 1 & 2 valve seats.
- Attachments
-
-
-
-
Every home is a school, what are you teaching?

-
Slim140
- 5+ Years
- Posts: 4908
- Joined: Wed Nov 22, 2017 6:24 am
- Zip Code: 00000
- Tractors Owned: .
1970 International 140
1972 International 140
1949 John Deere A
1993 Ford 4630 W/Loader
1965 John Deere 110
1961 Cub Cadet Original - Circle of Safety: Y
Re: Restoration Project - Four digit Cub
Started with this.
- Attachments
-
Every home is a school, what are you teaching?
-
Stanton

- Cub Pro

- Posts: 7760
- Joined: Mon Jun 22, 2009 6:56 am
- Zip Code: 64070
- Tractors Owned: 1942 Farmall AV, serial #87025
1947 Farmall Circle Cub, serial #2116
1948 Farmall Cub, serial #46066 - Circle of Safety: Y
- Location: Lone Jack, MO

-
Slim140
- 5+ Years
- Posts: 4908
- Joined: Wed Nov 22, 2017 6:24 am
- Zip Code: 00000
- Tractors Owned: .
1970 International 140
1972 International 140
1949 John Deere A
1993 Ford 4630 W/Loader
1965 John Deere 110
1961 Cub Cadet Original - Circle of Safety: Y
Re: Restoration Project - Four digit Cub
Decided I may as well shave the head while it's off. Took .0075" off of it.
- Attachments
-
- Before cleaning/cutting.
-
- Set up in mill.
-
- Cutting.
-
- Starting to machine.
-
- Before blowing metal off.
-
- Done.
Every home is a school, what are you teaching?
-
Jim Becker
- Team Cub

- Posts: 17278
- Joined: Sun Feb 02, 2003 2:59 pm
- Zip Code: 55319
- Circle of Safety: Y
- Location: MN
Re: Restoration Project - Four digit Cub
Wow. Some of those valve seats looked nasty before you ground them. I'm sure you know this, but I'll mention it because they are easy to overlook. Check the specs for maximum width of the seats and the minimum thickness of the edge of the valves.
-
Slim140
- 5+ Years
- Posts: 4908
- Joined: Wed Nov 22, 2017 6:24 am
- Zip Code: 00000
- Tractors Owned: .
1970 International 140
1972 International 140
1949 John Deere A
1993 Ford 4630 W/Loader
1965 John Deere 110
1961 Cub Cadet Original - Circle of Safety: Y
Re: Restoration Project - Four digit Cub
Jim Becker wrote:Wow. Some of those valve seats looked nasty before you ground them. I'm sure you know this, but I'll mention it because they are easy to overlook. Check the specs for maximum width of the seats and the minimum thickness of the edge of the valves.
You wouldn't happen to have those numbers handy would you Jim? I have googled it and can't find it.
Every home is a school, what are you teaching?
-
BIGHOSS

- Cub Pro
- Posts: 1741
- Joined: Tue Jul 18, 2006 9:55 pm
- Zip Code: 37087
- Tractors Owned: 1947 Cub S/N 9216
w/ C-22 Mower
1974 Cub S/N 244814
w/59 Woods Mower
Ford 3000 Gas S/N C375091 w/Bushhog QT2345 Loader & 6' Squealer Bushhog
and a Palomino Mare named GIGI - Circle of Safety: Y
- Location: TN, Lebanon
Re: Restoration Project - Four digit Cub
Click on PDF Manuals at top of this page. Find engine section under "Blue Ribbon Service Manual". You should find all that you need to know about specs.
"Courage is being scared to death-but saddling up anyway".......John Wayne
-
Slim140
- 5+ Years
- Posts: 4908
- Joined: Wed Nov 22, 2017 6:24 am
- Zip Code: 00000
- Tractors Owned: .
1970 International 140
1972 International 140
1949 John Deere A
1993 Ford 4630 W/Loader
1965 John Deere 110
1961 Cub Cadet Original - Circle of Safety: Y
Re: Restoration Project - Four digit Cub
BIGHOSS wrote:Click on PDF Manuals at top of this page. Find engine section under "Blue Ribbon Service Manual". You should find all that you need to know about specs.
Thank you BIGHOSS! Going to print that one out, 32 pages of Cub goodness!
Every home is a school, what are you teaching?
-
Jim Becker
- Team Cub
- Posts: 17278
- Joined: Sun Feb 02, 2003 2:59 pm
- Zip Code: 55319
- Circle of Safety: Y
- Location: MN
Re: Restoration Project - Four digit Cub
Some of the detailed valve specs aren't easy to find. Looking at the Blue Ribbon Service Manuals that you have found above, there are GSS-1007 Engine and GSS-1008 Specifications.
For the seat width, GSS-1007 says 3/16 in the text and (a more believable) 3/64 in the table. GSS-1008 gives a range .040 to .050 (which brackets 3/64). I notice GSS-1008 gives a slightly different seat angle too. I wouldn't worry about that for an early tractor. Look at the illustration (#31) that shows seat position relative to the valve. The OD of the seat needs to be smaller than the valve and the entire seat needs to hit the surface of the valve. If you need to reduce the OD of the seat, you grind a bit at another angle, typically using a 20 degree stone. A steeper stone can be used if needed to further reduce the seat width (increasing the ID) after the OD is set. These adjustments are the source of the name of the "three angle" valve job.
The edge of the valve is the really hard thing to pin down. By the way, the proper term for this is "margin". GSS-1007 says "carefully check each valve margin after refacing" and has an illustration showing two kinds of wrong and one correct with no specifications. GSS-1008 doesn't seem to address it at all. My general information from a valve grinding tool set just says to check for a "good margin". Other web sources, all I found was a small engine site that says new valves typically have a 1/32 margin and a reground valve is OK with at least 1/64. Those are probably reasonable numbers. A uniform margin on any individual valve is important and a variation indicates a warped valve.
-
Cecil
- Team Cub Mentor

- Posts: 4128
- Joined: Tue Jan 11, 2005 12:12 pm
- Zip Code: 13830
- eBay ID: adak8965
- Circle of Safety: Y
- Location: Oxford, NY
Re: Restoration Project - Four digit Cub
When you lap the valves take a permenant marker and put 4 marks on the face of the valve at 90 degrees to each other. When you wear the marks off the valves are lapped in.
-
Slim140
- 5+ Years
- Posts: 4908
- Joined: Wed Nov 22, 2017 6:24 am
- Zip Code: 00000
- Tractors Owned: .
1970 International 140
1972 International 140
1949 John Deere A
1993 Ford 4630 W/Loader
1965 John Deere 110
1961 Cub Cadet Original - Circle of Safety: Y
Re: Restoration Project - Four digit Cub
After looking at what you said Jim and also marking the valves with a permanent marker like you said Cecil this is the first one I lapped in. I made me a tool to put in the hand drill and turn it real slow with lapping compound on the valve/seat. I put 2 ~ 5/64" roll pins in a piece of 7/8" steel and welded a 1/4" bolt in the middle to chuck on. This is the first time I've ever done my own valves, I'm beginning to see why machine shops charge so much, lol.
- Attachments
-
-
-
-
-
-
Every home is a school, what are you teaching?
-
tst
- 10+ Years

- Posts: 5214
- Joined: Tue Jan 12, 2010 2:08 pm
- Zip Code: 12514
- Circle of Safety: Y
Re: Restoration Project - Four digit Cub
hard to see the lap line in the pic, it should be in the middle of the valve face, to close to the top of the valve and it will burn through in a short time
-
Urbish

- 10+ Years
- Posts: 2428
- Joined: Sat Sep 07, 2013 3:45 pm
- Zip Code: 48158
- Tractors Owned: ~
1958 International Cub LoBoy
1947 Farmall H
1946 Farmall B
1953 Willys CJ3B
2022 Massey Ferguson GC1723E Subcompact
Cub Loboy L-54 Leveling and Grader Blade - Circle of Safety: Y
- Location: Manchester, MI
Re: Restoration Project - Four digit Cub
Chipmaker wrote: This is the first time I've ever done my own valves, I'm beginning to see why machine shops charge so much, lol.
Be careful with that drill. Are you going slow with light pressure and in both directions? If you go one direction only, you can wear contours into the valve and seat not unlike how a badly worn brake pad and rotor will have matching concentric rings. Looking good as always!
Jim
-
Jim Becker
- Team Cub
- Posts: 17278
- Joined: Sun Feb 02, 2003 2:59 pm
- Zip Code: 55319
- Circle of Safety: Y
- Location: MN
Re: Restoration Project - Four digit Cub
tst wrote:hard to see the lap line in the pic, it should be in the middle of the valve face, to close to the top of the valve and it will burn through in a short time
Yes, there needs to be good contact in the right place to maximize heat transfer from the valve to the block. Having the seat extend past the valve also encourages carbon deposits. Check illustration 31 in GSS-1007. The illustration is hard to see, but a close look helps.
The valve in the illustration is a "perfect" valve. After regrinding, the face may extend closer to the valve stem, which is harmless. As long as you have "some" of the marker lines showing at the outside of the valve seat you are good.
-
Slim140
- 5+ Years
- Posts: 4908
- Joined: Wed Nov 22, 2017 6:24 am
- Zip Code: 00000
- Tractors Owned: .
1970 International 140
1972 International 140
1949 John Deere A
1993 Ford 4630 W/Loader
1965 John Deere 110
1961 Cub Cadet Original - Circle of Safety: Y
Re: Restoration Project - Four digit Cub
Aright Jim and Tim, (thanks Tim for your info as well) I been reading the part Jim has been talking about and I just put another grinding wheel on and re ground the seat, not so much the seat where the valve meets but above where the valve meets the seat to make it look like the correct picture. It's hard to tell in my pictures but where the grey is that's from where I lapped them and haven't cleaned it well. The shiny part is where I just ground to give me less contact area on valve/seat. Thank everyone for their input on this!
- Attachments
-
- Before regrind.
-
- Reground.
-
- Reground top.
-
- After regrind.
Every home is a school, what are you teaching?
Who is online
Users browsing this forum: No registered users and 48 guests


