Page 1 of 1

PTO Problem

Posted: Thu May 08, 2014 1:01 pm
by Dell
1952 FCub Woods 59 Everything runs smooth except for the following.

I was mowing along the edge of a building and hit a baseball size rock with the left mower blade.
Then I felt a unbalance feeling in the mower so I stopped and blades are straight and turn easy.
Mowed some more and mower deck froze up. Shut down and blades turned easy by hand.
Powered up, when engaged pto has a slow gear meshing sound and the lever wants to pop out of gear.
If I kept going I know it would have froze up again so I put it in the barn.

Did the rock hurt the pto.
What's on the the to do list.

Thanks,
Dell

Add. I did a search on here and web and it does not sound like an easy fix.
Re: PTO Problem

Posted: Thu May 08, 2014 6:07 pm
by Bob McCarty
It sounds like you may have rounded off the splines on the shaft and/or in the collar. Here is a link to a photo page from TM Tractor that shows the individual parts:
http://www.tm-tractor.com/gpt/complete_001.htm The left center picture shows the clutch which slides forward onto the drive shaft when you move the lever to engage the PTO. The bottom left picture shows the splines on the end of the shaft that can get rounded off and then not engage into the clutch, you can also see the bushing in the end of the shaft. You'll need to remove the tranny filler plug and then using a good light, see if you can identify the problem. Also, pull and push on the pulley and see if there is any in and out movement. Pulling the PTO is not difficult, but if the drive shaft splines are shot, there is work involved to replace it.

Bob

Re: PTO Problem

Posted: Sat May 10, 2014 6:55 am
by Dell
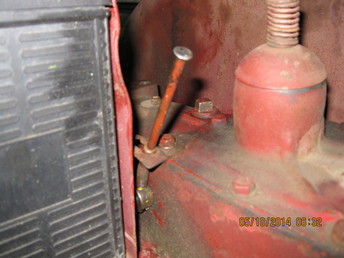
Image
The short version is that I bent the PTO lever so it holds the coupler farther onto the driveshaft.

The long version is this:
I read all the posts on the PTO coupler and I never saw anything about bending the rod.
Maybe it's a common fix and I just missed it.

Inspecting and troubleshooting the PTO coupler through the trans filler hole I discovered:
The driveshaft teeth look ok.
When engaged the coupler had more than 1/2" of for/aft slop in it.
Only about 1/8" of the slop was from the inside lever to coupler.
The majority of the slop was from worn parts outside the case at the operators lever below the spring.
So I ordered a new assembly which includes both inside and outside levers for $35.

But, in the meantime I needed to mow the lawn so I did a temporary fix.
(In the following explanation, all directions are from the drivers seat)

I needed to take the slop out of the engaging levers and to keep the coupler farther forward on the driveshaft so it wouldn't disengage on it's own.

To keep the coupler farther forward on the shaft I needed to turn the outside end of the coupler lever counter-clockwise. But how? Tack welding it would be a pain to undue, bushings would be tedious and probably would not work.

So, 2" from the spring end of the rod/lever I put a 1/4" bend. I put it in my bench vice and tapped lightly with a hammer to get the 1/4" bend. And I punched a divot on the bend side of the handle so I would know which side went forward when I put it throught the collar and installed the cotter pin.

It worked. Engaged there is only 1/8" free movement and it stays farther onto the driveshaft.

I mowed the lawn without a peep from the PTO.
If everything inside the case is good then bending the rod is a quick and easy fix.
It may not be your cup of tea to do it this way but it works.

Dell