This site uses cookies to maintain login information on FarmallCub.Com. Click the X in the banner upper right corner to close this notice. For more information on our privacy policy, visit this link: Privacy Policy
NEW REGISTERED MEMBERS: Be sure to check your SPAM/JUNK folders for the activation email.
48 Cub Magneto Timing Help?!
Forum rules
Notice: For sale and wanted posts are not allowed in this forum. Please use our free classifieds or one of our site sponsors for your tractor and parts needs.
Notice: For sale and wanted posts are not allowed in this forum. Please use our free classifieds or one of our site sponsors for your tractor and parts needs.
-
farmergiffIV

- 10+ Years

- Posts: 203
- Joined: Sat Aug 17, 2013 8:36 pm
- Zip Code: 97526
- Tractors Owned: 1948 FCub
1953 FCub - Location: Oregon
Re: 48 Cub Magneto Timing Help?!
another question; after I reinstalled the governor oil seal the magneto seemed like it has a firmer fit. It fits snug and in its place as it could, would that be any reason it isn't starting well? Seems unlikely.
-
Glen

- 10+ Years
- Posts: 6152
- Joined: Mon Mar 19, 2012 7:33 pm
- Zip Code: 00000
- Tractors Owned: 1956 Farmall Cub with Fast Hitch, F-11 plow, Disc, Cultivator, Cub-22 mower
- Circle of Safety: Y
- Location: Wa.
Re: 48 Cub Magneto Timing Help?!
Hi,
The gear teeth ordinarily cannot change mesh unless someone takes it apart and changes the position.
I don't know if it would be possible for it to change if the idler gear bushing was worn enough, it is the gear that runs the governor gear. Someone lately on here had a worn bushing, he said he could move the gear up and down some.
I have not read back through all of your posts recently, you could check the spark while it is turning over, it should have a blue spark.
If it has a weak yellow spark, that can make it start hard,
The points need to be good, with flat and shiny surfaces.
Also the condenser can go bad, and need replacing.
It might need a new coil.
It will run again if everything is working right.
-
farmergiffIV
- 10+ Years
- Posts: 203
- Joined: Sat Aug 17, 2013 8:36 pm
- Zip Code: 97526
- Tractors Owned: 1948 FCub
1953 FCub - Location: Oregon
Re: 48 Cub Magneto Timing Help?!
Glen wrote:Hi,
The gear teeth ordinarily cannot change mesh unless someone takes it apart and changes the position.
I don't know if it would be possible for it to change if the idler gear bushing was worn enough, it is the gear that runs the governor gear. Someone lately on here had a worn bushing, he said he could move the gear up and down some.
I have not read back through all of your posts recently, you could check the spark while it is turning over, it should have a blue spark.
If it has a weak yellow spark, that can make it start hard,
The points need to be good, with flat and shiny surfaces.
Also the condenser can go bad, and need replacing.
It might need a new coil.
It will run again if everything is working right.
I'll check for blue spark today. How do you know if the condenser is bad?
-
Slim140

- 5+ Years

- Posts: 4908
- Joined: Wed Nov 22, 2017 6:24 am
- Zip Code: 00000
- Tractors Owned: .
1970 International 140
1972 International 140
1949 John Deere A
1993 Ford 4630 W/Loader
1965 John Deere 110
1961 Cub Cadet Original - Circle of Safety: Y
Re: 48 Cub Magneto Timing Help?!
Here's one way to test your condenser.
1.) Remove the condenser from the engine (or at least disconnect the lead wire). Note the small metal connector located on the end of the condenser. This connector is the "hot" or power connection. The metal case of the condenser is the grounding point. Discharge the condenser by shorting the lead wire to the case.
2.) Switch the meter to the ohms position. Place the red lead into the "ohm" connector on the meter. Insert the black lead into the "com" or common connector on the meter. Set the resistance range to the highest available setting (if it is selectable). Connect the test leads together and zero the meter. If the meter won't zero replace the battery. (Yes, an ohm meter has a battery).
3.) Touch the red lead to the hot connector on the condenser. Place the black lead to the metal case on the condenser. The meter's needle should jump slightly to the right (toward 0-ohms), then should drop back to the left towards infinite resistance). Hold the leads in place for 15 to 20 seconds. This action places charge in the condenser. If the test shows any reading other than infinity, the condenser is leaking and needs to be replaced.
4.) Remove the leads and reverse the placement to the condenser. Move the red lead from the hot connector to the metal case, and move the black lead from the metal case to the hot connector. At the moment where both leads are touching the correct points, the meter should jump towards the right. The second time the needle may move twice as far, as this action discharges the condenser. Holding the leads in contact should again result in movement of the needle back toward infinite resistance.
5.) Movement of the meter's needle indicates the condenser is good. If no movement was indicated on the meter in any circumstance, the condenser is bad and must be replaced. Retest the condenser several times for a consistent reading.
Every home is a school, what are you teaching?

-
farmergiffIV
- 10+ Years
- Posts: 203
- Joined: Sat Aug 17, 2013 8:36 pm
- Zip Code: 97526
- Tractors Owned: 1948 FCub
1953 FCub - Location: Oregon
Re: 48 Cub Magneto Timing Help?!
Chipmaker wrote:Here's one way to test your condenser.
1.) Remove the condenser from the engine (or at least disconnect the lead wire). Note the small metal connector located on the end of the condenser. This connector is the "hot" or power connection. The metal case of the condenser is the grounding point. Discharge the condenser by shorting the lead wire to the case.
2.) Switch the meter to the ohms position. Place the red lead into the "ohm" connector on the meter. Insert the black lead into the "com" or common connector on the meter. Set the resistance range to the highest available setting (if it is selectable). Connect the test leads together and zero the meter. If the meter won't zero replace the battery. (Yes, an ohm meter has a battery).
3.) Touch the red lead to the hot connector on the condenser. Place the black lead to the metal case on the condenser. The meter's needle should jump slightly to the right (toward 0-ohms), then should drop back to the left towards infinite resistance). Hold the leads in place for 15 to 20 seconds. This action places charge in the condenser. If the test shows any reading other than infinity, the condenser is leaking and needs to be replaced.
4.) Remove the leads and reverse the placement to the condenser. Move the red lead from the hot connector to the metal case, and move the black lead from the metal case to the hot connector. At the moment where both leads are touching the correct points, the meter should jump towards the right. The second time the needle may move twice as far, as this action discharges the condenser. Holding the leads in contact should again result in movement of the needle back toward infinite resistance.
5.) Movement of the meter's needle indicates the condenser is good. If no movement was indicated on the meter in any circumstance, the condenser is bad and must be replaced. Retest the condenser several times for a consistent reading.
Ok great, and after a quick search it appears the condensor is inside the magneto right? or... I am not sure I am familiar with where it on the tractor it is...

Today I took off the central plug (the one that connects the distributor cap to the magneto) on the distributor cap today and while scratching the surface of the tractor with this metal connector piece (I was scratching the surface with the end that should be in the distributor cap) I turned over the tractor multiple attempts and I didn't get any spark or any sign of electrical here.
-
farmergiffIV
- 10+ Years
- Posts: 203
- Joined: Sat Aug 17, 2013 8:36 pm
- Zip Code: 97526
- Tractors Owned: 1948 FCub
1953 FCub - Location: Oregon
Re: 48 Cub Magneto Timing Help?!
Eugene wrote:farmergiffIV wrote:Coil wire. Simple remove the spark plug wire from the center of the distributor cap. Locate the end of this plug wire about 1/4 inch from engine block. When you crank over the engine, with kill switch in on position, you will see a nice blue spark as you rotate the engine.
Compression test results were?
I am trying this tecnique to make sure we are getting spark but I want to make sure I understand what you think I should do: you say 1/4 from the engine block, so not actually touching the engine itself but enough so electricity passes through the air make a connection?
If there is no spark does this indicate the condensor is bad or what other things does this connection indicate could be going wrong in the magneto?
-
Glen
- 10+ Years
- Posts: 6152
- Joined: Mon Mar 19, 2012 7:33 pm
- Zip Code: 00000
- Tractors Owned: 1956 Farmall Cub with Fast Hitch, F-11 plow, Disc, Cultivator, Cub-22 mower
- Circle of Safety: Y
- Location: Wa.
Re: 48 Cub Magneto Timing Help?!
Hi,
Be sure when testing the spark that the ignition switch is on, it won't spark with the switch off.
Yes, the spark should jump the 1/4 inch easily if everything is good. It should be a place with bare metal on the engine so the spark will jump to ground.
You could check the points, they should be shiny and flat bare metal.
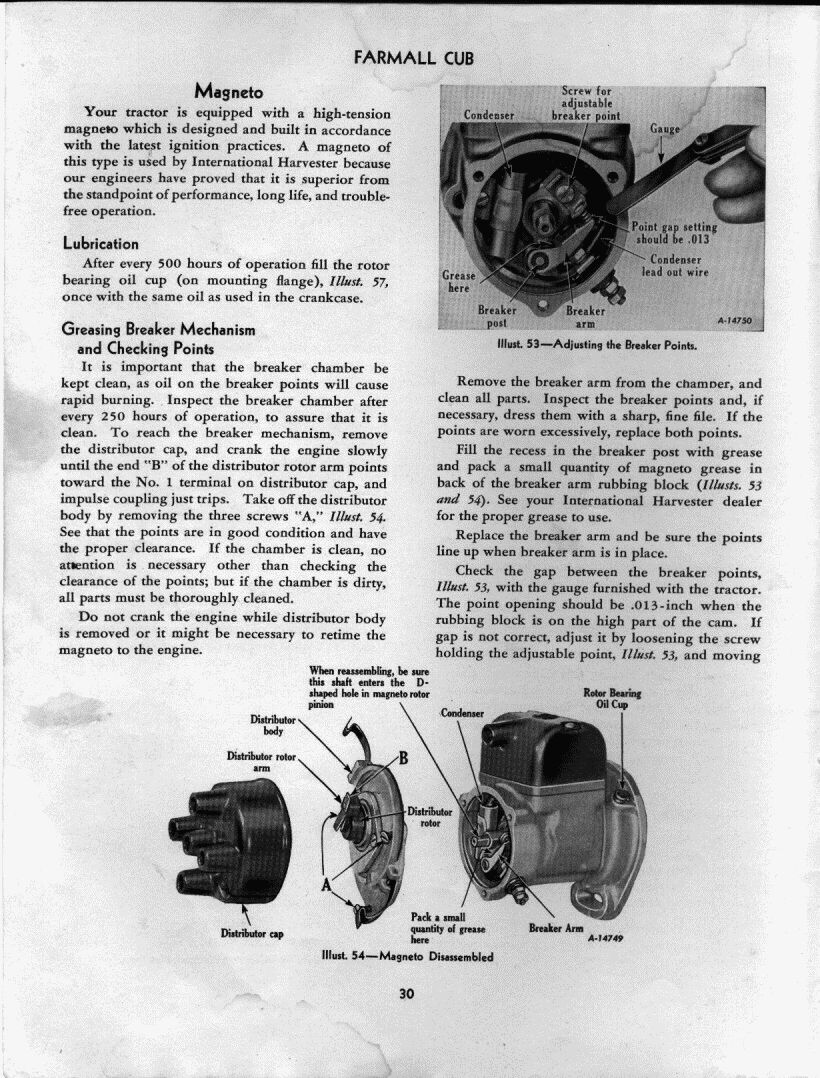
The points and condenser are under the plate that holds the distributor cap, the plate is held on with 3 screws. Here is a page from the Cub owner's manual showing the points and condenser.
http://farmallcub.com/rudi_cub/www.clea ... e%2030.jpg
If you are taking the plate off, turn the engine first so the rotor is pointed to number 1, then do not turn the engine with the plate off, except for a small amount to get the points so they open fully.
I take the points out and file them with a large file, so they are flat and shiny, then wipe off all filings with a clean rag. They have to be good so the power will go through them. If they are burned much, replacing them is better. I use a very short screwdriver, and probably an 11/32 inch open end wrench to get the points out. It is easier to sit next to the Cub on a lawn chair or something, use a good light, and put a large towel on the ground to catch any little screws you might drop.
Here is a listing for new points and condenser at TM Tractor so you can see them.
http://www.tmtractor.com/new/el/367fp.htm
If it's not the points or condenser, the coil may have quit. TM Tractor has a new coil.
http://www.tmtractor.com/new/el/713fp.htm
The ignition switch might be bad, grounding the magneto. You could disconnect the wire at the side of the magneto, and test for spark with it disconnected.
Be sure when testing the spark that the ignition switch is on, it won't spark with the switch off.
Yes, the spark should jump the 1/4 inch easily if everything is good. It should be a place with bare metal on the engine so the spark will jump to ground.
You could check the points, they should be shiny and flat bare metal.
The points and condenser are under the plate that holds the distributor cap, the plate is held on with 3 screws. Here is a page from the Cub owner's manual showing the points and condenser.
http://farmallcub.com/rudi_cub/www.clea ... e%2030.jpg
If you are taking the plate off, turn the engine first so the rotor is pointed to number 1, then do not turn the engine with the plate off, except for a small amount to get the points so they open fully.
I take the points out and file them with a large file, so they are flat and shiny, then wipe off all filings with a clean rag. They have to be good so the power will go through them. If they are burned much, replacing them is better. I use a very short screwdriver, and probably an 11/32 inch open end wrench to get the points out. It is easier to sit next to the Cub on a lawn chair or something, use a good light, and put a large towel on the ground to catch any little screws you might drop.
Here is a listing for new points and condenser at TM Tractor so you can see them.
http://www.tmtractor.com/new/el/367fp.htm
If it's not the points or condenser, the coil may have quit. TM Tractor has a new coil.
http://www.tmtractor.com/new/el/713fp.htm
The ignition switch might be bad, grounding the magneto. You could disconnect the wire at the side of the magneto, and test for spark with it disconnected.
-
farmergiffIV
- 10+ Years
- Posts: 203
- Joined: Sat Aug 17, 2013 8:36 pm
- Zip Code: 97526
- Tractors Owned: 1948 FCub
1953 FCub - Location: Oregon
Re: 48 Cub Magneto Timing Help?!
Ok. I am going to check the condenser now and inspect the plates in the rotor again.
I did run the spark test there was a very small blue and yellowish spark, it seemed very tiny but visible. The true color was hard but I saw hints of blue and yellow in it for sure. Any ideas? Is it possible the condenser is bad even with some spark?
I did run the spark test there was a very small blue and yellowish spark, it seemed very tiny but visible. The true color was hard but I saw hints of blue and yellow in it for sure. Any ideas? Is it possible the condenser is bad even with some spark?
-
Glen
- 10+ Years
- Posts: 6152
- Joined: Mon Mar 19, 2012 7:33 pm
- Zip Code: 00000
- Tractors Owned: 1956 Farmall Cub with Fast Hitch, F-11 plow, Disc, Cultivator, Cub-22 mower
- Circle of Safety: Y
- Location: Wa.
Re: 48 Cub Magneto Timing Help?!
Hi,
Filing or replacing the points is a place to begin. It won't have good spark if the points are burned or dirty.
If it doesn't have a good spark after that, then the condenser or coil could cause it. The condenser comes with the TM Tractor points.
NAPA has new points and condensers too. The numbers are,
Points, CS 1600
Condenser, IH 200
-
farmergiffIV
- 10+ Years
- Posts: 203
- Joined: Sat Aug 17, 2013 8:36 pm
- Zip Code: 97526
- Tractors Owned: 1948 FCub
1953 FCub - Location: Oregon
Re: 48 Cub Magneto Timing Help?!
Glen wrote:Hi,
Filing or replacing the points is a place to begin. It won't have good spark if the points are burned or dirty.
If it doesn't have a good spark after that, then the condenser or coil could cause it. The condenser comes with the TM Tractor points.
NAPA has new points and condensers too. The numbers are,
Points, CS 1600
Condenser, IH 200
I am trying to figure out if the spark I saw yesterday coming from the middle spark plug off the distributor is good enough, is there any chance there is a way to reference this? A picture or the spark appeared very small is that typical?
Are you all referring to points inside the distributor cap that the rotor hits?
-
Bill V in Md

- 10+ Years
- Posts: 1124
- Joined: Sun Feb 02, 2003 6:51 pm
- Zip Code: 21228
- Tractors Owned: 1948 Farmall Cub
LT1045 Cub Cadet - Circle of Safety: Y
- Location: MD, Catonsville
Re: 48 Cub Magneto Timing Help?!
farmergiffIV wrote:Glen wrote:Hi,
Filing or replacing the points is a place to begin. It won't have good spark if the points are burned or dirty.
If it doesn't have a good spark after that, then the condenser or coil could cause it. The condenser comes with the TM Tractor points.
NAPA has new points and condensers too. The numbers are,
Points, CS 1600
Condenser, IH 200
I am trying to figure out if the spark I saw yesterday coming from the middle spark plug off the distributor is good enough, is there any chance there is a way to reference this? A picture or the spark appeared very small is that typical?
Are you all referring to points inside the distributor cap that the rotor hits?
No, they are referring to the ignition points that open and close. See below link to the ignition points for sale by TM Tractor.
http://www.tmtractor.com/new/el/367fp.htm
Bill VanHooser
Cub 54 Blade, Cub 193 Moldboard Plow, Cub 28A Disc Harrow
Cub 54 Blade, Cub 193 Moldboard Plow, Cub 28A Disc Harrow
-
Slim140
- 5+ Years
- Posts: 4908
- Joined: Wed Nov 22, 2017 6:24 am
- Zip Code: 00000
- Tractors Owned: .
1970 International 140
1972 International 140
1949 John Deere A
1993 Ford 4630 W/Loader
1965 John Deere 110
1961 Cub Cadet Original - Circle of Safety: Y
Re: 48 Cub Magneto Timing Help?!
The points are #42 in this photo, they are behind the black cap you are referring to. Be sure and pay attention to the timing marks on the pinion gear/rotor button before taking it apart. If it has worn gears it's best to replace them now. Brillman has the cheaper price if memory serves me right. https://brillman.com/product/internatio ... nion-gear/
- Attachments
-
Every home is a school, what are you teaching?
-
Glen
- 10+ Years
- Posts: 6152
- Joined: Mon Mar 19, 2012 7:33 pm
- Zip Code: 00000
- Tractors Owned: 1956 Farmall Cub with Fast Hitch, F-11 plow, Disc, Cultivator, Cub-22 mower
- Circle of Safety: Y
- Location: Wa.
Re: 48 Cub Magneto Timing Help?!
Hi,
Look at the links I posted above, in my post on May 9, it shows you what the ignition points are, and a pic of inside the magneto, and how to set the point gap.
The spark should make a powerful snapping sound, and easily jump 1/4 inch, and be blue. If it looks small, something needs service. Start by working on the points, like I wrote on May 9.
-
farmergiffIV
- 10+ Years
- Posts: 203
- Joined: Sat Aug 17, 2013 8:36 pm
- Zip Code: 97526
- Tractors Owned: 1948 FCub
1953 FCub - Location: Oregon
Re: 48 Cub Magneto Timing Help?!
Glen wrote:Hi,
Look at the links I posted above, in my post on May 9, it shows you what the ignition points are, and a pic of inside the magneto, and how to set the point gap.
The spark should make a powerful snapping sound, and easily jump 1/4 inch, and be blue. If it looks small, something needs service. Start by working on the points, like I wrote on May 9.
I opened up the magneto this evening and found that the connection that holds the condensor/coil/ breaker arm to the kill switch was damaged and there was not a very good connection hence the weak spark I saw earlier- this connection issue was assumed to be caused by pieces of a broken rubber/plastic gasket inside this is either the terminal anchor insulator, but the picture on TM looks like its metal, I don't see anything in my mag that looks like the spring terminal anchor insulator.. (I have since learned to be very careful when removing or adjusting the kill switch wire holding nut!)
From what I can tell this serves as an insulation piece so the wires don't ground out on the body of the magneto- it would be # 44 or 45 in that picture, it appears to actually not be in that page or its part of the those little parts in 44 and 45 - I cant tell. from my assumption of the need to insulate these wires I jimmy rigged some plastic and electrical tape and fit the wires back snuggly so they don't touch the body of the magneto but all connect to each other and the kill switch. Since I saw this I didn't check the condensor, (I ordered a new one and a new coil in the mean time). Strangely, after I reassembled the magneto I hand cranked the engine and looked for spark again off the middle plug but this time nothing! as before there was a weak spark....
hmmm, I am going to replace condensor and coil as soon as they arrive- is there any up close pictures of the proper wiring of the condensor, coil, and break arm inside the magneto? I am considering having an extra magneto on hand does anyone else carry a spare and fix them as you go a long?
-
staninlowerAL
- 10+ Years
- Posts: 4996
- Joined: Fri Oct 29, 2010 11:34 pm
- Zip Code: 36558
- Tractors Owned: Cubs: (3)'49's, (1 is for parts), (1)'57 IH Cub LoBoy w/FH, (2)154 Number Series Loboys, (1 is for parts), '76 Longstripe w/FH, Mowers: C-22, Bush Hog 412, Pennington 59, Woods RM42CF, Woods 42, assorted FCub plows, planters, discs, etc. OTHERS: '49 AC B & Ind. Sickle mower, '61 AC D12 Ser 2, '52 8N, '56 Ferguson 35 Deluxe, '47 & '49 Avery V, '53 MM BG (offset), '51 JD M (regular), '56 JD 420C, with Blade and fire plow, '85 JD 850 (Yanmar) w/72" belly mower, '76? Yanmar 2TR15 1500 & Bush Hog SQ42S-2 mower, '78? FORD Dexta, '86 FORD LGT14D & 48" Mower, (2)Cub Cadets & Mowers (MTD), (4) Sears Surburban's, other MTD mowers, Jeeps & other misc. "treasures"
- Circle of Safety: Y
- Location: AL (Southwest)
Re: 48 Cub Magneto Timing Help?!
IMHO it's a lot less trouble and easier to maintain (not to mention the reduced cost of parts) to convert to a battery ignition system. When the battery ignition system became available it was offered as an upgrade for the older (magneto) systems. You can probably buy one by advertising on "THE VINE, Classified" forum. Just be sure you get ALL the parts. The points, condenser and distributor cap are the same and interchangable but the rotor and coil is not.farmergiffIV wrote:I am considering having an extra magneto on hand does anyone else carry a spare and fix them as you go a long?
Stan in LA (lower AL)
USAF & Reserves, Reg ARMY, ARMY NG (AL)
USAF & Reserves, Reg ARMY, ARMY NG (AL)
-
- Similar Topics
- Replies
- Views
- Last post
-
- 3
- 186
-
by Jim Becker
Thu May 19, 2022 11:23 pm
-
-
Magneto Timing: the ‘Book’ or ‘MiCarl’s’ way ?
by Ole90633 » Fri Jan 14, 2022 8:25 am » in Farmall Cub - 5
- 340
-
by k hutchins
Sun Jan 16, 2022 4:12 pm
-
-
- 5
- 339
-
by staninlowerAL
Mon Sep 12, 2022 8:27 pm
-
- 5
- 179
-
by Jpm
Wed Mar 06, 2024 10:12 pm
-
- 11
- 363
-
by DBIZZELL
Mon Feb 20, 2023 3:43 pm
Who is online
Users browsing this forum: Majestic-12 [Bot] and 8 guests


