This site uses cookies to maintain login information on FarmallCub.Com. Click the X in the banner upper right corner to close this notice. For more information on our privacy policy, visit this link: Privacy Policy
NEW REGISTERED MEMBERS: Be sure to check your SPAM/JUNK folders for the activation email.
Starting on the '50
Forum rules
Notice: For sale and wanted posts are not allowed in this forum. Please use our free classifieds or one of our site sponsors for your tractor and parts needs.
Notice: For sale and wanted posts are not allowed in this forum. Please use our free classifieds or one of our site sponsors for your tractor and parts needs.
-
Rob in NH
- 10+ Years

- Posts: 2729
- Joined: Sun Oct 03, 2004 7:11 am
- Zip Code: 03848
- eBay ID: panelbeata
- Tractors Owned: 1947 circle cub
1950 cub demonstrator
1957 cub
1967 cub - Circle of Safety: Y
- Location: NH, Kingston
- Contact:

-
bob in CT

- Team Cub Mentor

- Posts: 6018
- Joined: Thu Jun 07, 2007 9:34 am
- Zip Code: 06040
- Tractors Owned: 77 Cub (red); 74 Cub; 52 Cub; 50 Cub ( post-demo)
- Circle of Safety: Y
- Location: CT, Manchester
Re: Starting on the '50
Rob in NH wrote:that is really going to be a nice cub when your done.
It should be a good working tractor. Some of the tractor was painted with automotive paint when I bought it and I am using the fenders and platform as-is. The color match it pretty good with the Nason I used to paint the castings. The hood has a fisheye spot on it the size of a baseball, so I will need to sand that and put on another coat.
Boss set me up with with his favorite Zenith carb to complete the engine upgrade- 154 governor, pop-ups, 154 manifold and carb. I will source some SS tubing for the exhaust stack and run a larger pipe without a reducer. I'll wait to paint the hood to make sure there are no fit-up issues with the larger stack. I started out going for stock, even finding all the dot-head bolts I needed. The magneto looks bad, I had no charging system, and I had a nice battery ignition so I decided to put on an alternator and go with 12 volt and a Pertronix system. I will make up my own wiring harness and find some LED bulbs for the teardrop lights. I like the underslung exhaust for mowing, but if I whittle down to a single tractor, this may be my keeper. That won't be an easy choice with the red Longstripe in the mix.
-
PVF1799

- 10+ Years
- Posts: 1475
- Joined: Fri Mar 15, 2013 9:46 pm
- Zip Code: 12009
- eBay ID: kepara
- Tractors Owned: 1929 Farmall Regular #T111250 (Original Owner)
1942 Farmall M #55654
1948 Farmall Cub #21005
1955 Farmall Cub #190769
1961 Cub Cadet #16509
1975 Cub Cadet 1250H
197x IH 990 Haybine
1994 JD 5320 Diesel
Attachments: Woods 42F Fast Hitch, L38 Disc Fast Hitch, F11 Plow Fast Hitch, Land Plow, Snow Plow, Grader Blade, Planter w/Fertilizer, Cultivators, Hilling Disks, Sickle Bar Mower(2), IH 7' Sickle Bar Mower, Flail Mower and 5' International Belly Mower. - Circle of Safety: Y
- Location: Altamont, NY
- Contact:
Re: Starting on the '50
Bob - good luck with that - can't wait to see pictures.
Ken
Pleasant View Farm - Est. 1799
1930 Farmall Restoration Project
My Restoration Project - FCUB '48 - Rex
Pleasant View Farm - Est. 1799
1930 Farmall Restoration Project
My Restoration Project - FCUB '48 - Rex
-
bob in CT
- Team Cub Mentor
- Posts: 6018
- Joined: Thu Jun 07, 2007 9:34 am
- Zip Code: 06040
- Tractors Owned: 77 Cub (red); 74 Cub; 52 Cub; 50 Cub ( post-demo)
- Circle of Safety: Y
- Location: CT, Manchester
Re: Starting on the '50
Been blasting the front bolster, steering box, and front axle pats plus this touch control. Burned up the belts on "someone's" compressor (located in a unattached shed where you can't hear the shrieking)  I ordered new belts so in the meantime, I opened this up:

It was loaded with a gelatin-like goop and, as usual, the screen was shot. Good thing I am taking this one apart too.
I sandblasted the outside before I took it apart. Last time I tried to use stripper and that was a mess. Made the blanking plate out of 10 gauge steel and punched out a heavy gasket. This will work for blasting the steel lines too. I taped up the cylinders up front to protect them.
-
VMBanner
- 5+ Years

- Posts: 22
- Joined: Thu Apr 23, 2015 7:07 am
- Zip Code: 70737
- Tractors Owned: 1948 Farmall Cub (12v conversion); 1950 Farmall Cub (12 V conversion); 1968 John Deere 140H1 (stock); 1972 Cub Low Boy
Re: Starting on the '50
Hey Bob. Looks like you've been going at it for a few years. I recently purchased a complete 1950 and a "for parts" 1948. Thanks for telling your story about the '50. I'll use it as a guide for mine.
-
bob in CT
- Team Cub Mentor
- Posts: 6018
- Joined: Thu Jun 07, 2007 9:34 am
- Zip Code: 06040
- Tractors Owned: 77 Cub (red); 74 Cub; 52 Cub; 50 Cub ( post-demo)
- Circle of Safety: Y
- Location: CT, Manchester
Re: Starting on the '50
VMBanner wrote:Hey Bob. Looks like you've been going at it for a few years. I recently purchased a complete 1950 and a "for parts" 1948. Thanks for telling your story about the '50. I'll use it as a guide for mine.
This had been a VERY un-Bob-like project! I usually put my head down and push a job right through to conclusion. This one has been a lot more relaxed, but I have had numerous parallel projects going at the same time while this has been on low heat. Today has been a great example: tilled some of my neighbor's garden ( too many rocks!) with my old Swiftamatic Gravely, made a trip to figure ourt what belts to order for "someone's" compressor
-
Ben B
- 10+ Years
- Posts: 494
- Joined: Fri Apr 09, 2010 4:49 am
- Zip Code: 24354
- Tractors Owned: 1950 Farmall Cub post demo 108xxx
- Circle of Safety: Y
- Location: Southwest Virginia
Re: Starting on the '50
Mercy Bob! It sounds like you have a talent for juggling!!!
As usual, you do top notch work!
As usual, you do top notch work!
1950 Farmall Cub post demo 108xxx
1964 Farmall Cub 6 volt 223xxx
1968 Fairmont Railroad Motor Car 2 cycle hit and miss single cylinder
1964 Farmall Cub 6 volt 223xxx
1968 Fairmont Railroad Motor Car 2 cycle hit and miss single cylinder
-
bob in CT
- Team Cub Mentor
- Posts: 6018
- Joined: Thu Jun 07, 2007 9:34 am
- Zip Code: 06040
- Tractors Owned: 77 Cub (red); 74 Cub; 52 Cub; 50 Cub ( post-demo)
- Circle of Safety: Y
- Location: CT, Manchester
Re: Starting on the '50
Nice day. I planned to paint tomorrow, but I have a 24 hour window to topcoat the etch prime, so I thought I would get one out of the way.
First a good washdown with Final Clean and then a wipe with phosphoric acid to clean any flash rust.

Then etch primer

Tomorrow, sealer and then RED.
First a good washdown with Final Clean and then a wipe with phosphoric acid to clean any flash rust.
Then etch primer
Tomorrow, sealer and then RED.
-
Ben B
- 10+ Years
- Posts: 494
- Joined: Fri Apr 09, 2010 4:49 am
- Zip Code: 24354
- Tractors Owned: 1950 Farmall Cub post demo 108xxx
- Circle of Safety: Y
- Location: Southwest Virginia
Re: Starting on the '50
You do excellent work as usual Bob! That looks excellent! Looks by the casting code that your engine block was cast one day before mine was.
1950 Farmall Cub post demo 108xxx
1964 Farmall Cub 6 volt 223xxx
1968 Fairmont Railroad Motor Car 2 cycle hit and miss single cylinder
1964 Farmall Cub 6 volt 223xxx
1968 Fairmont Railroad Motor Car 2 cycle hit and miss single cylinder
-
bob in CT
- Team Cub Mentor
- Posts: 6018
- Joined: Thu Jun 07, 2007 9:34 am
- Zip Code: 06040
- Tractors Owned: 77 Cub (red); 74 Cub; 52 Cub; 50 Cub ( post-demo)
- Circle of Safety: Y
- Location: CT, Manchester
Re: Starting on the '50
Ben B wrote:You do excellent work as usual Bob! That looks excellent! Looks by the casting code that your engine block was cast one day before mine was.
Thanks Ben! It is now RED. I wheeled it into the garage to cure as I am getting a few pops. I have a bunch of blasted parts so I am going back out to see how many I can rig up and shoot today. My engine number is 109775.
Last edited by bob in CT on Fri May 01, 2015 6:17 am, edited 1 time in total.
-
bob in CT
- Team Cub Mentor
- Posts: 6018
- Joined: Thu Jun 07, 2007 9:34 am
- Zip Code: 06040
- Tractors Owned: 77 Cub (red); 74 Cub; 52 Cub; 50 Cub ( post-demo)
- Circle of Safety: Y
- Location: CT, Manchester
Re: Starting on the '50
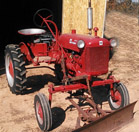
A little more red.


-
Stanton

- Cub Pro

- Posts: 7760
- Joined: Mon Jun 22, 2009 6:56 am
- Zip Code: 64070
- Tractors Owned: 1942 Farmall AV, serial #87025
1947 Farmall Circle Cub, serial #2116
1948 Farmall Cub, serial #46066 - Circle of Safety: Y
- Location: Lone Jack, MO
-
Ben B
- 10+ Years
- Posts: 494
- Joined: Fri Apr 09, 2010 4:49 am
- Zip Code: 24354
- Tractors Owned: 1950 Farmall Cub post demo 108xxx
- Circle of Safety: Y
- Location: Southwest Virginia
Re: Starting on the '50
bob in CT wrote:... My engine number is 109775.
I had never even looked at my engine's serial number Bob. I checked it and its 109869, but I had to scrape off a few layers of paint to get to it!
That RED paint sure does make it look AWESOME!
1950 Farmall Cub post demo 108xxx
1964 Farmall Cub 6 volt 223xxx
1968 Fairmont Railroad Motor Car 2 cycle hit and miss single cylinder
1964 Farmall Cub 6 volt 223xxx
1968 Fairmont Railroad Motor Car 2 cycle hit and miss single cylinder
-
bob in CT
- Team Cub Mentor
- Posts: 6018
- Joined: Thu Jun 07, 2007 9:34 am
- Zip Code: 06040
- Tractors Owned: 77 Cub (red); 74 Cub; 52 Cub; 50 Cub ( post-demo)
- Circle of Safety: Y
- Location: CT, Manchester
Re: Starting on the '50
After reading one of Clark's posts about replacing clutch yokes, I took a look at mine.
The holes for the TO bearing cross pins are .030" out of round and I don't know what this was rubbing on. Later style yokes are still available from IH, at $150 for both halves. I think I will re-work this one before I install the engine.

The holes for the TO bearing cross pins are .030" out of round and I don't know what this was rubbing on. Later style yokes are still available from IH, at $150 for both halves.
-
tst
- 10+ Years
- Posts: 5214
- Joined: Tue Jan 12, 2010 2:08 pm
- Zip Code: 12514
- Circle of Safety: Y
Re: Starting on the '50
the rub marks were from hitting the fingers on the pressure plate
Who is online
Users browsing this forum: Glen, Leewebb7, RaymondDurban and 82 guests


