I continue to work on my cub. I replaced the coil, drained the radiator and the fluids looked good. refilled the radiator. Cleaned out the crankcase vent tube (it was plugged). Removed the hood and set up a temporary fuel system.
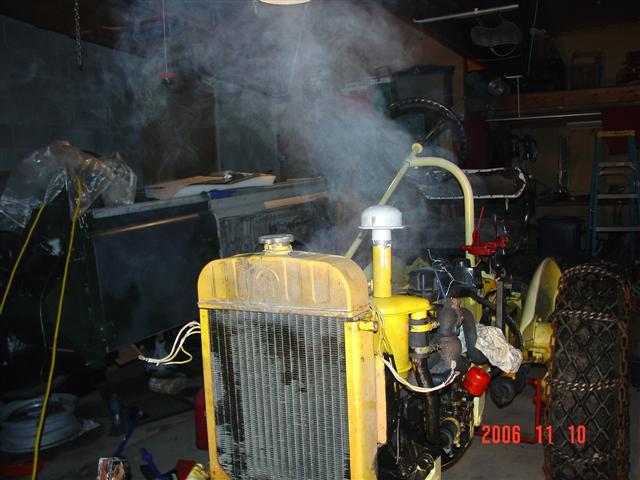
I ran the cub for about 15 minutes and it started and ran well. I backed it into the garage and the radiator is steaming. Coudn't see this when running it as it is dark out. I did check the fan and it is turning great. What is the correct radiator cap for the 74 International cub. Mine is not spring loaded in any way just a plain cap. I did not have any of these problems this summer when I was grading my yard.
I have a digital picture of the tractor about 10 minutes after I pulled it in the garage with it steaming but do not know how to post a picture. Could I email this to someone to post?
This site uses cookies to maintain login information on FarmallCub.Com. Click the X in the banner upper right corner to close this notice. For more information on our privacy policy, visit this link: Privacy Policy
NEW REGISTERED MEMBERS: Be sure to check your SPAM/JUNK folders for the activation email.
steamin Cub
Forum rules
Notice: For sale and wanted posts are not allowed in this forum. Please use our free classifieds or one of our site sponsors for your tractor and parts needs.
Notice: For sale and wanted posts are not allowed in this forum. Please use our free classifieds or one of our site sponsors for your tractor and parts needs.
-
siii8873
- 10+ Years

- Posts: 237
- Joined: Sat May 20, 2006 7:58 am
- Location: Plattsburgh NY Area
steamin Cub
"May the current be with you and the wind at your back"
-
siii8873
- 10+ Years
- Posts: 237
- Joined: Sat May 20, 2006 7:58 am
- Location: Plattsburgh NY Area
-
Eugene
- Team Cub Mentor

- Posts: 20378
- Joined: Fri Jul 02, 2004 9:52 pm
- Zip Code: 65051
- Circle of Safety: Y
- Location: Mo. Linn
The pressure cap is either vented - no pressure or 2 or 3 lbs. Just a plain old cap is good.
Try this.
Remove the water manifold, under the starter. Clean out all of the crap that has settled in the bottom of the block. Clean out all of the crap that has settled in the bottom of the radiator. Remove the water housing from the top of the block. Back flush the block from the top. Back flush the radiator.
I made a tool to clean out the block. It's 1/4" copper tubing soldered to a female garden hose end. It's about 8 inches long with a bend about 3 inches from the end. Attach to a garden hose - turn on the water. Stick the tool into the block to get the crap from the back side of the cylinders and between the cylinders. Use the tool in the lower radiator housing.
Eugene
-
TOOLMAN
- 10+ Years
- Posts: 684
- Joined: Mon Mar 06, 2006 3:03 pm
- Zip Code: 90210
- Location: 90210
-
siii8873
- 10+ Years
- Posts: 237
- Joined: Sat May 20, 2006 7:58 am
- Location: Plattsburgh NY Area
Eugene,
thanks. The fluids looked good but its probable just the fluids in the radiator. I though about doing this today but didn't have gaskets. I was at the CaseIH dealer today. My wife was correct when she said we never get everything we need the first time. Well now she knows where the place is and can run errands for me. She is very goos at that. I will most likely need new gaskets to reinstall these connections.CaseIH item?
thanks. The fluids looked good but its probable just the fluids in the radiator. I though about doing this today but didn't have gaskets. I was at the CaseIH dealer today. My wife was correct when she said we never get everything we need the first time. Well now she knows where the place is and can run errands for me. She is very goos at that. I will most likely need new gaskets to reinstall these connections.CaseIH item?
"May the current be with you and the wind at your back"
-
EZ

- 10+ Years
- Posts: 1185
- Joined: Tue Feb 11, 2003 6:33 pm
- Zip Code: P0M1Z0
- Tractors Owned: 49 Cub
67 International Cub Loboy
57 Farmall 130 - Location: Northern Ontario
-
Eugene
- Team Cub Mentor
- Posts: 20378
- Joined: Fri Jul 02, 2004 9:52 pm
- Zip Code: 65051
- Circle of Safety: Y
- Location: Mo. Linn
Gaskets. I make some of my own gaskets. Purchase a roll of gasket material from the autoparts store. Making gaskets is pretty easy.
Cost effective. Yes when you figure in your transportation expense to and from the autoparts store and you only need one or two gaskets. For overhauls, I purchase gasket sets.
Eugene
If you haven't done so, take the garden hose to the radiator fins from the front and back.
Cost effective. Yes when you figure in your transportation expense to and from the autoparts store and you only need one or two gaskets. For overhauls, I purchase gasket sets.
Eugene
If you haven't done so, take the garden hose to the radiator fins from the front and back.
-
siii8873
- 10+ Years
- Posts: 237
- Joined: Sat May 20, 2006 7:58 am
- Location: Plattsburgh NY Area
Toolman how did you make the picture full size?
Do you use the rubberized cork (1/16, 1/32?) for these types of gaskets?
I reused the coolant.. It looked so good that I ran the stuff I removed through a filter and reused it. What is the correct level? I filled it untill it covered the top of the core but just below the overflow. I ran the tractor for about 5 minutes checked it and it raised up to the top. After I ran it for a while and brought it back in it was back down a little. Maybe this is the source of the steam from the overflow.
EZ,
what was the source of your problem, just overfilling it?
One thing I learned from this is that the next time I'm going to do a tune up I'm going to include a clean up ect and the hood is going to come off. It is much easier to get at things and I now have a temporary gas tank set up. It is not that difficult to take the hood off.
"May the current be with you and the wind at your back"
-
Eugene
- Team Cub Mentor
- Posts: 20378
- Joined: Fri Jul 02, 2004 9:52 pm
- Zip Code: 65051
- Circle of Safety: Y
- Location: Mo. Linn
siii8873 wrote:Do you use the rubberized cork (1/16, 1/32?) for these types of gaskets?
Maybe this is the source of the steam from the overflow. just overfilling it?
I use 1/32" thick gasket material. It's not rubberized or cork. Last roll (sheet) was purchased from NAPA.
Steam. Over filling the radiator will cause water to spue out of the overflow. If the steam is comming out the radiator cap or overflow, then overfilling is not the cause.
Eugene
-
TOOLMAN
- 10+ Years
- Posts: 684
- Joined: Mon Mar 06, 2006 3:03 pm
- Zip Code: 90210
- Location: 90210
Simple to enlarge
after you upload your picture go find it in your albaum and click on the picture it will open up and enlarge for you if you click on it again it will reach Maxium size
at this point you right click your mouse over the pictire and copy the properties than place in you posting in the enlarge size you get the picture?
after you upload your picture go find it in your albaum and click on the picture it will open up and enlarge for you if you click on it again it will reach Maxium size
at this point you right click your mouse over the pictire and copy the properties than place in you posting in the enlarge size
3969 Members
1954 Cub quick hitch /Plow
1947 Ford 2N
1948 Green Machine Model M (i know)
Knowledge Is Power
and Power is Knowledge
"The bitterness of poor quality remains long after the sweetness of the low price is forgotten."
1954 Cub quick hitch /Plow
1947 Ford 2N
1948 Green Machine Model M (i know)
Knowledge Is Power
and Power is Knowledge
"The bitterness of poor quality remains long after the sweetness of the low price is forgotten."
Who is online
Users browsing this forum: No registered users and 3 guests


