This site uses cookies to maintain login information on FarmallCub.Com. Click the X in the banner upper right corner to close this notice. For more information on our privacy policy, visit this link: Privacy Policy
NEW REGISTERED MEMBERS: Be sure to check your SPAM/JUNK folders for the activation email.
1961 Cub Electrical
Forum rules
Notice: For sale and wanted posts are not allowed in this forum. Please use our free classifieds or one of our site sponsors for your tractor and parts needs.
Notice: For sale and wanted posts are not allowed in this forum. Please use our free classifieds or one of our site sponsors for your tractor and parts needs.
-
AZ Gary
- Posts: 41
- Joined: Fri Oct 16, 2020 8:05 am
- Zip Code: 86326
1961 Cub Electrical
What gauge was the original cable from the battery to the starter on teh volt system
-
Glen

- 10+ Years

- Posts: 6146
- Joined: Mon Mar 19, 2012 7:33 pm
- Zip Code: 00000
- Tractors Owned: 1956 Farmall Cub with Fast Hitch, F-11 plow, Disc, Cultivator, Cub-22 mower
- Circle of Safety: Y
- Location: Wa.
Re: 1961 Cub Electrical
Hi,
You didn't say the voltage in your post.
The one I bought at Case IH for the 6 volt system says number 2 copper on the insulation.
Below is a listing at TM Tractor for a new battery to starter cable, for the 6 volt system. It says it is number 2 also.
I suppose it is the right length to route it the original way, but they don't show how they routed it.
http://www.tmtractor.com/new/el/2581fp.htm
Below is info about the original cable and wiring routing, if you need it.
The battery cable is supposed to go forward from the battery box, down through the hole by the PTO lever, under the platform, between the clutch pedal and the clutch housing, up the edge of the dash, to the hood, and forward under the right side of the hood, held up with 4 metal clips, and then down to the starter, going between the distributor cap and the oil filter housing.
The end of the cable at the starter switch is facing about straight to the right as it goes on the switch post.
The 4 clips hold the wiring harness also.
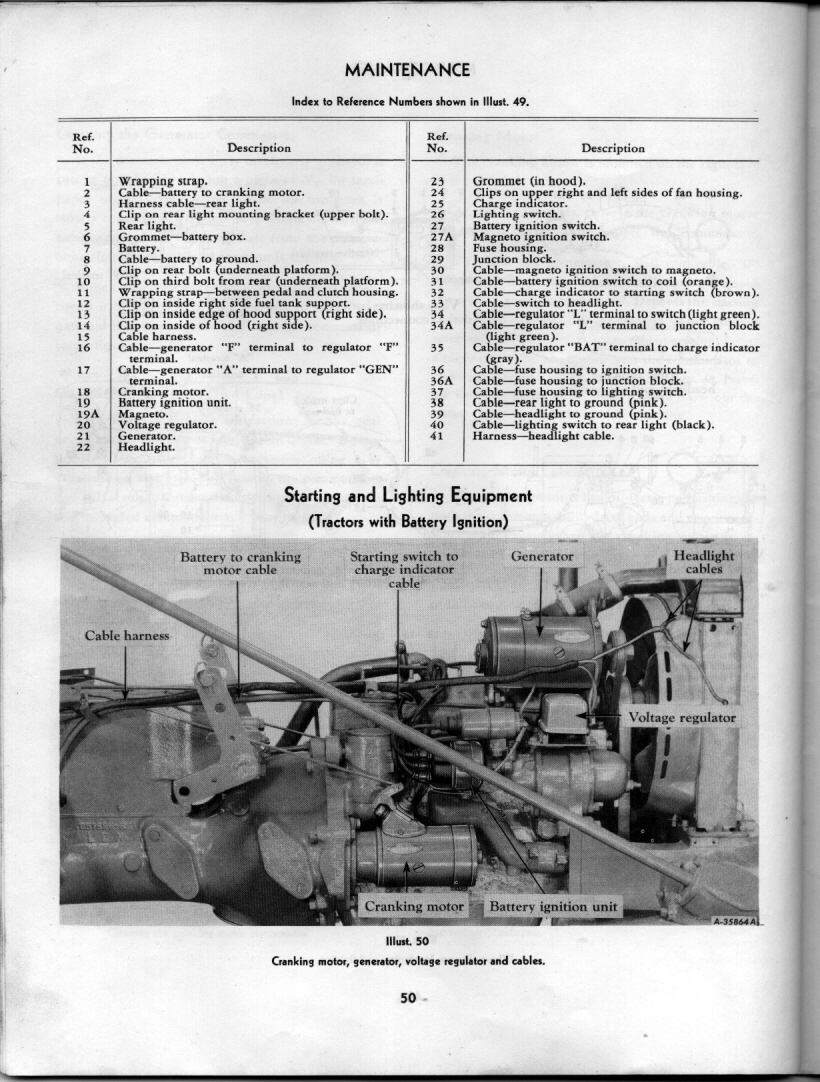
Below are pages from the 1955 Cub operator's manual showing the cable routing in the center pic on the 1st page.
The numbers on the 1st page are explained on the 2nd page.
The 2nd page has a pic of the 6 volt system, and you can see how the cable and wire look at the starter switch, and the direction they go.
The pics can probably be seen better on a computer with a screen bigger than a phone.
http://farmallcub.com/rudi_cub/www.clea ... e%2049.jpg
http://farmallcub.com/rudi_cub/www.clea ... e%2050.jpg
The pic on the 2nd page shows the ends of the starter band are at the bottom.
Below is a listing from TM Tractor for the battery cable clip for the lower side of the dash, if yours is gone. The cable and rear light wire go in it. There are pics on the page showing where it goes.
It is number 12 in the parts manual pic.
http://www.tmtractor.com/new/el/534fp.htm
TM Tractor doesn't sell clips 13 and 14 in the pic, if yours are gone, but people on here have made them from sheet metal. The clips on my Cub are about 3/4" wide.
There was originally a wrapping strap, number 11 in the parts pic, around the cable and light wire, at the clutch pedal, TM Tractor doesn't sell them, but it can be made from sheet metal.
It is about 3/4" or 1" wide.
When putting it together, bend the battery cable so it doesn't rub on the clutch pedal.
The parts pics above are for Cubs serial number 115403 and above, with the voltage regulator system.
Before that, IH had the cutout or Relay system, with the Relay mounted on top of the generator.
Don't use the voltage regulator wiring diagram if you have a Relay system, they are wired differently.
The wiring routing is about the same though, except right at the generator.
You didn't say the voltage in your post.
The one I bought at Case IH for the 6 volt system says number 2 copper on the insulation.
Below is a listing at TM Tractor for a new battery to starter cable, for the 6 volt system. It says it is number 2 also.
I suppose it is the right length to route it the original way, but they don't show how they routed it.
http://www.tmtractor.com/new/el/2581fp.htm
Below is info about the original cable and wiring routing, if you need it.
The battery cable is supposed to go forward from the battery box, down through the hole by the PTO lever, under the platform, between the clutch pedal and the clutch housing, up the edge of the dash, to the hood, and forward under the right side of the hood, held up with 4 metal clips, and then down to the starter, going between the distributor cap and the oil filter housing.
The end of the cable at the starter switch is facing about straight to the right as it goes on the switch post.
The 4 clips hold the wiring harness also.
Below are pages from the 1955 Cub operator's manual showing the cable routing in the center pic on the 1st page.
The numbers on the 1st page are explained on the 2nd page.
The 2nd page has a pic of the 6 volt system, and you can see how the cable and wire look at the starter switch, and the direction they go.
The pics can probably be seen better on a computer with a screen bigger than a phone.
http://farmallcub.com/rudi_cub/www.clea ... e%2049.jpg
http://farmallcub.com/rudi_cub/www.clea ... e%2050.jpg
The pic on the 2nd page shows the ends of the starter band are at the bottom.
Below is a listing from TM Tractor for the battery cable clip for the lower side of the dash, if yours is gone. The cable and rear light wire go in it. There are pics on the page showing where it goes.
It is number 12 in the parts manual pic.
http://www.tmtractor.com/new/el/534fp.htm
TM Tractor doesn't sell clips 13 and 14 in the pic, if yours are gone, but people on here have made them from sheet metal. The clips on my Cub are about 3/4" wide.
There was originally a wrapping strap, number 11 in the parts pic, around the cable and light wire, at the clutch pedal, TM Tractor doesn't sell them, but it can be made from sheet metal.
It is about 3/4" or 1" wide.
When putting it together, bend the battery cable so it doesn't rub on the clutch pedal.
The parts pics above are for Cubs serial number 115403 and above, with the voltage regulator system.
Before that, IH had the cutout or Relay system, with the Relay mounted on top of the generator.
Don't use the voltage regulator wiring diagram if you have a Relay system, they are wired differently.
The wiring routing is about the same though, except right at the generator.
Who is online
Users browsing this forum: No registered users and 55 guests


