This site uses cookies to maintain login information on FarmallCub.Com. Click the X in the banner upper right corner to close this notice. For more information on our privacy policy, visit this link: Privacy Policy
NEW REGISTERED MEMBERS: Be sure to check your SPAM/JUNK folders for the activation email.
How do I get coil off to replace?
Forum rules
Notice: For sale and wanted posts are not allowed in this forum. Please use our free classifieds or one of our site sponsors for your tractor and parts needs.
Notice: For sale and wanted posts are not allowed in this forum. Please use our free classifieds or one of our site sponsors for your tractor and parts needs.
-
marshall
- 10+ Years

- Posts: 150
- Joined: Mon Sep 23, 2013 7:36 am
- Zip Code: 01012
- Tractors Owned: 1950 Farmall Cub
How do I get coil off to replace?
I have a J4 magneto and have replaced points but can't figure out how the coil comes out after removing the cover. Can't see any mounting screws. From looking at the new one, the core of it is filled with a metal bar which goes horizontally through the coil and drops vertically down either side of the coil toward the base, but I see no way to remove these so the whole unit is locked into place.
-
Waif
- 5+ Years

- Posts: 1140
- Joined: Thu Aug 25, 2016 1:29 pm
- Zip Code: 49343
- Tractors Owned: 48 Farmall Cub "Seen Yore Dobbin"
53 F-Cub W/Loader. - Circle of Safety: Y
- Location: Michigan
Re: How do I get coil off to replace?
The bar through the coil is holding on due to magnetic force. Lift it off along with the coil .
Be careful of the coil wire. It is/was attached with the points and fits snug through the grommet it passes through if the grommet is in good condition..
Be careful of the coil wire. It is/was attached with the points and fits snug through the grommet it passes through if the grommet is in good condition..
-
Glen

- 10+ Years
- Posts: 6152
- Joined: Mon Mar 19, 2012 7:33 pm
- Zip Code: 00000
- Tractors Owned: 1956 Farmall Cub with Fast Hitch, F-11 plow, Disc, Cultivator, Cub-22 mower
- Circle of Safety: Y
- Location: Wa.
Re: How do I get coil off to replace?
Hi,
The coil is supposed to have a metal bar through it. Both parts lift up, and out of the magneto.
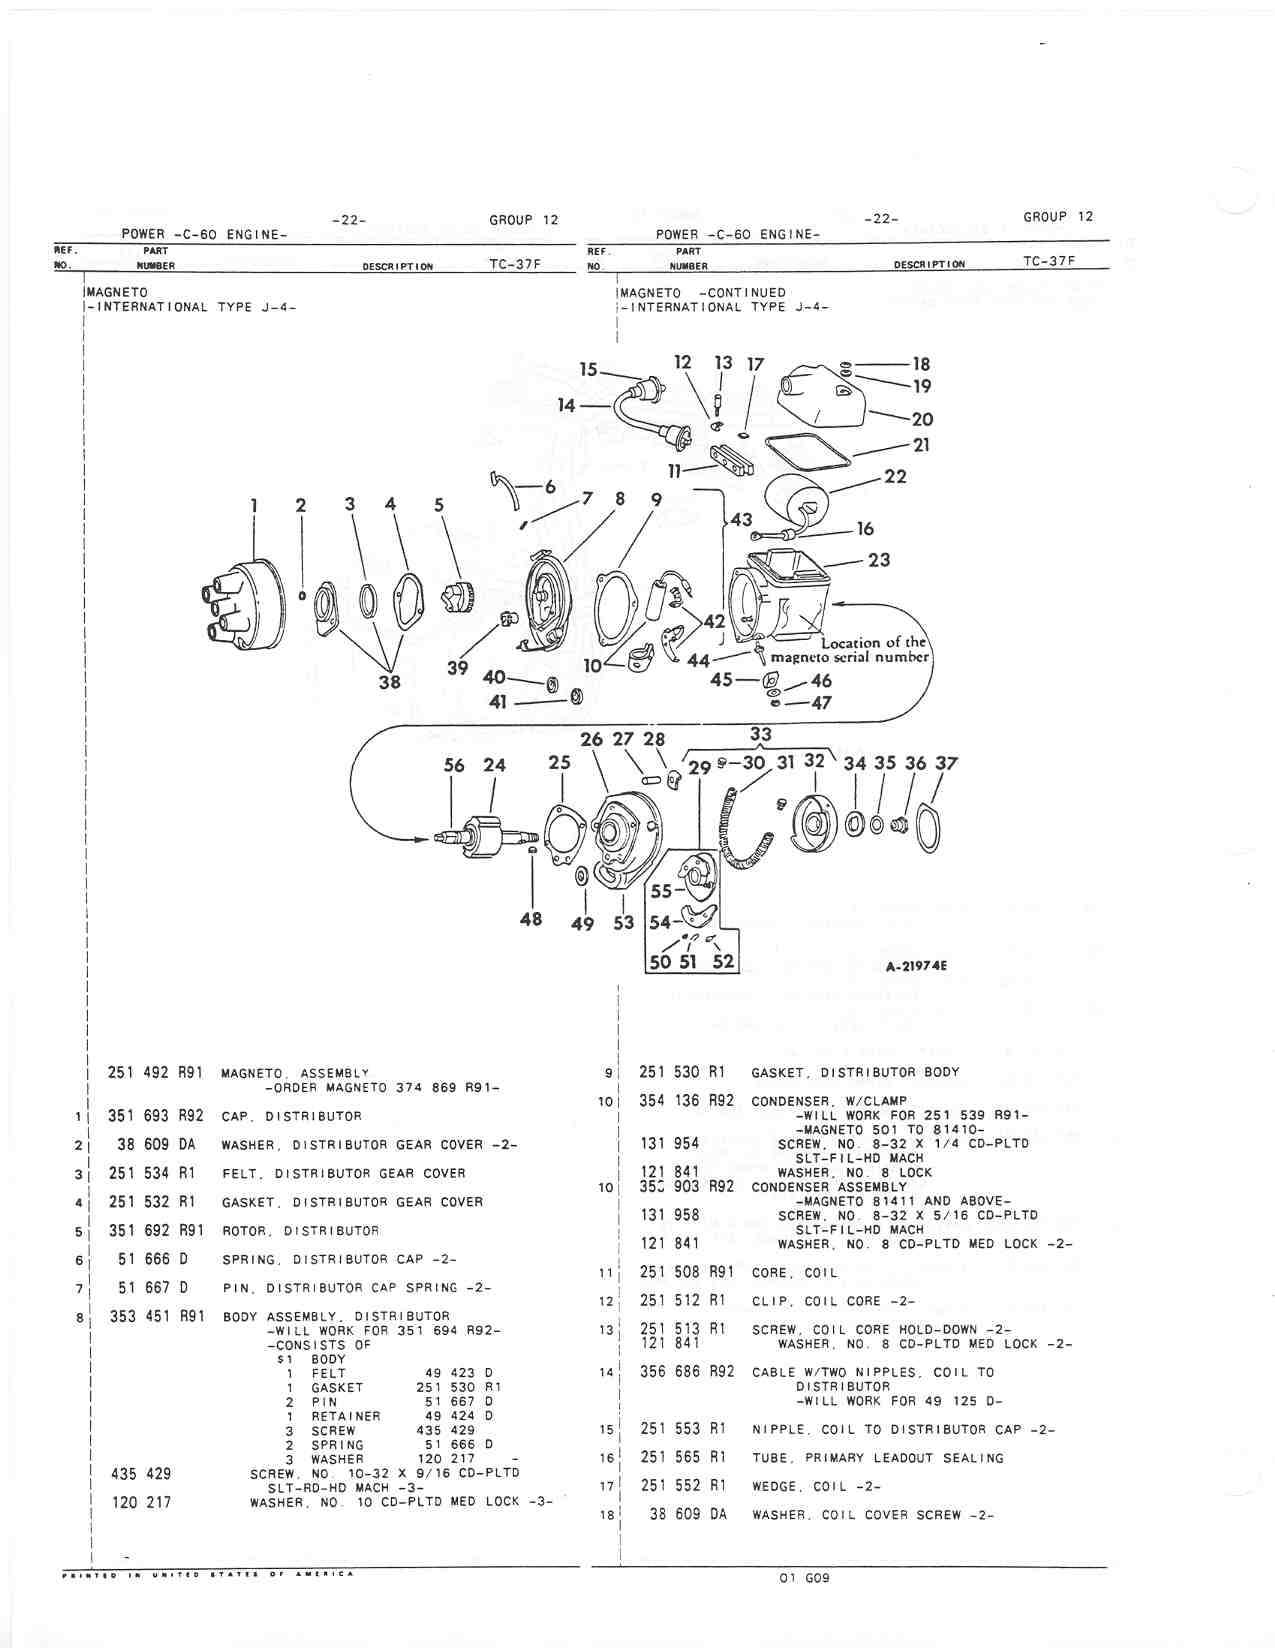
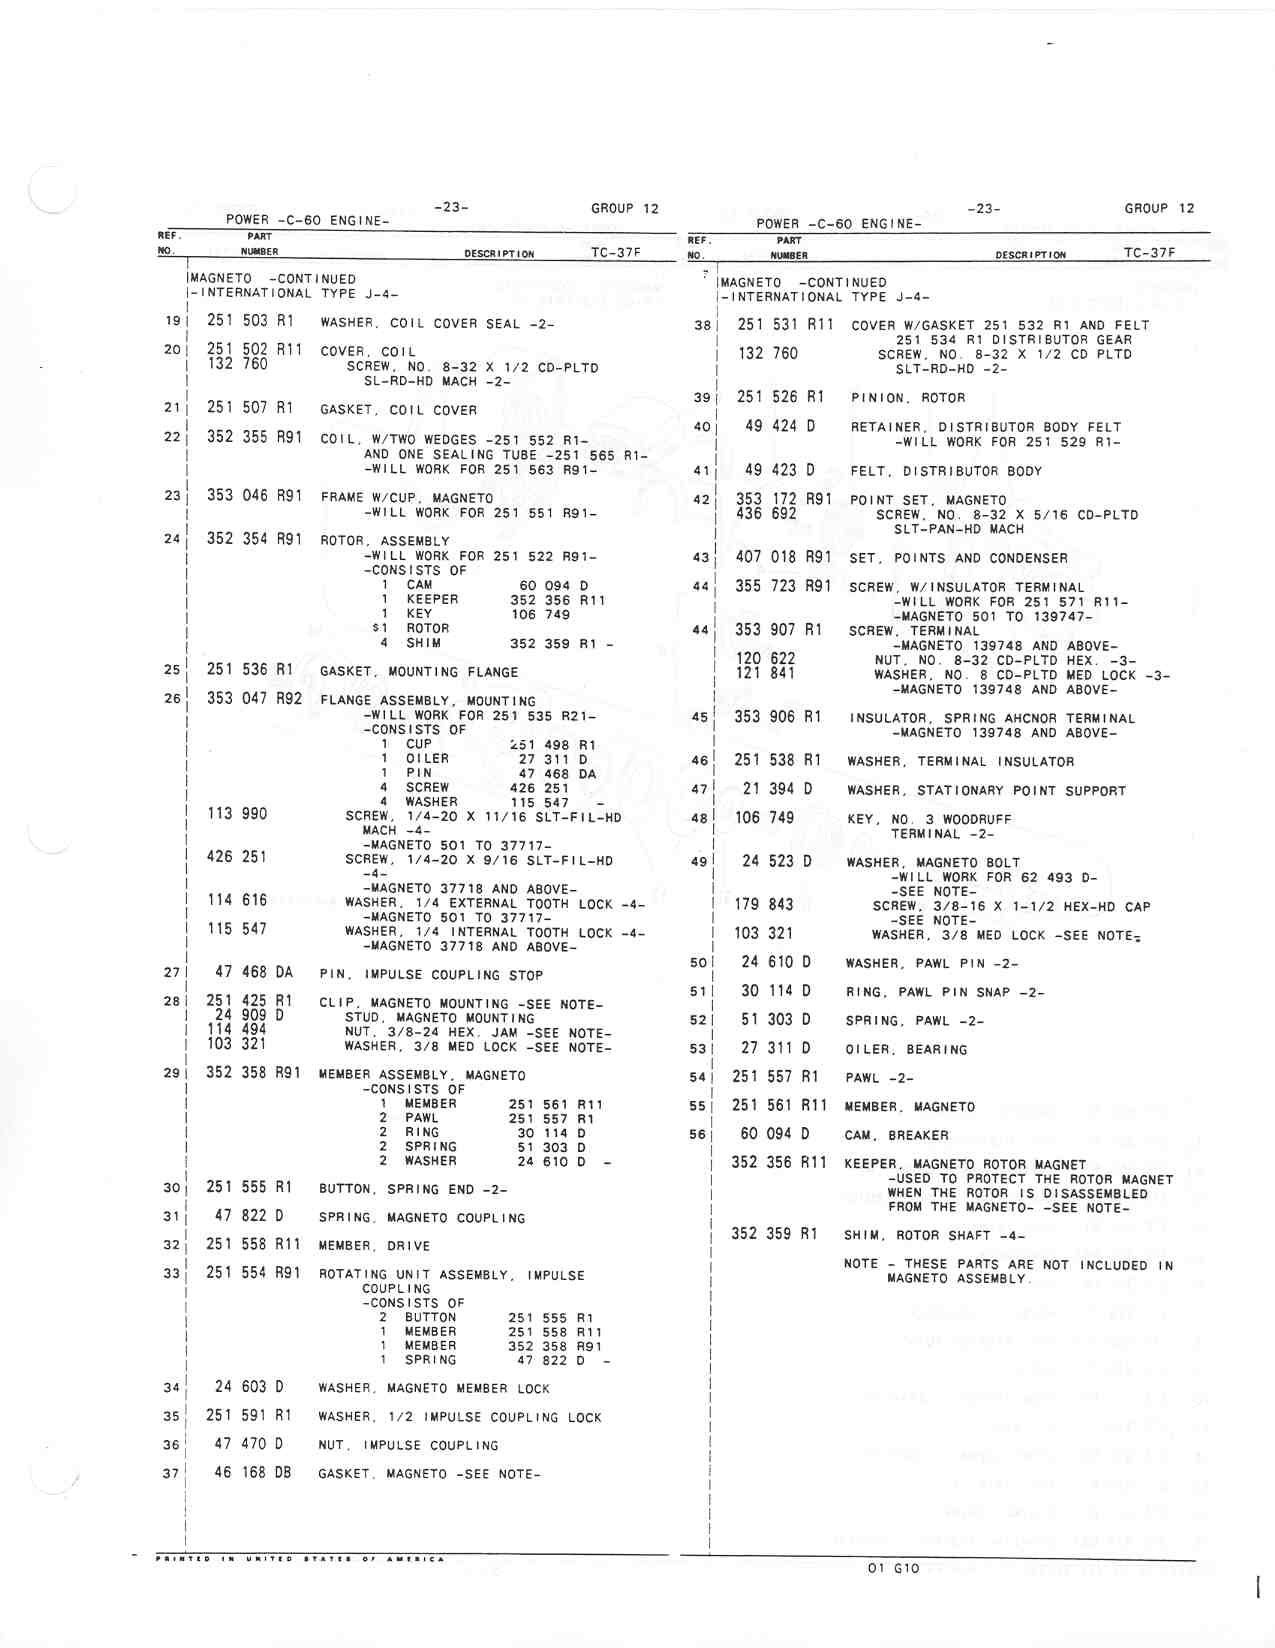
You have to disconnect the small wire from the coil to the post on the side of the magneto, inside the magneto. You have to remove the cover over the points to get to the wire. That's a good time to put in new points and condenser.
Below are pages from the Cub parts manual, showing the IH magneto.
http://www.farmallcub.info/manuals/cub_ ... 012-22.jpg
http://www.farmallcub.info/manuals/cub_ ... 012-23.jpg
I guess you posted before I did, Waif.
Also while it is apart, remove the cover that holds the rotor in place, and check the timing marks, be sure they are aligned.
You could clean the old grease out of the area, and grease the rotor gears, the owner's manual says to grease them.
Below is a pic of the gears.
The coil is supposed to have a metal bar through it. Both parts lift up, and out of the magneto.
You have to disconnect the small wire from the coil to the post on the side of the magneto, inside the magneto. You have to remove the cover over the points to get to the wire. That's a good time to put in new points and condenser.
Below are pages from the Cub parts manual, showing the IH magneto.
http://www.farmallcub.info/manuals/cub_ ... 012-22.jpg
http://www.farmallcub.info/manuals/cub_ ... 012-23.jpg
I guess you posted before I did, Waif.
Also while it is apart, remove the cover that holds the rotor in place, and check the timing marks, be sure they are aligned.
You could clean the old grease out of the area, and grease the rotor gears, the owner's manual says to grease them.
Below is a pic of the gears.
- Attachments
-
- Cub magneto 4.jpg (25.13 KiB) Viewed 1364 times
Last edited by Glen on Mon May 13, 2019 2:30 am, edited 1 time in total.
-
Rick Spivey

- Cub Pro

- Posts: 2779
- Joined: Sun Jul 01, 2007 10:07 pm
- Zip Code: 29518
- Circle of Safety: Y
- Location: SC, Cades 29518
Re: How do I get coil off to replace?
There are two "screws" holding down the flat bar, which are then tapped in the end to accept the coil cover screws. So the screwdriver slot has a tapped hole in the middle of it. Take those screws out, drive the bar out of the coil, and then push (tap) it into the new coil. The coil also has a grounding tab that lays on the bar and under the screw, one end only.
Rick Spivey
'52 Cub ("Great Personality") 148xxx
'48 Cub with FH ("Gunny Cub") 38xxx
'57 Lambretta (a slow work in progress)
'74 Triumph TR6 (Mama's toy)
'52 Cub ("Great Personality") 148xxx
'48 Cub with FH ("Gunny Cub") 38xxx
'57 Lambretta (a slow work in progress)
'74 Triumph TR6 (Mama's toy)
-
Waif
- 5+ Years
- Posts: 1140
- Joined: Thu Aug 25, 2016 1:29 pm
- Zip Code: 49343
- Tractors Owned: 48 Farmall Cub "Seen Yore Dobbin"
53 F-Cub W/Loader. - Circle of Safety: Y
- Location: Michigan
Re: How do I get coil off to replace?
There ya go Marshall , Rick's got ya.
Sorry if you're cussing me while trying to lift that bar off with two fasteners holding it....
Same alignment as the caps holes. As Rick mentioned it's the same fastener the cap screws run into.
The fasteners you need to remove next after the cap was removed are recessed into the bar.
(Round pieces like round stock threaded couplers , with slotted screw driver head slots cut across the threaded hole inside couplers).
Kinda fussy about the best screwdriver fit as far as width. But when you see the slots , it will make sense.
-
Bill V in Md
- 10+ Years
- Posts: 1124
- Joined: Sun Feb 02, 2003 6:51 pm
- Zip Code: 21228
- Tractors Owned: 1948 Farmall Cub
LT1045 Cub Cadet - Circle of Safety: Y
- Location: MD, Catonsville
Re: How do I get coil off to replace?
Below is a photo of a J4 magneto coil and the attachment screw.
Bill VanHooser
Cub 54 Blade, Cub 193 Moldboard Plow, Cub 28A Disc Harrow

Cub 54 Blade, Cub 193 Moldboard Plow, Cub 28A Disc Harrow
-
marshall
- 10+ Years
- Posts: 150
- Joined: Mon Sep 23, 2013 7:36 am
- Zip Code: 01012
- Tractors Owned: 1950 Farmall Cub
Re: How do I get coil off to replace?
Ah. The picture makes it all clear. With the generator above the magneto on mine it makes it very hard to access and these slots are barely visible on mine because of the way they are rotated. Of course with the generator in the way I can't even get my screwdriver into the slot without a lot angle.
I was contemplating removing the generator so that I can get at this better or is it sufficient to just loosen some bolts so that I can push it one way or another so that I can access the coil and cover screws?
Glen, thanks for the advice for checking the timing marks. I'm guessing if things aren't lined up, then I'm into a timing adjustment which I've been trying to avoid.
-
k hutchins
- 10+ Years
- Posts: 687
- Joined: Tue Mar 27, 2012 5:48 pm
- Zip Code: 48843
- Tractors Owned: 1948 Farmall Cub
193 plow
1948 snow/grading blade
Woods 59 C3
Cub 144 cultivator
Cub 22 mower
Cub 172 one row planter
Original manuals for all the above - Circle of Safety: Y
Re: How do I get coil off to replace?
Easier to remove and retime the magneto than trying to replace the coil while it's in place. Especially since you have to thread the wire through the grommet and then attach it to the bottom side of the distributor.
Timing the mag is not that difficult. The directions can be found in the '49 owners manual available in the pdf files. Glen can supply a link if you can't find it.
A quick synopsis is, set #1 cylinder to tdc. Pull the plug, place thumb or finger over the hole and "hand crank" until you feel outward air pressure, then keep cranking until the timing notch in the belt pulley lines up with the pointer. I do this before removing the mag. Once you have completed your work on the mag, rotate it by hand until the rotor is pointing toward the 1 o'clock position. Remount the mag keeping the body of it rotated close to the block. Don't tighten the mounting bolts, just enough to hold it in place, you'll need it to move slightly.
Go back and hand crank #1 back to tdc as before, then go back to your mag, grasp the coil cover and slowly pull it (rotate) away from the block just until it trips. Then tighten down the mounting bolts. Your rotor should be pointing back at approximately 1 o'clock and you should be static timed sufficiently.
Replace your cap, wires, and plugs. Reconnect the ignition switch and you should be good to go.
Sorry if my description isn't exactly how it's written in the manual but l was going from memory of what works for me on my '48.
Good luck
Hutch
Why is there never enough time to do the job right, but always enough time to do it over. 
-
Waif
- 5+ Years
- Posts: 1140
- Joined: Thu Aug 25, 2016 1:29 pm
- Zip Code: 49343
- Tractors Owned: 48 Farmall Cub "Seen Yore Dobbin"
53 F-Cub W/Loader. - Circle of Safety: Y
- Location: Michigan
Re: How do I get coil off to replace?
I put witness marks on the magneto and it's mating surfaces , and the rotor position before removing and took care not to rotate the shaft that goes through it. (The shaft mounts into slots in the governor and turns easy once the mag is removed from tractor..)
Due as much to good fortune as careful removal with those marks the timing was still where it needed to be after re-installing. But was checked anyways of course.
Due as much to good fortune as careful removal with those marks the timing was still where it needed to be after re-installing. But was checked anyways of course.
-
Jim Becker
- Team Cub

- Posts: 17279
- Joined: Sun Feb 02, 2003 2:59 pm
- Zip Code: 55319
- Circle of Safety: Y
- Location: MN
Re: How do I get coil off to replace?
Do it the way Waif suggested, easy. One step I would add is to turn the engine with the crank until you hear the impulse click before you follow his steps. To recap:
1) Turn engine manually until you hear the impulse click.
2) Mark the magneto flange and engine block so you can reinstall to the exact rotation.
3) Remove the distributor cap and note the direction the rotor is pointing.
4) Remove the magneto and do whatever work it needs. Do not turn the engine while the magneto is off.
5) Rotate the magneto backwards until the rotor points the same as noted in step 3.
6) Bolt the magneto in place and align to the marks made in step 2.
7) Install the cap and all wires.
8 ) Recheck the timing. It will be back where it was.
-
Rick Spivey
- Cub Pro
- Posts: 2779
- Joined: Sun Jul 01, 2007 10:07 pm
- Zip Code: 29518
- Circle of Safety: Y
- Location: SC, Cades 29518
Re: How do I get coil off to replace?
Just a note, while the magneto is off the tractor, don't spin it unnecessarily with no path for the spark to get to ground. That can burn up a coil quickly. You will have to turn it some to assemble everything, just avoid the temptation to spin it any more than necessary.
Rick Spivey
'52 Cub ("Great Personality") 148xxx
'48 Cub with FH ("Gunny Cub") 38xxx
'57 Lambretta (a slow work in progress)
'74 Triumph TR6 (Mama's toy)
'52 Cub ("Great Personality") 148xxx
'48 Cub with FH ("Gunny Cub") 38xxx
'57 Lambretta (a slow work in progress)
'74 Triumph TR6 (Mama's toy)
-
Glen
- 10+ Years
- Posts: 6152
- Joined: Mon Mar 19, 2012 7:33 pm
- Zip Code: 00000
- Tractors Owned: 1956 Farmall Cub with Fast Hitch, F-11 plow, Disc, Cultivator, Cub-22 mower
- Circle of Safety: Y
- Location: Wa.
Re: How do I get coil off to replace?
Hi,
After looking closer at the parts manual pic that I posted above, I see that one screw is shown in the pic, it is number 13 in the pic. The description says it uses 2 of them.
After looking closer at the parts manual pic that I posted above, I see that one screw is shown in the pic, it is number 13 in the pic. The description says it uses 2 of them.
-
- Similar Topics
- Replies
- Views
- Last post
-
-
Welch plug...to replace or not replace...? Attachment(s)
by Dale Finch » Sun Sep 19, 2021 9:47 pm » in Farmall Cub - 7
- 478
-
by Dale Finch
Thu Sep 23, 2021 11:30 pm
-
-
- 2
- 95
-
by Don McCombs
Tue Apr 09, 2024 9:58 am
-
- 3
- 264
-
by inairam
Thu Jul 22, 2021 2:20 pm
-
-
frame to replace engine in tractor Attachment(s)
by inairam » Wed Jan 19, 2022 1:09 pm » in Farmall Cub - 13
- 586
-
by Dale Finch
Thu Jan 20, 2022 5:52 pm
-
-
-
Sleeving a worn axle or simply replace it? Attachment(s)
by 4thGen » Thu Aug 18, 2022 3:03 pm » in Farmall Cub - 1
- 124
-
by Glen
Thu Aug 18, 2022 3:40 pm
-
Who is online
Users browsing this forum: No registered users and 7 guests


