I stopped by a machine/welding shop and they asked if the housing was cast iron or cast steel. I assume it is cast iron which would be harder to weld. Which is it?
The price was too high to fix the pin breakout so I am checking with another shop. Does anyone think that a good weld would work?
The shop also said that they could drill the hole deeper and fabricate another pin with a longer extended foot. What do you think of that idea?
This site uses cookies to maintain login information on FarmallCub.Com. Click the X in the banner upper right corner to close this notice. For more information on our privacy policy, visit this link: Privacy Policy
NEW REGISTERED MEMBERS: Be sure to check your SPAM/JUNK folders for the activation email.
Final Drive - What to do next?
Forum rules
Notice: For sale and wanted posts are not allowed in this forum. Please use our free classifieds or one of our site sponsors for your tractor and parts needs.
Notice: For sale and wanted posts are not allowed in this forum. Please use our free classifieds or one of our site sponsors for your tractor and parts needs.
-
WildFarmall
- 5+ Years

- Posts: 110
- Joined: Mon Jan 14, 2019 3:32 pm
- Zip Code: 28570
- Tractors Owned: Uncle Hubert - 1940 Farmall A
Aunt Elsie - 1949 Farmall Cub
-
Slim140
- 5+ Years
- Posts: 4908
- Joined: Wed Nov 22, 2017 6:24 am
- Zip Code: 00000
- Tractors Owned: .
1970 International 140
1972 International 140
1949 John Deere A
1993 Ford 4630 W/Loader
1965 John Deere 110
1961 Cub Cadet Original - Circle of Safety: Y
Re: Final Drive - What to do next?
It is cast iron. I don't see why drilling it deeper and making a new pin wouldn't work.
You may be able to put that pin in it and have it brazed where the pin is fixed in that piece, just an idea.
You may be able to put that pin in it and have it brazed where the pin is fixed in that piece, just an idea.
Every home is a school, what are you teaching?

-
Slim140
- 5+ Years
- Posts: 4908
- Joined: Wed Nov 22, 2017 6:24 am
- Zip Code: 00000
- Tractors Owned: .
1970 International 140
1972 International 140
1949 John Deere A
1993 Ford 4630 W/Loader
1965 John Deere 110
1961 Cub Cadet Original - Circle of Safety: Y
Re: Final Drive - What to do next?
This just hit me too, if you are taking the final off the other side and both brake pin holes are good you can switch sides. They interchange and you won't have to worry about fixing that hole now, that is if both are good on the other side.
Every home is a school, what are you teaching?
-
Glen

- 10+ Years

- Posts: 6168
- Joined: Mon Mar 19, 2012 7:33 pm
- Zip Code: 00000
- Tractors Owned: 1956 Farmall Cub with Fast Hitch, F-11 plow, Disc, Cultivator, Cub-22 mower
- Circle of Safety: Y
- Location: Wa.
Re: Final Drive - What to do next?
Shane Nelson wrote:This just hit me too, if you are taking the final off the other side and both brake pin holes are good you can switch sides. They interchange and you won't have to worry about fixing that hole now, that is if both are good on the other side.
Hi,
The castings are the same, like Shane said above.
If you want the seed plate drive on the right final drive, you would need to change the lower axle shafts to the opposite castings from where they are. There are shims for the bearings on those shafts, they need setting like the service manual shows.
I don't know if you are replacing the oil seals by the wheel hub, if you are, the shafts have to be removed anyway. The service manual says to press the shafts out, then there is a bearing you have to pull off the shaft to remove the oil seal. It's not something every owner wants to do, a shop with a press is easier for the job.
You should also inspect the 5/8" implement attaching holes on each casting, and see if the holes and threads are good. 2 of the holes at the front now, on each side, would be at the rear, and used for the drawbar.
If the holes or threads are bad, then they need repair too.
Think of where any implements you use bolt on, and check those threads also.
-
WildFarmall
- 5+ Years
- Posts: 110
- Joined: Mon Jan 14, 2019 3:32 pm
- Zip Code: 28570
- Tractors Owned: Uncle Hubert - 1940 Farmall A
Aunt Elsie - 1949 Farmall Cub
Re: Final Drive - What to do next?
Hello all that have helped - thank you so much! This is all uncharted territory for me. I decided to take my final drive and have a welder repair the breakout. It is kind of a rough job but the pin depth is the same, the top surface is relatively flat, and nothing protrudes out like where the brake drum would spin and hit. Hope that it holds!
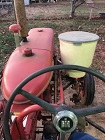
Another issue cropped up - as usual! I noticed that on the left side the brake pivot pin was seated as shown in the picture - with the fat spacer piece on the outside (away from the transmission). When I opened up the right side I noticed that the pin was the opposite - the fat spacer section was on the inside (closest to the transmission). I assume that one has to be wrong. I was told that the fat section should go toward the transmission. Is this correct?
Also, I purchased some denatured alcohol to clean the brake pads of oil. The pads look ok as far as wear. Will this work ok?
- Attachments
-
-
Dale Finch

- 10+ Years
- Posts: 6692
- Joined: Tue Apr 27, 2010 11:34 am
- Zip Code: 27517
- Tractors Owned: '51 Cub #140966 "Bruno" with Woods 59 mower
'55 Cub #187541 "Betty" with Fast Hitch
'55 Cub #190482 "Ben" with Woods 42 mower
'55 Cub #191739 "Bertha" with Woods 42 mower
'56 Cub #194370 "Boris" with Mott Flail mower - Circle of Safety: Y
- Location: NC, Chapel Hill
Re: Final Drive - What to do next?
Bob McCarty wrote:It's easy to change the seals now, I'd do it. The brake lining looks fine, but if that is grease/oil on it, you might want to burn that off with a torch before reinstalling.
 The easiest way I have seen to clean the soaked-in oil off/out of the brake lining is to set them on fire with a propane torch. You can watch the oil bubble out of the lining...works great!!
Dale Finch

-
Glen
- 10+ Years
- Posts: 6168
- Joined: Mon Mar 19, 2012 7:33 pm
- Zip Code: 00000
- Tractors Owned: 1956 Farmall Cub with Fast Hitch, F-11 plow, Disc, Cultivator, Cub-22 mower
- Circle of Safety: Y
- Location: Wa.
Re: Final Drive - What to do next?
Hi,
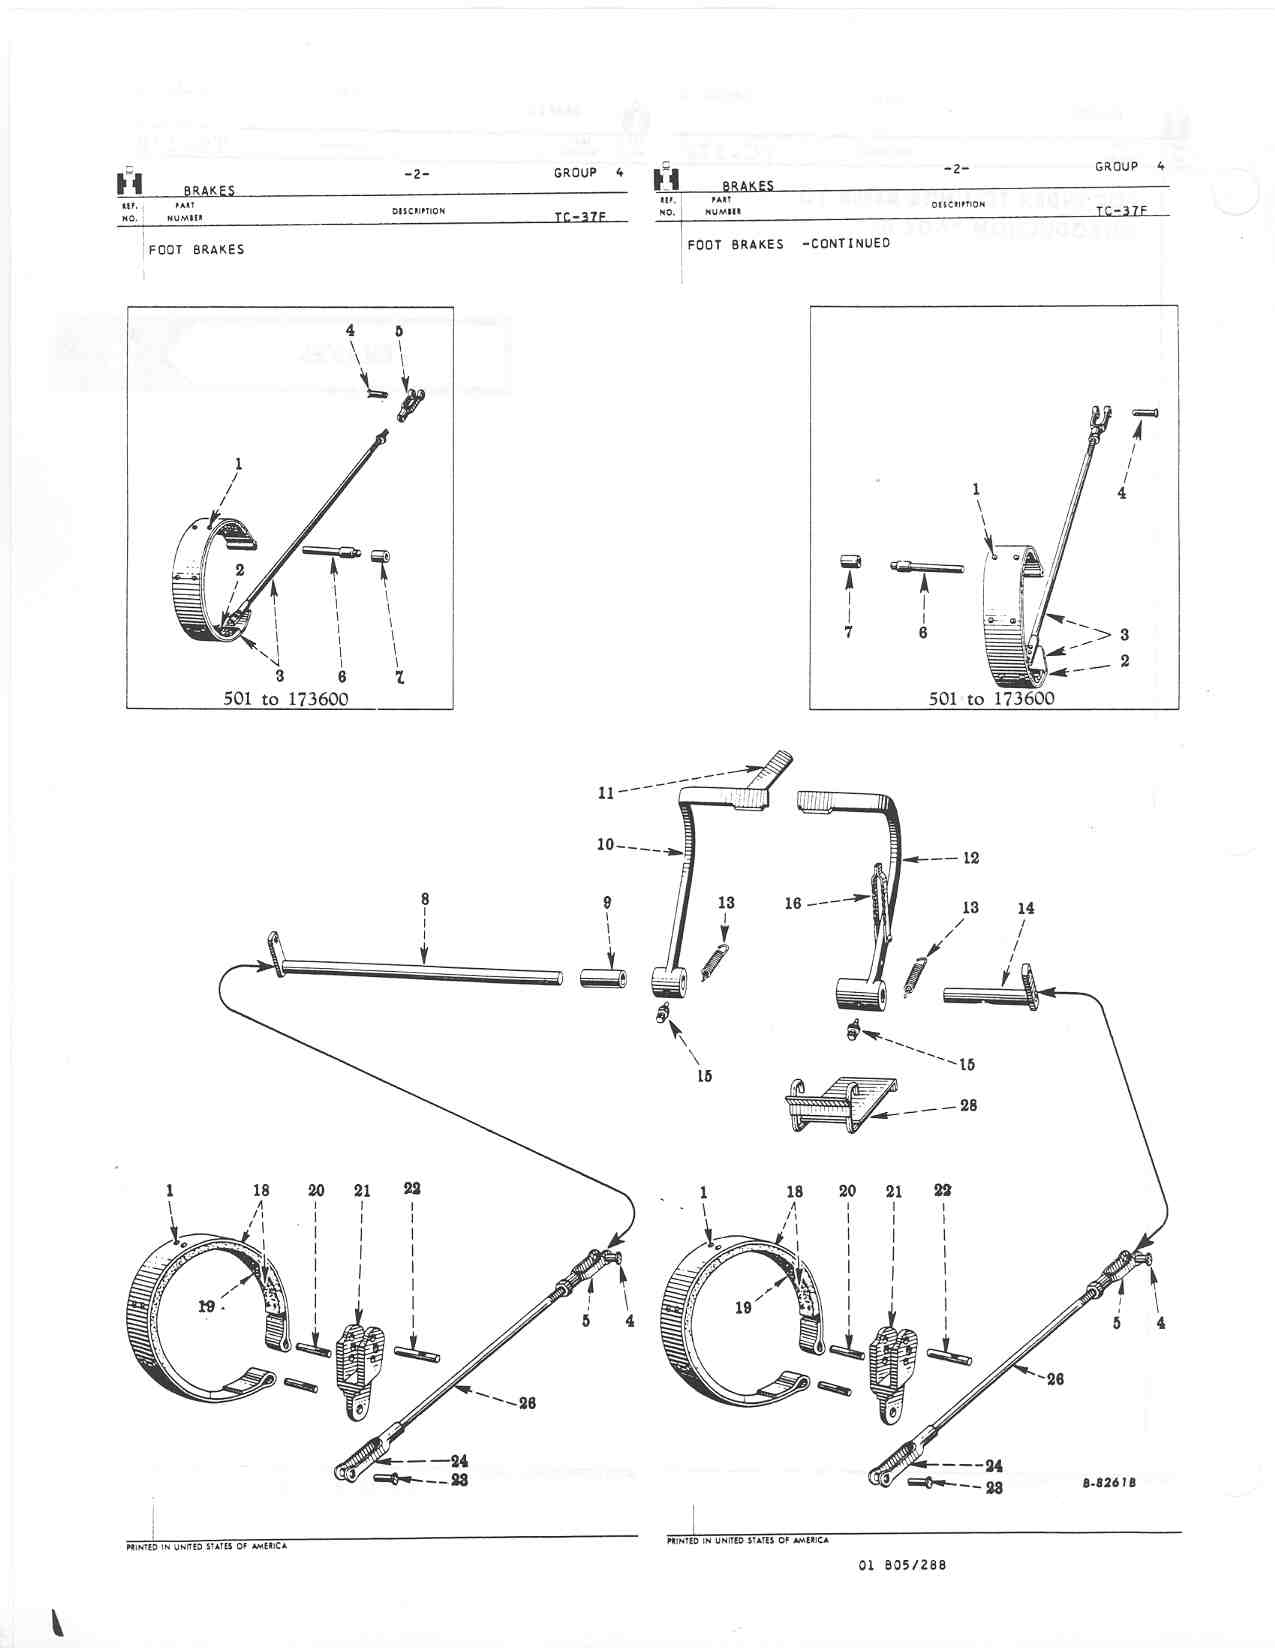
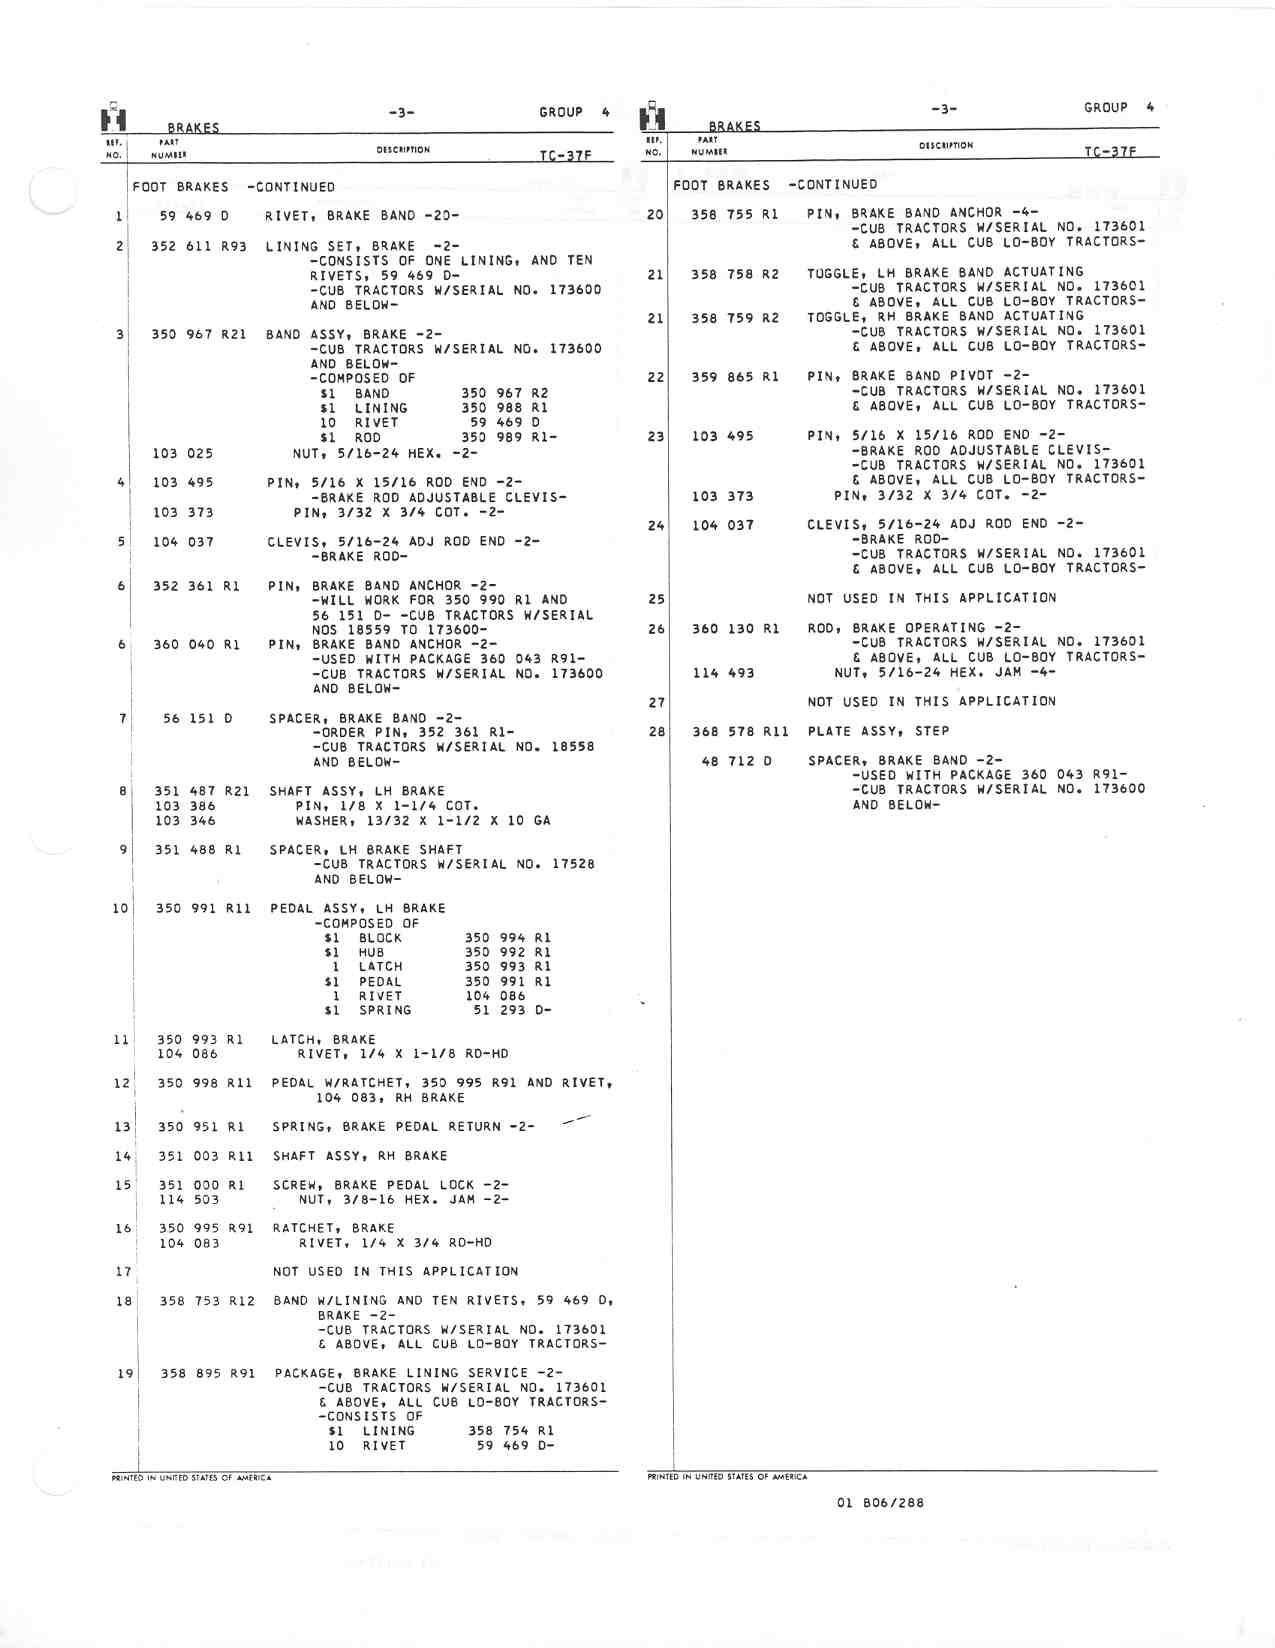
The spacer on the pin has to be in towards the transmission, it looks like in the Cub parts manual.
It spaces the brake band to the proper place on the brake drum, side to side. You can assemble the bands on the final drives, and see how the spacing looks.
Below are pages from the Cub parts manual showing the brakes. The 1st style of brake is in the upper pics on the page. Part number 7 in the pic is not used if you have the pins with the built on spacers.
http://www.farmallcub.info/manuals/cub_ ... 004-02.jpg
http://www.farmallcub.info/manuals/cub_ ... 004-03.jpg
The alcohol should work for cleaning the brake lining.
The lining looked good in your pic, but I couldn't see the rivets. Be sure it is not worn down to the rivets.
-
WildFarmall
- 5+ Years
- Posts: 110
- Joined: Mon Jan 14, 2019 3:32 pm
- Zip Code: 28570
- Tractors Owned: Uncle Hubert - 1940 Farmall A
Aunt Elsie - 1949 Farmall Cub
Re: Final Drive - What to do next?
Thank you so much Glen & Dale. Your help is greatly appreciated. I am wading into this and often have a hard time visualizing what might be apparent to others. I think I will do everything but take the bearings off the axels as I am worried about getting them off and on again. This will mean that I will not be replacing the outside oil seals on the axels. So far everything mechanical has seemed easier than I was worrying about. I don't have a bearing separator and do not want to spend $100 or so for one as I already am way over my budget - passed that about a month ago! Can the bearing be removed without easily damaging it without the separator?
-
rockfarmer

- 5+ Years
- Posts: 515
- Joined: Mon Apr 13, 2015 6:35 pm
- Zip Code: 78633
- Tractors Owned: 1947 Circle Cub
1948 Cub
1949 Cub (Rocky)
1950 Cub
1962 Cub - Circle of Safety: Y
Re: Final Drive - What to do next?
WildFarmall,
If you have a name brand auto parts store close by, they will rent you a bearing separator, for free. You give them a $50-75 deposit and they will give it back when you return the tool.
You can remove the bearing, install a new oil seal and replace bearing without damaging. Removing the oil seal from the retainer might be the most difficult part of this job. Buying a retainer with the seal already installed is way easier.
Replacing the bearing will require a pipe or something similar to get around the axle and a block of wood. Schedule 80 PVC might work. I have never removed a bearing without a separator, but I'm sure it can be done.
Keep up the good work!
-
Dale Finch
- 10+ Years
- Posts: 6692
- Joined: Tue Apr 27, 2010 11:34 am
- Zip Code: 27517
- Tractors Owned: '51 Cub #140966 "Bruno" with Woods 59 mower
'55 Cub #187541 "Betty" with Fast Hitch
'55 Cub #190482 "Ben" with Woods 42 mower
'55 Cub #191739 "Bertha" with Woods 42 mower
'56 Cub #194370 "Boris" with Mott Flail mower - Circle of Safety: Y
- Location: NC, Chapel Hill
Re: Final Drive - What to do next?
What rockfarmer said. I seriously think the splitter would be needed...I would check on "renting" one, or borrowing one from a friendly mechanic. It would be a shame to NOT replace that seal while you have it disassembled this far...it is a common leaker.As he also mentioned, some of those seals are impossible to remove from the retainer, and you only manage bending the retainer. It is my recommendation to order the seal/retainer assembly that TM Tractors sells:
http://www.tmtractor.com/new/fr/393fp.htm
Dale Finch
-
WildFarmall
- 5+ Years
- Posts: 110
- Joined: Mon Jan 14, 2019 3:32 pm
- Zip Code: 28570
- Tractors Owned: Uncle Hubert - 1940 Farmall A
Aunt Elsie - 1949 Farmall Cub
Re: Final Drive - What to do next?
Well I cannot go much deeper in this project! I bought an el cheapo bearing splitter from Harbor Freight for $50 and went after the axels on both sides. With a little advice from Ron with TM Tractors (which I highly recommend) I was able to get both axels out and bearings removed. The splitter was marginal but it worked with a good deal of effort. It appears that the bearings were original and had never been removed. In the process the two large bearings had the cages slightly disfigured when the splitter pinched around the backside of the bearings. Other than that the bearings look fine. There are no scars on any of the rollers and the races (where the bearings seat - not sure the proper term) are all clean and shiny. How do you tell if the bearings need replacement? Take a look at the phot and let me know what you think. I would assume that the slight disfigure in the cages would simply be corrected when the bearings seat in the races. Should I just replace all the bearings? Can these be acquired at local NAPA store? I would like to stop throwing more money at this.
A couple of shims came out broken. Any source for these?
I plan to use a 2" od pipe to "press" the bearings on. Any advise on this?
A couple of shims came out broken. Any source for these?
I plan to use a 2" od pipe to "press" the bearings on. Any advise on this?
- Attachments
-
-
Slim140
- 5+ Years
- Posts: 4908
- Joined: Wed Nov 22, 2017 6:24 am
- Zip Code: 00000
- Tractors Owned: .
1970 International 140
1972 International 140
1949 John Deere A
1993 Ford 4630 W/Loader
1965 John Deere 110
1961 Cub Cadet Original - Circle of Safety: Y
Re: Final Drive - What to do next?
Put the bearings in the race and put some pressure on them with your hands and turn them, if they are free they can be reused, if they are rough feeling replace them. The cage can be tapped with a hammer and you can get them back straight-ish.
Every home is a school, what are you teaching?
-
Dale Finch
- 10+ Years
- Posts: 6692
- Joined: Tue Apr 27, 2010 11:34 am
- Zip Code: 27517
- Tractors Owned: '51 Cub #140966 "Bruno" with Woods 59 mower
'55 Cub #187541 "Betty" with Fast Hitch
'55 Cub #190482 "Ben" with Woods 42 mower
'55 Cub #191739 "Bertha" with Woods 42 mower
'56 Cub #194370 "Boris" with Mott Flail mower - Circle of Safety: Y
- Location: NC, Chapel Hill
Re: Final Drive - What to do next?
I MAY have a couple shims (and the beveled spacer), but not positive, and not sure of their thickness. I may not be out at the farm where they are until Monday, but if you can wait until then, I'll check...IF I can remember that far away!! 
If you do decide to replace the bearings, I'm pretty sure NAPA has, or can get, them. There is a cross-reference table somewhere on the forum...if I find it I'll post it.
And TM Tractors has them:
http://www.tmtractor.com/new/fr/fi_001newparts.htm
If you do decide to replace the bearings, I'm pretty sure NAPA has, or can get, them. There is a cross-reference table somewhere on the forum...if I find it I'll post it.
And TM Tractors has them:
http://www.tmtractor.com/new/fr/fi_001newparts.htm
Dale Finch
-
rockfarmer
- 5+ Years
- Posts: 515
- Joined: Mon Apr 13, 2015 6:35 pm
- Zip Code: 78633
- Tractors Owned: 1947 Circle Cub
1948 Cub
1949 Cub (Rocky)
1950 Cub
1962 Cub - Circle of Safety: Y
Re: Final Drive - What to do next?
Those bearings can be purchased thru a local auto parts store as well for around $20 - 25.
The retainer, http://www.tmtractor.com/new/fr/393fp.htm, that goes on the axle first, will most likely need to be purchased from a site sponsor. You will need 2 of them. I tried replacing the seal once, and never again.
Also, the right final has a seed drive on the inside of the axle that requires a seal and retainer. This retainer is easy to work with and the manual says to use 2 seals here as the original seal was twice the thickness. These seals can also be purchased at local auto parts store. http://www.tmtractor.com/new/fr/279fp.htm
You are doing a great job. Keep posting.
-
Dale Finch
- 10+ Years
- Posts: 6692
- Joined: Tue Apr 27, 2010 11:34 am
- Zip Code: 27517
- Tractors Owned: '51 Cub #140966 "Bruno" with Woods 59 mower
'55 Cub #187541 "Betty" with Fast Hitch
'55 Cub #190482 "Ben" with Woods 42 mower
'55 Cub #191739 "Bertha" with Woods 42 mower
'56 Cub #194370 "Boris" with Mott Flail mower - Circle of Safety: Y
- Location: NC, Chapel Hill
Re: Final Drive - What to do next?
rockfarmer wrote: I tried replacing the seal once, and never again.
Me too!!! Ended up spending a lot of time and energy getting that seal out, and still had a bent retainer!
Get the seal/retainer from TM:
http://www.tmtractor.com/new/fr/393fp.htm
Hang in there! If you do it right now, it should last a couple more generations!
Dale Finch
-
- Similar Topics
- Replies
- Views
- Last post
-
- 6
- 369
-
by Clemsonfor
Sun Sep 12, 2021 6:59 pm
-
- 1
- 217
-
by Jim Becker
Mon Feb 21, 2022 12:40 am
-
- 3
- 237
-
by C-dubb
Fri Oct 20, 2023 7:25 am
-
- 3
- 162
-
by Jim Becker
Mon Jul 24, 2023 2:14 pm
-
- 16
- 572
-
by MattS
Thu Mar 30, 2023 11:53 am
Who is online
Users browsing this forum: No registered users and 2 guests


