This site uses cookies to maintain login information on FarmallCub.Com. Click the X in the banner upper right corner to close this notice. For more information on our privacy policy, visit this link: Privacy Policy
NEW REGISTERED MEMBERS: Be sure to check your SPAM/JUNK folders for the activation email.
'53 Restoration JBailey
Forum rules
Notice: For sale and wanted posts are not allowed in this forum. Please use our free classifieds or one of our site sponsors for your tractor and parts needs.
Notice: For sale and wanted posts are not allowed in this forum. Please use our free classifieds or one of our site sponsors for your tractor and parts needs.
-
jbailey
- 10+ Years

- Posts: 29
- Joined: Mon Mar 05, 2012 9:54 am
- Zip Code: 75460
Re: '53 Restoration JBailey hydraulics
What I see is the rod yoke and is flush with edge of housing. Just don't know how much farther it should come out, but it has to in order to get at connecting rod pin?
'53 cub restoration project.
viewtopic.php?f=1&t=102720
viewtopic.php?f=1&t=102720
-
Glen

- 10+ Years
- Posts: 6149
- Joined: Mon Mar 19, 2012 7:33 pm
- Zip Code: 00000
- Tractors Owned: 1956 Farmall Cub with Fast Hitch, F-11 plow, Disc, Cultivator, Cub-22 mower
- Circle of Safety: Y
- Location: Wa.
Re: '53 Restoration JBailey
Hi,
That is right about the starter bushings, I looked and there are 2 different sizes.
The parts manual page link I posted on page 1 of this post either has a mistake, or some of the starters use both bushings the same size.
The Cub owner's manual says to put motor oil on the bushings when the starter is apart, when reassembling it.
-
jbailey
- 10+ Years
- Posts: 29
- Joined: Mon Mar 05, 2012 9:54 am
- Zip Code: 75460
Re: '53 Restoration JBailey hydraulics
picture
'53 cub restoration project.
viewtopic.php?f=1&t=102720
viewtopic.php?f=1&t=102720
-
Glen
- 10+ Years
- Posts: 6149
- Joined: Mon Mar 19, 2012 7:33 pm
- Zip Code: 00000
- Tractors Owned: 1956 Farmall Cub with Fast Hitch, F-11 plow, Disc, Cultivator, Cub-22 mower
- Circle of Safety: Y
- Location: Wa.
Re: '53 Restoration JBailey
Hi,
The cylinder and rockshaft have to be in the ahead position to get the crossways pin out of the piston rod end. It looks like it is nearly in the rear position. The piston moves ahead out of the cylinder a distance. I think it hits it's stop made on the piston when it goes fully ahead.
The guys on here have said use air to make the Touch Control move. You have to find the right passage to blow the air into. Use your safety glasses when using the air.
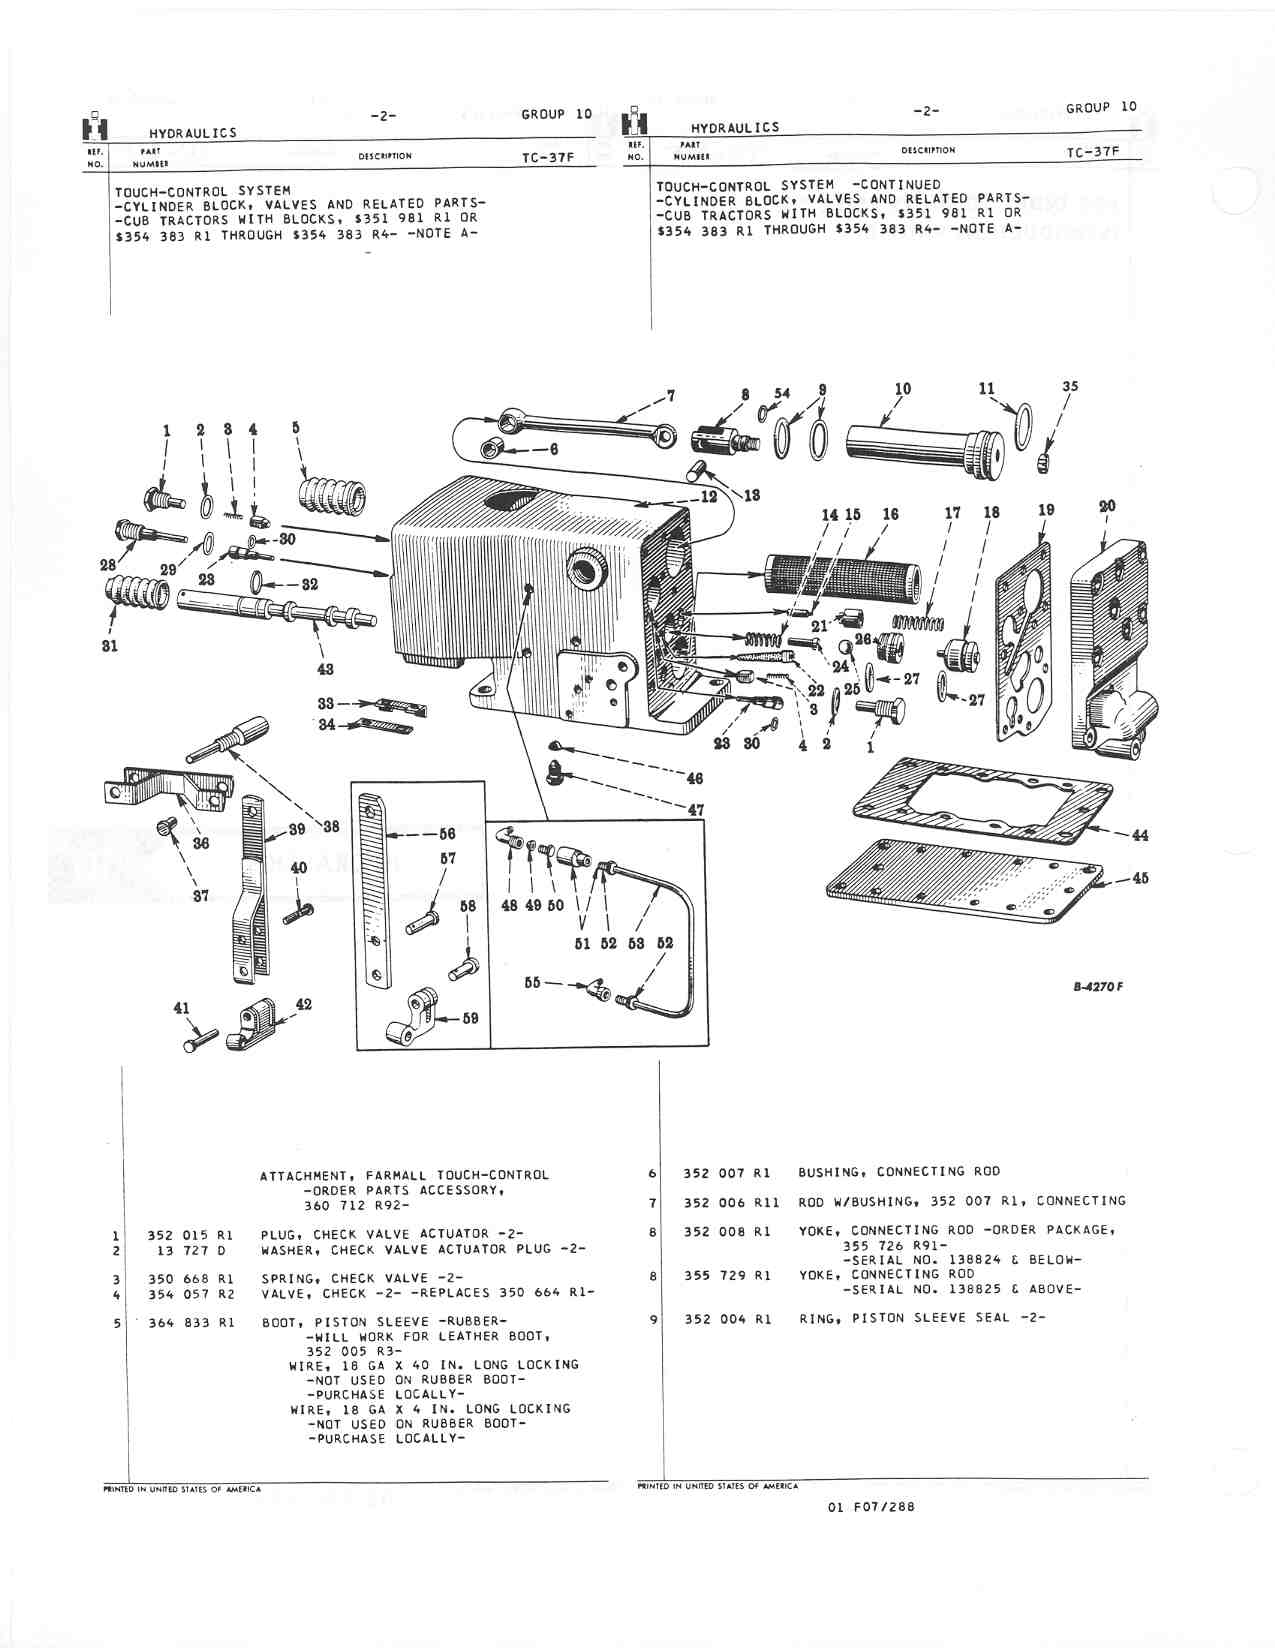
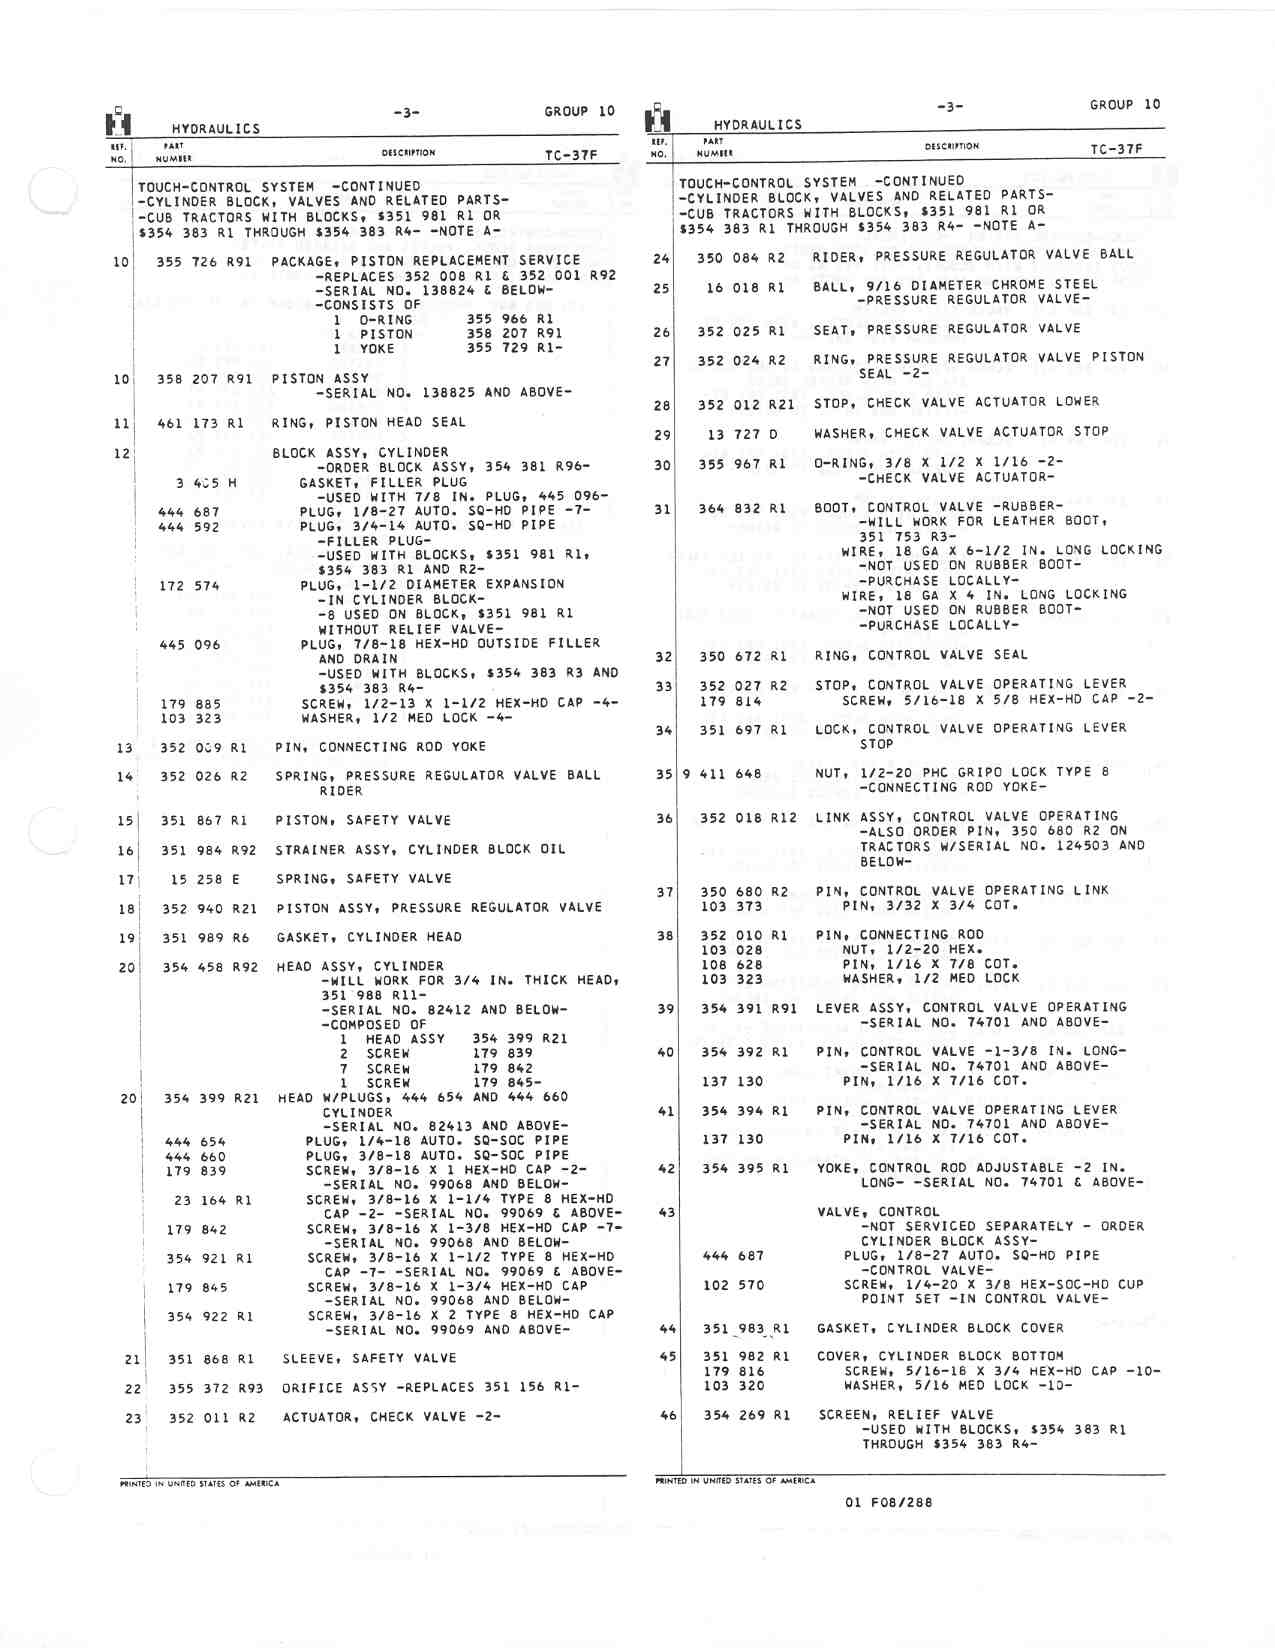
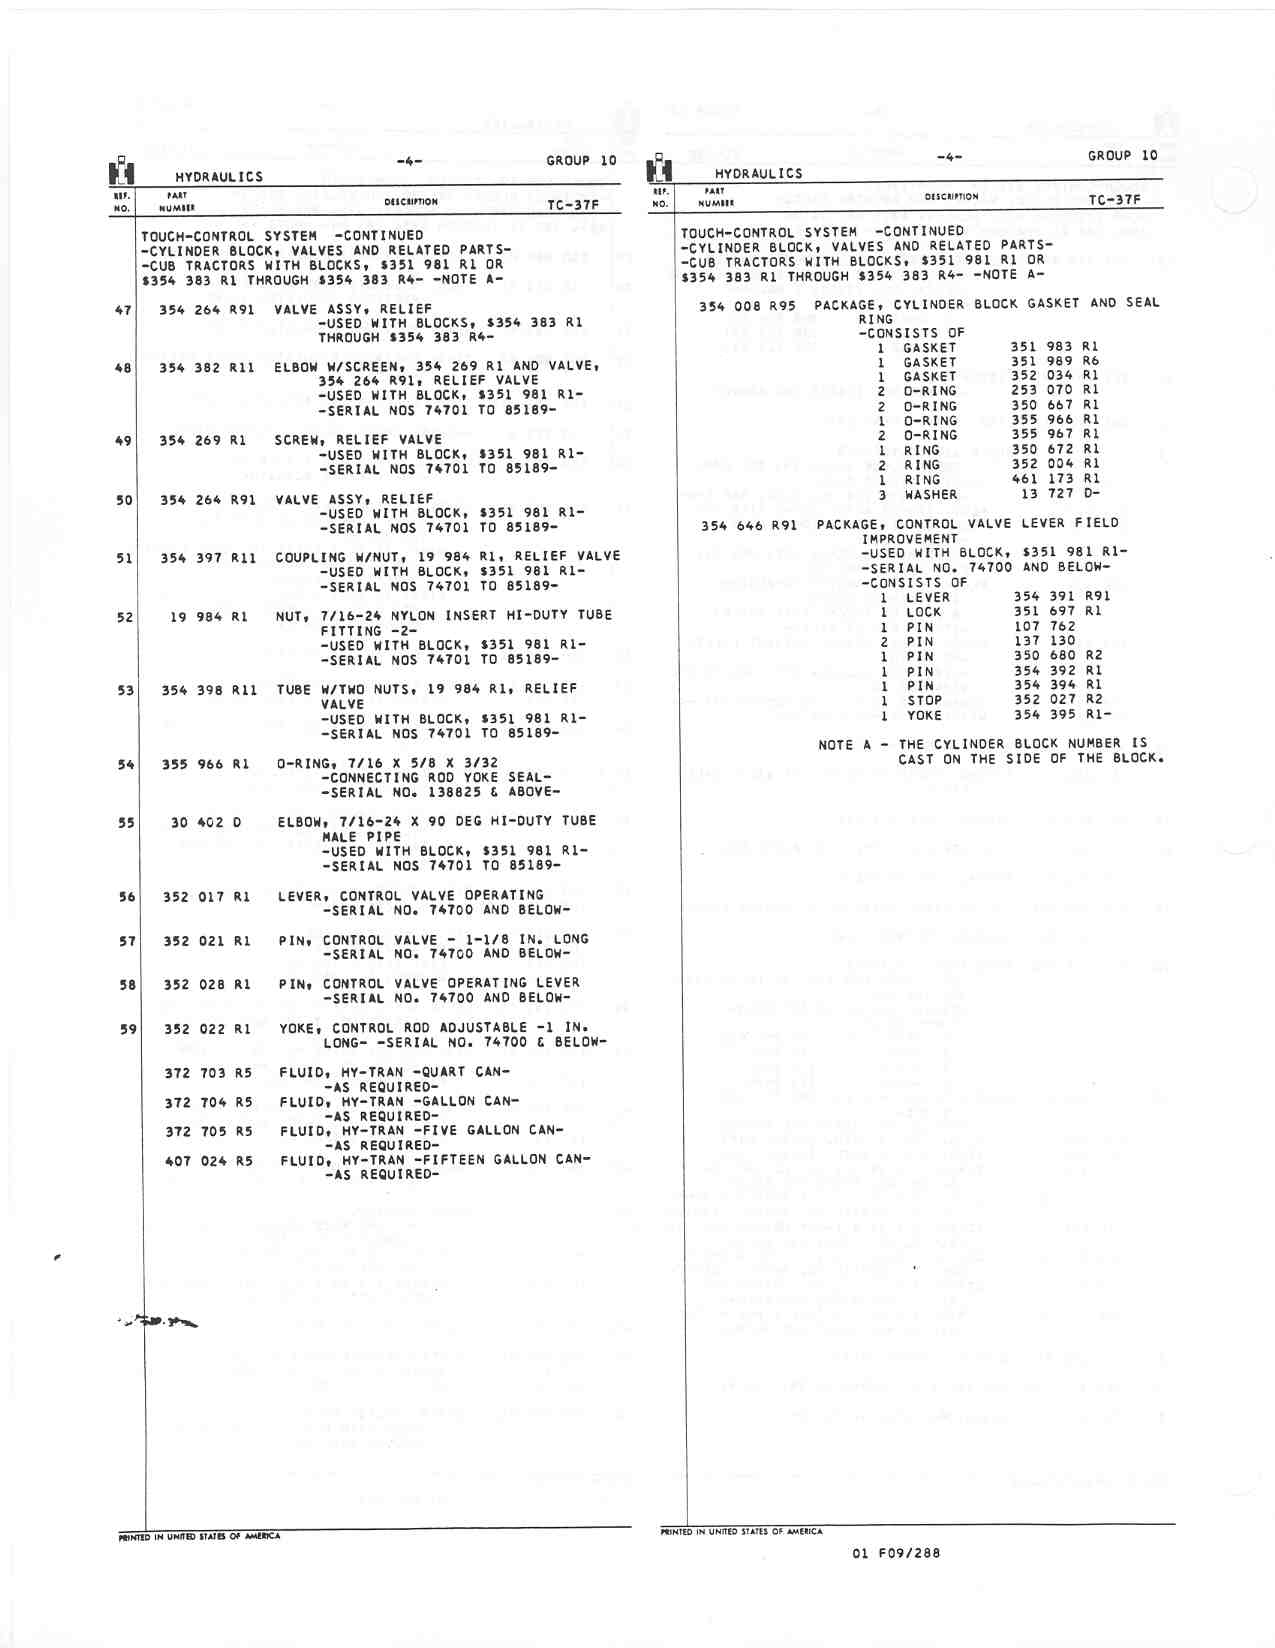
Below are pages from the Cub parts manual of the Touch Control, showing the style a 1953 Cub would have come with.
If you have block part number 360719R1, it has a newer Touch Control, and some parts inside it are different than the pic.
You can see in the pic the piston, number 10, is bigger at the rear, and only goes ahead a certain distance. The piston has to come out to the rear, after removing the head.
Not all the Touch Controls have the parts in the rectangle and square in the pic.
http://www.farmallcub.info/manuals/cub_ ... 010-02.jpg
http://www.farmallcub.info/manuals/cub_ ... 010-03.jpg
http://www.farmallcub.info/manuals/cub_ ... 010-04.jpg
The cylinder and rockshaft have to be in the ahead position to get the crossways pin out of the piston rod end. It looks like it is nearly in the rear position. The piston moves ahead out of the cylinder a distance. I think it hits it's stop made on the piston when it goes fully ahead.
The guys on here have said use air to make the Touch Control move. You have to find the right passage to blow the air into. Use your safety glasses when using the air.
Below are pages from the Cub parts manual of the Touch Control, showing the style a 1953 Cub would have come with.
If you have block part number 360719R1, it has a newer Touch Control, and some parts inside it are different than the pic.
You can see in the pic the piston, number 10, is bigger at the rear, and only goes ahead a certain distance. The piston has to come out to the rear, after removing the head.
Not all the Touch Controls have the parts in the rectangle and square in the pic.
http://www.farmallcub.info/manuals/cub_ ... 010-02.jpg
http://www.farmallcub.info/manuals/cub_ ... 010-03.jpg
http://www.farmallcub.info/manuals/cub_ ... 010-04.jpg
-
jbailey
- 10+ Years
- Posts: 29
- Joined: Mon Mar 05, 2012 9:54 am
- Zip Code: 75460
Re: '53 Restoration JBailey hrdraulics
found previous thread that said use air pressure to push out hyd piston, worked great, pushed out pin where I could removed it. of course I got covered in oil while standing in front of return line.
'53 cub restoration project.
viewtopic.php?f=1&t=102720
viewtopic.php?f=1&t=102720
-
jbailey
- 10+ Years
- Posts: 29
- Joined: Mon Mar 05, 2012 9:54 am
- Zip Code: 75460
Re: '53 Restoration JBailey hydraulic
found a post that said use air pressure tp push piston. it worked great and the piston rod moved out where I could get to it. question, will the rubber piston boot covers replace the worn out leather boot covers or should I go back with leather covers?
'53 cub restoration project.
viewtopic.php?f=1&t=102720
viewtopic.php?f=1&t=102720
-
jbailey
- 10+ Years
- Posts: 29
- Joined: Mon Mar 05, 2012 9:54 am
- Zip Code: 75460
Re: '53 Restoration JBailey piston and valve pic
got the head off today. could not see any blow by. showing picture of #3 piston and valve. piston has a 3 on the face. Is this original and does this mean it is standard size and this engine has not been bored oversized? the intake valve has numbers, as does the exhaust. Are these original? just looking for info on the history of the engine.
'53 cub restoration project.
viewtopic.php?f=1&t=102720
viewtopic.php?f=1&t=102720
-
Glen
- 10+ Years
- Posts: 6149
- Joined: Mon Mar 19, 2012 7:33 pm
- Zip Code: 00000
- Tractors Owned: 1956 Farmall Cub with Fast Hitch, F-11 plow, Disc, Cultivator, Cub-22 mower
- Circle of Safety: Y
- Location: Wa.
Re: '53 Restoration JBailey
Hi,
I'm not sure about the piston, I don't think IH stamped a number for the cylinder in the top.
Member tst would know.
You could turn the engine so the pistons are down some in the cylinders, and measure the cylinders, if you have measuring tools. Then you can see if they are worn, or have been rebored before.
The valves are the original style, with an IH and the IH numbers on the heads.
-
jbailey
- 10+ Years
- Posts: 29
- Joined: Mon Mar 05, 2012 9:54 am
- Zip Code: 75460
Re: '53 Restoration JBailey oil pressure relief valve
I am kind of rapid fire on the questions, but I am moving along on the take down. maybe I should wait until start putting it back together before asking so many questions! and I still have all my pictures posting 90' off from how I take them with my phone. I guess I could take one with my camera and post to see how it post.
this post is about the oil pressure valve. it came out easy. spring measures good at just under 3 inches. piston measures .618 dia but I have not found a size spec for that so I do not know if this is worn.. the piston does have a wear grove of about 3/8 inch in diameter. Yes it is round but is higher or more defined on one end. I presume this is worn from contact with the edge of the relief bypass hole. you can see this wear in the picture. My first plan would be to take fine sandpaper and smooth the rough edge and then replace in the hole with the piston rotated 180 deg from the bypass hole. what is your idea?
this post is about the oil pressure valve. it came out easy. spring measures good at just under 3 inches. piston measures .618 dia but I have not found a size spec for that so I do not know if this is worn.. the piston does have a wear grove of about 3/8 inch in diameter. Yes it is round but is higher or more defined on one end. I presume this is worn from contact with the edge of the relief bypass hole. you can see this wear in the picture. My first plan would be to take fine sandpaper and smooth the rough edge and then replace in the hole with the piston rotated 180 deg from the bypass hole. what is your idea?
'53 cub restoration project.
viewtopic.php?f=1&t=102720
viewtopic.php?f=1&t=102720
-
Glen
- 10+ Years
- Posts: 6149
- Joined: Mon Mar 19, 2012 7:33 pm
- Zip Code: 00000
- Tractors Owned: 1956 Farmall Cub with Fast Hitch, F-11 plow, Disc, Cultivator, Cub-22 mower
- Circle of Safety: Y
- Location: Wa.
Re: '53 Restoration JBailey
Hi,
The regulator valve in your pic is worn, I would put in a new one, and see if it fits well in the hole.
Below is a listing for a new valve at TM Tractor you can look at.
http://www.tmtractor.com/new/en/671fp.htm
I would look in the hole with a light, if the hole is rough inside, like the valve looks, it needs smoothing with fine sandpaper. Don't make the hole bigger sanding much. Sand as little as possible, but the bore needs to be smooth.
I'm not sure what tst would say about that, but that is my opinion.
The spring goes into the hollow end of the valve.
Below is a page from the Cub service manual showing the size of the valve.
http://farmallcub.com/rudi_cub/www.clea ... -01-09.jpg
Below is a page showing the assembly order of the parts.
http://farmallcub.com/rudi_cub/www.clea ... -01-55.jpg
Below is the whole Cub service manual, GSS-1411, if you don't have it.
http://farmallcub.com/rudi_cub/www.clea ... index.html
-
jbailey
- 10+ Years
- Posts: 29
- Joined: Mon Mar 05, 2012 9:54 am
- Zip Code: 75460
Re: '53 Restoration JBailey oil relief valve
thanks glen, I will get a new valve. I understand what you say about the relief hole may be a little rough and caused this wear. hopefully it is the valve piston that is worn and not the shaft.
'53 cub restoration project.
viewtopic.php?f=1&t=102720
viewtopic.php?f=1&t=102720
-
jbailey
- 10+ Years
- Posts: 29
- Joined: Mon Mar 05, 2012 9:54 am
- Zip Code: 75460
Re: '53 Restoration JBailey piston and valve pic
Glen, I only have a 1 inch caliper and can not measure the pistons. just ask the question for information. I am going to take it to a machine shop to get block checked and worked. I was just hoping that the engine has not been touched.
'53 cub restoration project.
viewtopic.php?f=1&t=102720
viewtopic.php?f=1&t=102720
-
jbailey
- 10+ Years
- Posts: 29
- Joined: Mon Mar 05, 2012 9:54 am
- Zip Code: 75460
Re: '53 Restoration JBailey engine
I got the timing cover off, gears look good with what feels like very little lash gap. Got the bolts out of the engine clutch housing but did not separate as they were stuck together pretty good. Sprayed with PB blaster and will let set overnight.
'53 cub restoration project.
viewtopic.php?f=1&t=102720
viewtopic.php?f=1&t=102720
-
Dale Finch

- 10+ Years
- Posts: 6684
- Joined: Tue Apr 27, 2010 11:34 am
- Zip Code: 27517
- Tractors Owned: '51 Cub #140966 "Bruno" with Woods 59 mower
'55 Cub #187541 "Betty" with Fast Hitch
'55 Cub #190482 "Ben" with Woods 42 mower
'55 Cub #191739 "Bertha" with Woods 42 mower
'56 Cub #194370 "Boris" with Mott Flail mower - Circle of Safety: Y
- Location: NC, Chapel Hill
Re: '53 Restoration JBailey
This may seem like a stupid question, but did you remove the clutch housing cover? (underneath and just behind the oil pan)
Also, did you disconnect the steering shaft bracket (at the steering wheel end) and pull loose?
I only ask because these are two items that I have seen at cubfests that are forgotten, and no matter how many folks are tugging on that tractor, it just Is NOT going to separate!!!

Also, did you disconnect the steering shaft bracket (at the steering wheel end) and pull loose?
I only ask because these are two items that I have seen at cubfests that are forgotten, and no matter how many folks are tugging on that tractor, it just Is NOT going to separate!!!
Dale Finch


-
jbailey
- 10+ Years
- Posts: 29
- Joined: Mon Mar 05, 2012 9:54 am
- Zip Code: 75460
Re: '53 Restoration JBailey engine
yes and yes. i have the front end off and to the side. I have not pulled that hard on the engine. I just pinged around on it and put the pb on it to soak. i can see it move just not ready to slide apart yet. could be pilot bearing is stuck?
'53 cub restoration project.
viewtopic.php?f=1&t=102720
viewtopic.php?f=1&t=102720


