Concise? No need for concise on this project.
Bill
This site uses cookies to maintain login information on FarmallCub.Com. Click the X in the banner upper right corner to close this notice. For more information on our privacy policy, visit this link: Privacy Policy
NEW REGISTERED MEMBERS: Be sure to check your SPAM/JUNK folders for the activation email.
Winter projects = Mini Fest!?
Forum rules
Notice: For sale and wanted posts are not allowed in this forum. Please use our free classifieds or one of our site sponsors for your tractor and parts needs.
Notice: For sale and wanted posts are not allowed in this forum. Please use our free classifieds or one of our site sponsors for your tractor and parts needs.
-
Bill Hudson

- Team Cub

- Posts: 9528
- Joined: Wed Jul 26, 2006 10:50 am
- Zip Code: 44057
- Tractors Owned: 57 F-Cub - Dad & Mom's Cub
77 F-Cub - Red Long Stripe - Circle of Safety: Y
- Location: OH, Madison
Re: Winter projects = Mini Fest!?
Bill
"The probability of life originating from accident is comparable to the probability of the unabridged dictionary resulting from an explosion in a printing shop." Edwin Conklin, biologist

Member of Ohio Chapter #6
"The probability of life originating from accident is comparable to the probability of the unabridged dictionary resulting from an explosion in a printing shop." Edwin Conklin, biologist
Member of Ohio Chapter #6
-
Dale Finch

- 10+ Years

- Posts: 6684
- Joined: Tue Apr 27, 2010 11:34 am
- Zip Code: 27517
- Tractors Owned: '51 Cub #140966 "Bruno" with Woods 59 mower
'55 Cub #187541 "Betty" with Fast Hitch
'55 Cub #190482 "Ben" with Woods 42 mower
'55 Cub #191739 "Bertha" with Woods 42 mower
'56 Cub #194370 "Boris" with Mott Flail mower - Circle of Safety: Y
- Location: NC, Chapel Hill
Re: Winter projects = Mini Fest!?
OK! Guess that means I really have to get going...no excuses!
I will start today by warming up the engine so I can drain the engine oil and coolant as part of the complete seasonal servicing of the cub I plan to do, in addition to the rear seal change. In preparation for the split, I will also drain the hydraulics. The remaining fluids (fan, steering, transmission, finals, ??) I will do either after the rear seal swap, or as I go along for fill-in tasks.
I will start today by warming up the engine so I can drain the engine oil and coolant as part of the complete seasonal servicing of the cub I plan to do, in addition to the rear seal change. In preparation for the split, I will also drain the hydraulics. The remaining fluids (fan, steering, transmission, finals, ??) I will do either after the rear seal swap, or as I go along for fill-in tasks.
Dale Finch

-
Nelson 634
- 5+ Years

- Posts: 308
- Joined: Thu May 24, 2018 9:57 pm
- Zip Code: 22958
- Tractors Owned: 5 Cubs
1952 100
1960 460 Utility - Location: Central Va.
Re: Winter projects = Mini Fest!?
Mr. Finch, May I request of you a small favor. I wish a photo of your mirror set up. I have tried several ways but alas nothing that works. a close up would be greatly appreciated. If any one has any suggestions.
Walter
-
Dusty B

- 10+ Years
- Posts: 1880
- Joined: Wed May 23, 2007 7:35 am
- Zip Code: 61736
- Tractors Owned: '45 SC Case
- Circle of Safety: Y
- Location: IL, Downs
Re: Winter projects = Mini Fest!?
If you don't start too soon just may duplicate the process long distance!
Grandpa's '41 B
'56,,'57,'59, Cu'b
'45 C
'55 Case S
Dad's DB garden tractor
'48 DeSoto
'31 "A Coup
'79 Lincoln TC
God looks out for those of us who don't know how to look out for ourselves!
'56,,'57,'59, Cu'b
'45 C
'55 Case S
Dad's DB garden tractor
'48 DeSoto
'31 "A Coup
'79 Lincoln TC
God looks out for those of us who don't know how to look out for ourselves!
-
Dale Finch
- 10+ Years
- Posts: 6684
- Joined: Tue Apr 27, 2010 11:34 am
- Zip Code: 27517
- Tractors Owned: '51 Cub #140966 "Bruno" with Woods 59 mower
'55 Cub #187541 "Betty" with Fast Hitch
'55 Cub #190482 "Ben" with Woods 42 mower
'55 Cub #191739 "Bertha" with Woods 42 mower
'56 Cub #194370 "Boris" with Mott Flail mower - Circle of Safety: Y
- Location: NC, Chapel Hill
Re: Winter projects = Mini Fest!?
Nelson 634 wrote:Mr. Finch, May I request of you a small favor. I wish a photo of your mirror set up. I have tried several ways but alas nothing that works. a close up would be greatly appreciated. If any one has any suggestions.
That mirror setup was made by our own, illustrious Tim (forum name tst) who also does, among other things, the rear seal rework.
The last ones I purchased from him did not have the mirror (at my request), but also were missing the small ring attached above the PVC cup holder. I must say, that without that ring, the cups/water bottles flop around and bounce out. The fix I have done is use a small bungee over the top of the water bottle, which works well.
Also, the original "basket" (bathroom or kitchen sponge holder?) was larger and deeper, which held my cell phone. This one does not. I do like the design, but the original was better. I'm sure if you spec'ed it out, he would be able to make the better one. I'll post some photos tomorrow.
Dusty B wrote:If you don't start too soon just may duplicate the process long distance!
You better get that tractor into the shed, then! However, I do move slowly!! As soon as I shower, I'll post today's achievements!
Dale Finch
-
Dale Finch
- 10+ Years
- Posts: 6684
- Joined: Tue Apr 27, 2010 11:34 am
- Zip Code: 27517
- Tractors Owned: '51 Cub #140966 "Bruno" with Woods 59 mower
'55 Cub #187541 "Betty" with Fast Hitch
'55 Cub #190482 "Ben" with Woods 42 mower
'55 Cub #191739 "Bertha" with Woods 42 mower
'56 Cub #194370 "Boris" with Mott Flail mower - Circle of Safety: Y
- Location: NC, Chapel Hill
Re: Winter projects = Mini Fest!?
Started this evening with the basics:
After warming the engine up, drained the engine oil and filter housing. Decided to use a filter to capture any foreign material, to check the condition of the engine. It came out pretty clean.
Then drained the radiator...it also was fairly clean:
Drained the small amount of fuel in the tank:
Removed the fill plug THEN removed the drain plug in the Touch Control block to drain the HyTran fluid. It was a bit low, but had been working fine. Using another filter, the drained fluid was also pretty clean...it should be since it was just rebuilt last year!! The small amount of dirt that was in the filter probably came from the outside on the clutch housing.
NOTE: Sorry about the sideways photos I will endeavor to take the future photos horizontally!!
After warming the engine up, drained the engine oil and filter housing. Decided to use a filter to capture any foreign material, to check the condition of the engine. It came out pretty clean.
Then drained the radiator...it also was fairly clean:
Drained the small amount of fuel in the tank:
Removed the fill plug THEN removed the drain plug in the Touch Control block to drain the HyTran fluid. It was a bit low, but had been working fine. Using another filter, the drained fluid was also pretty clean...it should be since it was just rebuilt last year!! The small amount of dirt that was in the filter probably came from the outside on the clutch housing.
NOTE: Sorry about the sideways photos
Dale Finch
-
Dale Finch
- 10+ Years
- Posts: 6684
- Joined: Tue Apr 27, 2010 11:34 am
- Zip Code: 27517
- Tractors Owned: '51 Cub #140966 "Bruno" with Woods 59 mower
'55 Cub #187541 "Betty" with Fast Hitch
'55 Cub #190482 "Ben" with Woods 42 mower
'55 Cub #191739 "Bertha" with Woods 42 mower
'56 Cub #194370 "Boris" with Mott Flail mower - Circle of Safety: Y
- Location: NC, Chapel Hill
Re: Winter projects = Mini Fest!?
The Zenith carb had been leaking slightly, from around the drain plug. When it was removed, the gasket was broken and the mating surface was rough. I will get a new gasket, and file the face smooth.
Removed the Zenith carb, and noticed the fairly new carb/manifiold gasket had signs of rubbing against the Throttle Plate. Looks like it was a gasket for the IH carb, with a smaller throttle plate:
Removed the Zenith carb, and noticed the fairly new carb/manifiold gasket had signs of rubbing against the Throttle Plate. Looks like it was a gasket for the IH carb, with a smaller throttle plate:
Dale Finch
-
Dale Finch
- 10+ Years
- Posts: 6684
- Joined: Tue Apr 27, 2010 11:34 am
- Zip Code: 27517
- Tractors Owned: '51 Cub #140966 "Bruno" with Woods 59 mower
'55 Cub #187541 "Betty" with Fast Hitch
'55 Cub #190482 "Ben" with Woods 42 mower
'55 Cub #191739 "Bertha" with Woods 42 mower
'56 Cub #194370 "Boris" with Mott Flail mower - Circle of Safety: Y
- Location: NC, Chapel Hill
Re: Winter projects = Mini Fest!?
I want to explain to all you very experienced cub owners that this post is intended for anyone who has NEVER had the nerve to remove the hood/tank, and all that entails ("while the hood is off"!!), and certainly has not tried splitting the cub for clutch or rear seal work. My apologies, in advance, for stating things that appear intuitively obvious, but they are only obvious because we have done them before! As I have mentioned in the past, I bought a repair manual for my 1964 VW Microbus engine, the was the "STEP BY STEP APPROACH FOR THE COMPLETE IDIOT". It was just that...it did not say "remove the engine". It said EXACTLY what tools you needed, how to plug the fuel line so the gas didn't run down your armpit, and how to find, by touch, the exact bolts to remove to drop the engine. So this post is along the lines of "explain EVERY step"...you have the option to skip whatever is obvious to you. Some of us did not grow up twisting wrenches and have learned by reading and, more importantly, watching (Cubfests!). So, I continue...
Last night's work toward the split:
Disconnected the battery GROUND cable.
If you look at where the split will take place, just behind the engine in this case, you can see all the items that cross that plane, and would need to be disconnected or removed. On the carb side: hydraulic manifold, choke rod, fuel line, exhaust pipe, and the 3 bolts on that side. On the starter side: throttle (gov) rod, starter rod, steering shaft, wiring, and the 3 bolts on this side.
Removed the clutch housing cover - allows the flywheel to clear (hard to separate otherwise!! )
)
Disconnected the choke, throttle and starter rods
Unhooked the wiring harness from the clips under the right side of the tank (embarrassing when you are trying to lift the tank off and it just doesn't budge! BTDT! )
)
Disconnected the wires to the headlights and fed back through grommet. (on my other tractors I installed quick disconnects, since the connector was too large to go through the grommet)
Removed the grill and 2 doglegs (be VERY careful if these have not been removed recently. Spray with penetrating oil, and make itty bitty turns back and forth. Otherwise, you will be drilling and tapping the broken off screws. They are quite small)
Removed the 4 truss screws at the rear of the tank attaching it to the panel.
Removed the 2 bolts at the front holding the tank to the radiator channels.
Removed the air cleaner and radiator caps. (If you have the vertical exhaust, remove the muffler)
Since I had already removed the carburetor, the fuel line was already loose.
Lifted off the tank, and set it on sawhorses to protect the sediment bowl.
Reinstalled the air cleaner and radiator caps.
Examined the entire area very carefully for any leaks, bare wires, etc. I found the holes in the alternator were packed with grass.
On a previous job on a different cub, I found some antifreeze around the base of a plug...it was from a leaking upper water outlet gasket.
Since I have the underslung exhaust, I removed the manifold-to-exhaust pipe clamp, then only loosened the muffler bracket and moved the exhaust pipe to give access to the 3 TC block-to-hydraulic manifold screws.
Removed the air cleaner hose (pipe for the IH carb) to give access to the 2 hydraulic pump-to-manifold screws. (I will be cleaning the entire air cleaner assembly later)
Removed the hydraulic manifold by removing the 3 bolts at the TC block and the 2 bolts at the hyd pump. (Watch out! Have pans under each end...it will still have fluid in it, and it does make a mess!! BTDT, too! ) Plug the 2 holes each at the pump and TC block! Keep it clean.
Removed hitch pins for throttle/gov rod (left in place)
Disconnected the wires to coil, alternator, starter, and pulled back toward the instrument panel. (Your wiring may vary. Make sure you document where each wire came from...I photograph them. Just clear any wires that cross the split)
Removed bolt holding the steering support bracket.
I AM READY TO SPLIT IT! But tomorrow...time now for dinner and
 !!
!!
Last night's work toward the split:
Disconnected the battery GROUND cable.
If you look at where the split will take place, just behind the engine in this case, you can see all the items that cross that plane, and would need to be disconnected or removed. On the carb side: hydraulic manifold, choke rod, fuel line, exhaust pipe, and the 3 bolts on that side. On the starter side: throttle (gov) rod, starter rod, steering shaft, wiring, and the 3 bolts on this side.
Removed the clutch housing cover - allows the flywheel to clear (hard to separate otherwise!!
Disconnected the choke, throttle and starter rods
Unhooked the wiring harness from the clips under the right side of the tank (embarrassing when you are trying to lift the tank off and it just doesn't budge! BTDT!
Disconnected the wires to the headlights and fed back through grommet. (on my other tractors I installed quick disconnects, since the connector was too large to go through the grommet)
Removed the grill and 2 doglegs (be VERY careful if these have not been removed recently. Spray with penetrating oil, and make itty bitty turns back and forth. Otherwise, you will be drilling and tapping the broken off screws.
Removed the 4 truss screws at the rear of the tank attaching it to the panel.
Removed the 2 bolts at the front holding the tank to the radiator channels.
Removed the air cleaner and radiator caps. (If you have the vertical exhaust, remove the muffler)
Since I had already removed the carburetor, the fuel line was already loose.
Lifted off the tank, and set it on sawhorses to protect the sediment bowl.
Reinstalled the air cleaner and radiator caps.
Examined the entire area very carefully for any leaks, bare wires, etc. I found the holes in the alternator were packed with grass.
On a previous job on a different cub, I found some antifreeze around the base of a plug...it was from a leaking upper water outlet gasket.
Since I have the underslung exhaust, I removed the manifold-to-exhaust pipe clamp, then only loosened the muffler bracket and moved the exhaust pipe to give access to the 3 TC block-to-hydraulic manifold screws.
Removed the air cleaner hose (pipe for the IH carb) to give access to the 2 hydraulic pump-to-manifold screws. (I will be cleaning the entire air cleaner assembly later)
Removed the hydraulic manifold by removing the 3 bolts at the TC block and the 2 bolts at the hyd pump. (Watch out! Have pans under each end...it will still have fluid in it, and it does make a mess!! BTDT, too!
Removed hitch pins for throttle/gov rod (left in place)
Disconnected the wires to coil, alternator, starter, and pulled back toward the instrument panel. (Your wiring may vary. Make sure you document where each wire came from...I photograph them. Just clear any wires that cross the split)
Removed bolt holding the steering support bracket.
I AM READY TO SPLIT IT! But tomorrow...time now for dinner and
Dale Finch
-
RonT
- 10+ Years
- Posts: 267
- Joined: Sat Apr 20, 2013 6:04 am
- Zip Code: 34448
- Tractors Owned: 1950 Cub - Whitington
1972 154 Cub Loboy
1989 Kubota L2050
1948 Willy's CJ-2A
1924 Model T Fordor - Location: FL, Homosassa
Re: Winter projects = Mini Fest!?
Great tutorial Dale! Your documented attention to detail is very much appreciated.
Note to readers who may be following along on their CUB and are tempted to take the next step:
THE FRONT AXLE MUST BE WEDGED BEFORE SPLITTING!!!
Ron
Note to readers who may be following along on their CUB and are tempted to take the next step:
THE FRONT AXLE MUST BE WEDGED BEFORE SPLITTING!!!
Ron
-
rockfarmer

- 5+ Years
- Posts: 515
- Joined: Mon Apr 13, 2015 6:35 pm
- Zip Code: 78633
- Tractors Owned: 1947 Circle Cub
1948 Cub
1949 Cub (Rocky)
1950 Cub
1962 Cub - Circle of Safety: Y
Re: Winter projects = Mini Fest!?
Dale,
Are those stickers on the oil filter housing and distributor cap date stamps with service dates? If so, "brilliant"...no need to look for service manuals, notebooks or rely on the the ol memory bank. I will be doing the same moving forward. Thank you for sharing the pictures.
Looking forward to seeing your progress.
-
Dale Finch
- 10+ Years
- Posts: 6684
- Joined: Tue Apr 27, 2010 11:34 am
- Zip Code: 27517
- Tractors Owned: '51 Cub #140966 "Bruno" with Woods 59 mower
'55 Cub #187541 "Betty" with Fast Hitch
'55 Cub #190482 "Ben" with Woods 42 mower
'55 Cub #191739 "Bertha" with Woods 42 mower
'56 Cub #194370 "Boris" with Mott Flail mower - Circle of Safety: Y
- Location: NC, Chapel Hill
Re: Winter projects = Mini Fest!?
Yes! Good eyes! And I was so happy to have done it. Even with TRYING to keep a maintenance log, with multiple tractors and my pea-brain, I have a hard time keeping track of when fluids, etc, were serviced. As we all know, time flies, and it's amazing how often you think you just changed the oil last season, and find out after checking your records it was 2 years ago!!
They are the labels with the BROTHER label makers. The labelers are cheap, though the tapes are not. The last one I bought was even battery powered, so I can keep it where the tractors are. They seem to be oil resistant and I KNOW they are water resistant, because I put them on my Tervis glasses and they have been through the dishwasher (with heated drying) for several years!
As you can see, they have been on this tractor 1-4 years. Sheesh! Thought that transmission fluid had been changed more recently!!
Dale Finch
-
UK-Cub
- 5+ Years
- Posts: 232
- Joined: Mon Jun 16, 2014 3:48 pm
- Zip Code: LA9
- Circle of Safety: Y
- Location: Kendal, England
Re: Winter projects = Mini Fest!?
Excellent post.
David
1956 Lister D stationary engine
1957 French Cub
2012 Land Rover Defender 110 double cab pick up
Every day is a school day
"Choose a job you love and you will never have to work a day in your life" Confucius
1956 Lister D stationary engine
1957 French Cub
2012 Land Rover Defender 110 double cab pick up
Every day is a school day
"Choose a job you love and you will never have to work a day in your life" Confucius
-
coppersmythe
- 10+ Years
- Posts: 1655
- Joined: Thu Dec 24, 2009 9:19 am
- Zip Code: 00000
- Tractors Owned: '48 trimmed dash high crop cub , '78 3/4 cub , lo-boy/59 mower , '64 "galvanized" cub , cub-6 toolbar , sicklebar mowers , 54 blade , plow , mott mower , early belly mower . . international 1010 pickup with 345ci v-8 .
- Circle of Safety: Y
- Location: louisiana
Re: Winter projects = Mini Fest!?
great job dale ! your attention to detail reminds me of the meticulousness of people in dangerous jobs , pilots  , blue water sailboaters , cavedivers ,ect...i'll be keeping up with your journey . coppersmythe.............................PS: one of the most entertaining repair manuals , my daughter (high school) and i rebuilt a 74 bug engine with that very same book , the idiots guide to the VW . the bug had the semi-automatic transmission , no clutch
  she drove it until leaving for college , then my son drove it for a couple years till the transmission blew . the ONLY transmission we found was a "maybe" replacement in mississippi that was supposed to be near the rear of a "full" schoolbus used for storage ( hippies ) . sold the tired bug to a local . i've heard that almost everyone over 50 has a bug story .
-
Dale Finch
- 10+ Years
- Posts: 6684
- Joined: Tue Apr 27, 2010 11:34 am
- Zip Code: 27517
- Tractors Owned: '51 Cub #140966 "Bruno" with Woods 59 mower
'55 Cub #187541 "Betty" with Fast Hitch
'55 Cub #190482 "Ben" with Woods 42 mower
'55 Cub #191739 "Bertha" with Woods 42 mower
'56 Cub #194370 "Boris" with Mott Flail mower - Circle of Safety: Y
- Location: NC, Chapel Hill
Re: Winter projects = Mini Fest!?
I learned so much about how to approach a task from that book. Of course, I definitely am a tad OCD, so generally have things lined up before I start a project.
Speaking of OCD, I take many photos when I am working on my cubs, and now entirely with my phone. My hands are usually messy, and I got tired of having to completely clean my hands before picking up the phone. So yesterday I wrapped it in plastic wrap (from COSTCO) and then carefully cut a hole where the camera lens is. Worked perfectly!! At the end of the day, I simply removed and tossed it. Clean phone and good photos!! You simply need to smooth it over the screen to have a good view, and it is thin enough that the touch screen works fine!
Too busy today to do the split. Hopefully tomorrow, before the snow hits. Want to get my Expedition back into the garage but need the space first to maneuver the engine hoist.
Dale Finch
-
Dale Finch
- 10+ Years
- Posts: 6684
- Joined: Tue Apr 27, 2010 11:34 am
- Zip Code: 27517
- Tractors Owned: '51 Cub #140966 "Bruno" with Woods 59 mower
'55 Cub #187541 "Betty" with Fast Hitch
'55 Cub #190482 "Ben" with Woods 42 mower
'55 Cub #191739 "Bertha" with Woods 42 mower
'56 Cub #194370 "Boris" with Mott Flail mower - Circle of Safety: Y
- Location: NC, Chapel Hill
Re: Winter projects = Mini Fest!?
Well, I did get the Expedition into the garage, but did not get the split done first. There isn't enough room to do the split with the car inside...at least I don't want to take the chance of bumping into my car. So, until the snow melts a bit, I switched to all the little tasks I was going to do anyway...
I had already removed the engine oil pan, so cleaned it up, applied a thin coating of Indian Head Varnish, and stuck a new gasket to it. Reusing fairly new bolts with new lockwashers, I installed the pan, snugging it up only a little over finger tight to seat the gasket. I did NOT install the 3 rear bolts that go into the base of the rear seal retainer, since it will be replaced. I wanted to have the pan all set so that I could tighten up all bolts, including those 3 rear bolts, BEFORE I put the front and rear halves back together. If you haven't tried to tighten them with the tractor together, let me say you will use some choice words!!
Removed the Valve Cover and cleaned the mating surfaces. I had recently adjusted the valves, so the gasket was in good shape, so I plan to reuse it.
Note: I like to "glue" the gasket to the cover with Indian Head Varnish, so it will stay in place during installation. I don't put anything on the engine side of the gasket.
This Valve Adjustment HOW TO by Gary Boutwell is about the simplest description: http://farmallcub.com/phpBB2/viewtopic.php?f=141&t=46322
For more detail, the Service Manual: GSS 1411, Section 1-15 http://farmallcub.com/rudi_cub/www.cleancomputes.com/Cub/Blue%20Ribbon%20Service%20Manuals/GSS-1411%20Service%20Manual%20for%20Cubs%20and%20Lo-boy%20Tractors/Section%201%20-%20Engine/Page-01-15.jpg
I don't remember who, but someone on this forum mentioned using a cork to determine TDC for #1 cylinder. I LOVE IT, since my thumb isn't large enough to adequately plug the spark plug hole! Simply stick a cork into the #1 spark plug hole, and rotate the engine (easiest with a handcrank) until the cork goes POP!! Then align the pointer with the first notch. I have learned to put a rag over the cork, after chasing that little guy all over the garage!
Cleaned the oil dipstick mesh with kerosene, then dried with compressed air. Will reoil it before installation.
Flushed radiator with hot water until clear. Installed the recently replaced drain plug, using anti-sieze.
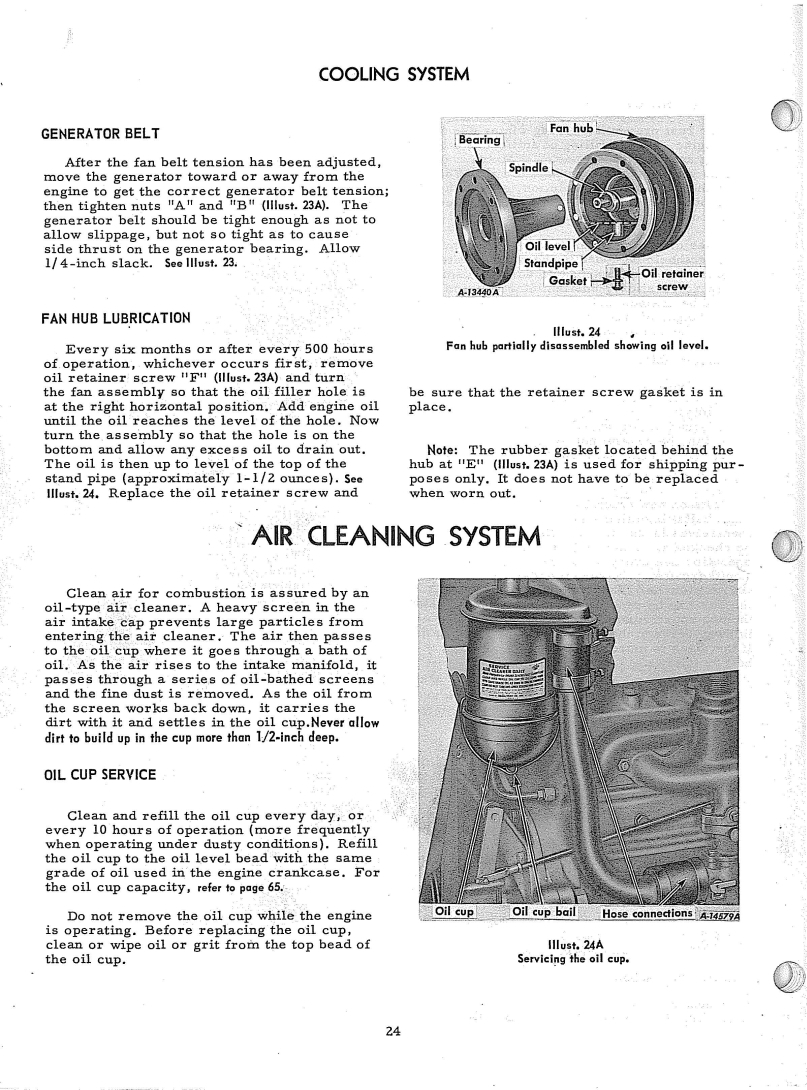
Removed the block/air cleaner vent tube and flushed with carb cleaner...it was clear. Removed the air cleaner oil cup to give access to the mounting bolts. Cleaned out a small amount of sludge. Removed the air cleaner and flushed with kerosene, then dried with compressed air.
http://farmallcub.com/rudi_cub/www.cleancomputes.com/Cub/Cub%20Owner's%20Manuals/International%20Cub%20and%20Cub%20Lo-boy%20Tractors%20Operators%20Manual%202-75/Page-24.jpg
http://farmallcub.com/rudi_cub/www.cleancomputes.com/Cub/Cub%20Owner's%20Manuals/International%20Cub%20and%20Cub%20Lo-boy%20Tractors%20Operators%20Manual%202-75/Page-25.jpg
Also cleaned the entire front engine area, inspecting for any problems.
Using the procedure in the owner's manual, serviced the fan oil.
http://farmallcub.com/rudi_cub/www.cleancomputes.com/Cub/Cub%20Owner's%20Manuals/International%20Cub%20and%20Cub%20Lo-boy%20Tractors%20Operators%20Manual%202-75/Page-70.jpg
I had already removed the engine oil pan, so cleaned it up, applied a thin coating of Indian Head Varnish, and stuck a new gasket to it. Reusing fairly new bolts with new lockwashers, I installed the pan, snugging it up only a little over finger tight to seat the gasket. I did NOT install the 3 rear bolts that go into the base of the rear seal retainer, since it will be replaced. I wanted to have the pan all set so that I could tighten up all bolts, including those 3 rear bolts, BEFORE I put the front and rear halves back together. If you haven't tried to tighten them with the tractor together, let me say you will use some choice words!!
Removed the Valve Cover and cleaned the mating surfaces. I had recently adjusted the valves, so the gasket was in good shape, so I plan to reuse it.
Note: I like to "glue" the gasket to the cover with Indian Head Varnish, so it will stay in place during installation. I don't put anything on the engine side of the gasket.
This Valve Adjustment HOW TO by Gary Boutwell is about the simplest description: http://farmallcub.com/phpBB2/viewtopic.php?f=141&t=46322
For more detail, the Service Manual: GSS 1411, Section 1-15 http://farmallcub.com/rudi_cub/www.cleancomputes.com/Cub/Blue%20Ribbon%20Service%20Manuals/GSS-1411%20Service%20Manual%20for%20Cubs%20and%20Lo-boy%20Tractors/Section%201%20-%20Engine/Page-01-15.jpg
I don't remember who, but someone on this forum mentioned using a cork to determine TDC for #1 cylinder. I LOVE IT, since my thumb isn't large enough to adequately plug the spark plug hole! Simply stick a cork into the #1 spark plug hole, and rotate the engine (easiest with a handcrank) until the cork goes POP!! Then align the pointer with the first notch. I have learned to put a rag over the cork, after chasing that little guy all over the garage!
Cleaned the oil dipstick mesh with kerosene, then dried with compressed air. Will reoil it before installation.
Flushed radiator with hot water until clear. Installed the recently replaced drain plug, using anti-sieze.
Removed the block/air cleaner vent tube and flushed with carb cleaner...it was clear. Removed the air cleaner oil cup to give access to the mounting bolts. Cleaned out a small amount of sludge. Removed the air cleaner and flushed with kerosene, then dried with compressed air.
http://farmallcub.com/rudi_cub/www.cleancomputes.com/Cub/Cub%20Owner's%20Manuals/International%20Cub%20and%20Cub%20Lo-boy%20Tractors%20Operators%20Manual%202-75/Page-24.jpg
http://farmallcub.com/rudi_cub/www.cleancomputes.com/Cub/Cub%20Owner's%20Manuals/International%20Cub%20and%20Cub%20Lo-boy%20Tractors%20Operators%20Manual%202-75/Page-25.jpg
Also cleaned the entire front engine area, inspecting for any problems.
Using the procedure in the owner's manual, serviced the fan oil.
http://farmallcub.com/rudi_cub/www.cleancomputes.com/Cub/Cub%20Owner's%20Manuals/International%20Cub%20and%20Cub%20Lo-boy%20Tractors%20Operators%20Manual%202-75/Page-70.jpg
Dale Finch
-
- Similar Topics
- Replies
- Views
- Last post
-
- 0
- 143
-
by Dale Finch
Fri Aug 20, 2021 8:21 am
-
- 10
- 251
-
by Jim Becker
Tue May 16, 2023 11:13 am
-
-
Winter Storm January 7, 2024 Attachment(s)
by Peter Person » Mon Jan 08, 2024 11:57 am » in Farmall Cub - 19
- 1271
-
by Mainely Saws
Tue Jan 09, 2024 1:31 pm
-
-
-
Ready for Winter 2023-2024 Attachment(s)
by Peter Person » Fri Nov 24, 2023 5:59 pm » in Farmall Cub - 17
- 824
-
by Eugene
Tue Dec 05, 2023 4:10 pm
-
-
-
1st plowable snow of 2022-2023 winter Attachment(s)
by Peter Person » Mon Dec 12, 2022 8:26 am » in Farmall Cub - 5
- 276
-
by ajhbike
Mon Dec 12, 2022 12:19 pm
-
Who is online
Users browsing this forum: Majestic-12 [Bot] and 7 guests


